Spring 3 makes JSON REST services really easy. This tutorial will show you how in just a few steps. You can grab the code on GitHub.
Prerequisites
You should have a working Spring MVC Application. If you do not already have a working Spring MVC application set up, follow this tutorial. We will define three REST services: 1) to retrieve a random Person, 2) to retrieve a Person by ID, and 3) to save a new Person. The services will be consumed using jQuery on a sample page we will set up. First, I will show the Spring Controller for our REST services, and then we will walk through how they work:
PersonController.java
01 02 03 04 05 06 07 08 09 10 11 12 13 14 15 16 17 18 19 20 21 22 23 24 25 26 27 28 29 30 31 32 33 34 35 36 37 38 39 40 41 42 43 44 45 46 47 48 49 50 51 52 53 54 55 56 57 58 | package com.codetutr.controller;import org.springframework.beans.factory.annotation.Autowired;import org.springframework.stereotype.Controller;import org.springframework.web.bind.annotation.PathVariable;import org.springframework.web.bind.annotation.RequestMapping;import org.springframework.web.bind.annotation.RequestMethod;import org.springframework.web.bind.annotation.RequestParam;import org.springframework.web.bind.annotation.ResponseBody;import com.codetutr.domain.Person;import com.codetutr.service.PersonService;@Controller@RequestMapping("api")public class PersonController { PersonService personService; @Autowired public PersonController(PersonService personService) { this.personService = personService; } @RequestMapping("person/random") @ResponseBody public Person randomPerson() { return personService.getRandom(); } @RequestMapping("person/{id}") @ResponseBody public Person getById(@PathVariable Long id) { return personService.getById(id); } /* same as above method, but is mapped to * /api/person?id= rather than /api/person/{id} */ @RequestMapping(value="person", params="id") @ResponseBody public Person getByIdFromParam(@RequestParam Long id) { return personService.getById(id); } /** * Saves new person. Spring automatically binds the name * and age parameters in the request to the person argument * @param person * @return String indicating success or failure of save */ @RequestMapping(value="person", method=RequestMethod.POST) @ResponseBody public String savePerson(Person person) { personService.save(person); return "Saved person: " + person.toString(); }} |
OK, so, as you can see, we have 4 request handlers in this controller. The first method returns a random person. The next two retrieve a person by ID – just two different approaches to the URL mapping. The last method saves a person.
Remember how Spring controllers usually return a type String (to indicate the resulting view name). Instead, here we are using Spring’s @ResponseBody annotation and returning the object that we want to send to the client. The @ResponseBody annotation tells Spring that we will be returning data in the response body rather than rendering a JSP.
When the @ResponseBody annotation is used, Spring will return the data in a format that is acceptable to the client. That is, if the client request has a header to accept json and Jackson-Mapper is present in the classpath, then Spring will try to serialize the return value to JSON. If the request header indicates XML as acceptable (accept=application/xml) and Jaxb is in the classpath and the return type is annotated with Jaxb annotation, Spring will try to marshall the return value to XML.
As I mentioned, if you want your services to return JSON, you have to have Jackson in the classpath. Here is the only dependency you need to add to your project:
Gradle
1 | compile 'org.codehaus.jackson:jackson-mapper-asl:1.9.12' |
Or, if you’re using Maven:
1 2 3 4 5 | <dependency> <groupId>org.codehaus.jackson</groupId> <artifactId>jackson-mapper-asl</artifactId> <version>1.9.12</version></dependency> |
Alternatively, if you want your services to return XML, include your favorite Jaxb implementation, eg. com.sun.xml.bind:jaxb:2.1.9.
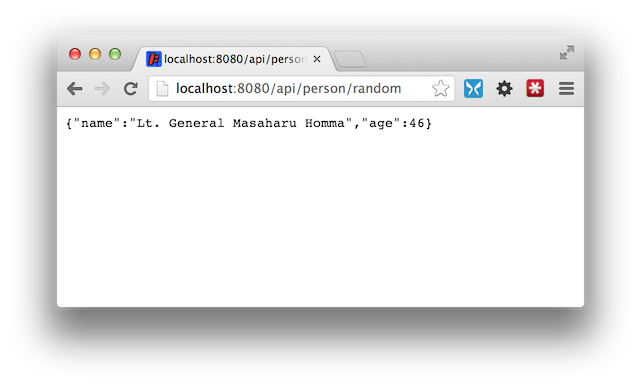
In a minute, we’ll build a front end to call these services using AJAX, but if you deploy your application now, you can try out your services using a REST client (or just typing the URL into your browser). Eg:
You can stop following along if you’re content with that. I will just connect all the pieces now by coding the client-side jQuery:
home.jsp
001 002 003 004 005 006 007 008 009 010 011 012 013 014 015 016 017 018 019 020 021 022 023 024 025 026 027 028 029 030 031 032 033 034 035 036 037 038 039 040 041 042 043 044 045 046 047 048 049 050 051 052 053 054 055 056 057 058 059 060 061 062 063 064 065 066 067 068 069 070 071 072 073 074 075 076 077 078 079 080 081 082 083 084 085 086 087 088 089 090 091 092 093 094 095 096 097 098 099 100 101 102 103 104 105 106 107 108 109 110 111 112 113 114 115 | <%@ taglib prefix="c" uri="http://java.sun.com/jsp/jstl/core" %><%@ taglib prefix="form" uri="http://www.springframework.org/tags/form" %><!DOCTYPE HTML><html> <head> <title>Spring MVC - Ajax</title> <script src="//ajax.googleapis.com/ajax/libs/jquery/1.9.1/jquery.min.js"></script> <style> body { background-color: #eee; font: helvetica; } #container { width: 500px; background-color: #fff; margin: 30px auto; padding: 30px; border-radius: 5px; box-shadow: 5px; } .green { font-weight: bold; color: green; } .message { margin-bottom: 10px; } label { width:70px; display:inline-block;} .hide { display: none; } .error { color: red; font-size: 0.8em; } </style> </head> <body> <div id="container"> <h1>Person Page</h1> <p>This page demonstrates Spring MVC's powerful Ajax functionality. Retrieve a random person, retrieve a person by ID, or save a new person, all without page reload. </p> <h2>Random Person Generator</h2> <input type="submit" id="randomPerson" value="Get Random Person" /><br/><br/> <div id="personResponse"> </div> <hr/> <h2>Get By ID</h2> <form id="idForm"> <div class="error hide" id="idError">Please enter a valid ID in range 0-3</div> <label for="personId">ID (0-3): </label><input name="id" id="personId" value="0" type="number" /> <input type="submit" value="Get Person By ID" /> <br /><br/> <div id="personIdResponse"> </div> </form> <hr/> <h2>Submit new Person</h2> <form id="newPersonForm"> <label for="nameInput">Name: </label> <input type="text" name="name" id="nameInput" /> <br/> <label for="ageInput">Age: </label> <input type="text" name="age" id="ageInput" /> <br/> <input type="submit" value="Save Person" /><br/><br/> <div id="personFormResponse" class="green"> </div> </form> </div> <script type="text/javascript"> $(document).ready(function() { // Random Person AJAX Request $('#randomPerson').click(function() { $.getJSON('${pageContext.request.contextPath}/api/person/random', function(person) { $('#personResponse').text(person.name + ', age ' + person.age); }); }); // Request Person by ID AJAX $('#idForm').submit(function(e) { var personId = +$('#personId').val(); if(!validatePersonId(personId)) return false; $.get('${pageContext.request.contextPath}/api/person/' + personId, function(person) { $('#personIdResponse').text(person.name + ', age ' + person.age); }); e.preventDefault(); // prevent actual form submit }); // Save Person AJAX Form Submit $('#randomPerson').click(function() { $.getJSON('${pageContext.request.contextPath}/api/person/random', function(person) { $('#personResponse').text(person.name + ', age ' + person.age); }); }); $('#newPersonForm').submit(function(e) { // will pass the form date using the jQuery serialize function $.post('${pageContext.request.contextPath}/api/person', $(this).serialize(), function(response) { $('#personFormResponse').text(response); }); e.preventDefault(); // prevent actual form submit and page reload }); }); function validatePersonId(personId) { console.log(personId); if(personId === undefined || personId < 0 || personId > 3) { $('#idError').show(); return false; } else { $('#idError').hide(); return true; } } </script> </body></html> |
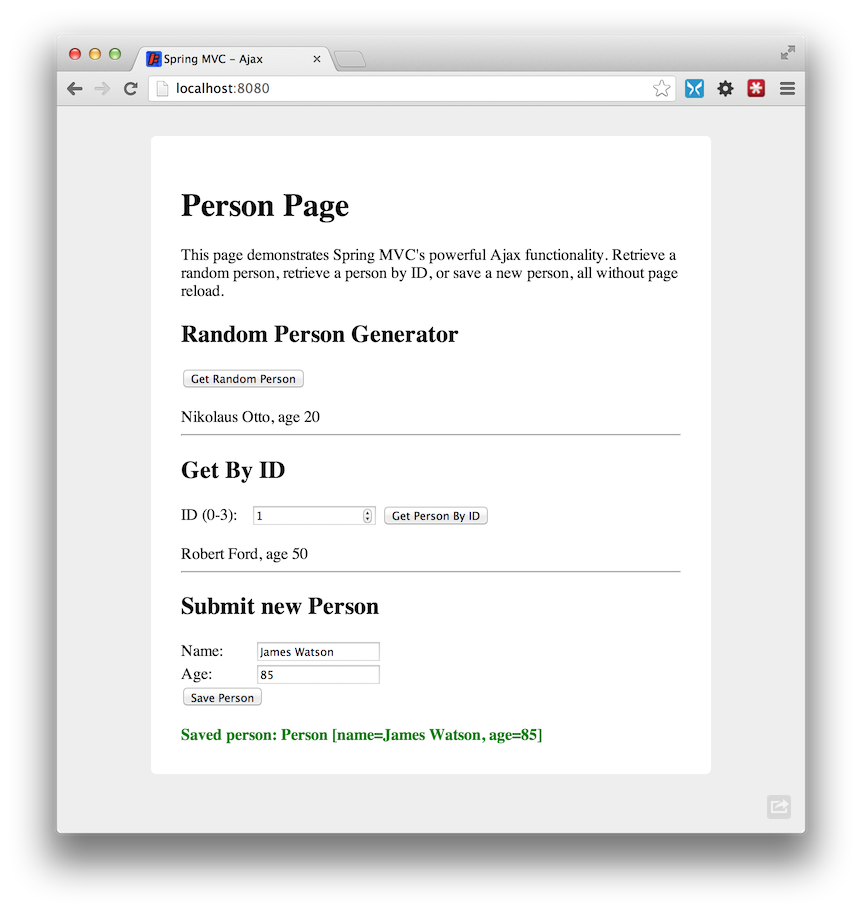
Once you have everything in place, you should have a page that looks like this:
Full Source:
ZIP, GitHub
To run the code from this tutorial: Must have Gradle installed. Download the ZIP. Extract. Open command prompt to extracted location. Run gradle jettyRunWar. Navigate in browser to http://localhost:8080.
References

really good tutorial
thanks mate :)
Great Tutorial! Just wondering if this is being run on Tomcat 7? I cannot seem to make any AJAX GET requests when applying the principles in this tutorial. I continually get a 403 Forbidden error, all by spring security configuration has been done correctly. I can access what I like when I use REST just fine.
I dont understand why, but I finally resolved my issue. In the AJAX $.get request I specified the actual URL of the request ‘http://localhost:8080/../etc’ and it worked. Although, when I actually gave it ‘${pageContext.request.contextPath}/etc/..’ it does not work.
ajax requests must be on the same domain check XDR for more info
Good tutorial, but you dont include the servlet configuration.
Could you please include it? Thanks
@roberto ciucci giuliani
https://github.com/stevehanson/spring-mvc-ajax
;-)
Interesting, i m trying to receive an array of object like this…But i have some problem..if you could help me out that would be very helpful ;) http://stackoverflow.com/questions/24314075/spring-mvc-could-not-read-json-can-not-deserialize-instance-of-java-util-vect