Android ExpandableListView with Custom Adapter: BaseExpandableListAdapter
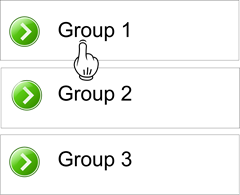
In the previous post we talked about ListView and how we can use it. Android OS has another widget that can be useful when you want to group items, this component is called ExpandableListView. This component has the capability to group items and when user clicks on the group it expands showing items.
This component can be used when we have a long item list and it can be divided in groups to organize them and make things less confused.
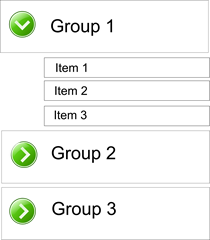
When user clicks on the group it gets expanded and we have:
As it is shown above, we need two different layout: one for the group and another one for items. So it is a little bit more complex than a listView even if the concept behind this component it is the same. We need to develop an adapter and two layouts.
Let’s suppose we have two classes that represent our model: one is the Category class and another one is the ItemDetail. Category holds a list of ItemDetail so Category class is like a Group (see above) and ItemDetail is an item.
Here there’s a code snippet:
01 02 03 04 05 06 07 08 09 10 | public class Category implements Serializable { private long id; private String name; private String descr; private List<ItemDetail> itemList = new ArrayList<ItemDetail>();...} |
1 2 3 4 5 6 7 8 | public class ItemDetail implements Serializable { private long id; private int imgId; private String name; private String descr;....} |
Now it is time to create our group layout. We will make it really simple: just two lines one for the Category name and the other for its description, so we have:
01 02 03 04 05 06 07 08 09 10 11 12 13 14 15 16 17 18 19 20 | <?xml version="1.0" encoding="utf-8"?> android:layout_width="match_parent" android:layout_height="match_parent" > <TextView android:id="@+id/groupName" android:layout_width="match_parent" android:layout_height="match_parent" android:paddingLeft="15dip" /> <TextView android:id="@+id/groupDescr" android:layout_width="match_parent" android:layout_height="match_parent" android:layout_alignParentLeft="true" android:layout_below="@id/groupName" android:textSize="8dip" /></RelativeLayout> |
Now we need another layout for items so we have:
01 02 03 04 05 06 07 08 09 10 11 12 13 14 15 16 17 18 19 | <?xml version="1.0" encoding="utf-8"?> android:layout_width="match_parent" android:layout_height="match_parent" > <TextView android:id="@+id/itemName" android:layout_width="match_parent" android:layout_height="match_parent" android:layout_alignParentLeft="true" /> <TextView android:id="@+id/itemDescr" android:layout_width="match_parent" android:layout_height="match_parent" android:layout_alignParentLeft="true" android:layout_below="@id/itemName" /></RelativeLayout> |
We made things really simple. Now we have our layouts we need to create an adapter to handle items and groups and bind them together.
ExpandableListView Adapter
To create a suitable adapter we have to extend BaseExpandableListAdapter. If you read the documentation about this abstract class you can notice we have to implement some methods. We could use SimpleExpandableListAdapter that implements some methods already, but we want to have a deeper control about our adapter.
There are two methods that are used to create the View corresponding to our layout, one for the items (childs) and one for the groups. These methods are:
- View getChildView(int groupPosition, int childPosition, boolean isLastChild, View convertView, ViewGroup parent) used when we need to create a child View
- View getGroupView(int groupPosition, boolean isExpanded, View convertView, ViewGroup parent) used when we need to create our group View.
So we have to override these two methods so that we can use our layouts. There are other “helper” methods that we need to implement in order to know the total number of childs (items in our case), the child ids, the total group (category) number and the group ids.
Let’s focus our attention on the getChildView first, here there’s the code
01 02 03 04 05 06 07 08 09 10 11 12 13 14 15 16 17 18 19 20 21 22 23 | @Overridepublic View getChildView(int groupPosition, int childPosition, boolean isLastChild, View convertView, ViewGroup parent) { View v = convertView; if (v == null) { LayoutInflater inflater = (LayoutInflater)ctx.getSystemService (Context.LAYOUT_INFLATER_SERVICE); v = inflater.inflate(R.layout.item_layout, parent, false); } TextView itemName = (TextView) v.findViewById(R.id.itemName); TextView itemDescr = (TextView) v.findViewById(R.id.itemDescr); ItemDetail det = catList.get(groupPosition).getItemList().get(childPosition); itemName.setText(det.getName()); itemDescr.setText(det.getDescr()); return v;} |
As you can notice in the method we receive the groupPosition and the childPosition this one specify the the child position inside the category (group). The code is quite trivial we simply inflate our item_layout and then we retrieve first the group inside the category list at groupPosition and then the child (ItemDetail class) inside the list held by Category class.
1 | ItemDetail det = catList.get(groupPosition).getItemList().get(childPosition); |
When we have to create a group View corresponding to our Category class we simply do the same thing, like shown below:
01 02 03 04 05 06 07 08 09 10 11 12 13 14 15 16 17 18 19 20 21 22 23 | @Overridepublic View getGroupView(int groupPosition, boolean isExpanded, View convertView, ViewGroup parent) { View v = convertView; if (v == null) { LayoutInflater inflater = (LayoutInflater)ctx.getSystemService (Context.LAYOUT_INFLATER_SERVICE); v = inflater.inflate(R.layout.group_layout, parent, false); } TextView groupName = (TextView) v.findViewById(R.id.groupName); TextView groupDescr = (TextView) v.findViewById(R.id.groupDescr); Category cat = catList.get(groupPosition); groupName.setText(cat.getName()); groupDescr.setText(cat.getDescr()); return v;} |
What about other methods?…Well they’re really trivial and we don’t need to explain them.
In the main activity the one that create our ExpandableListView we have:
01 02 03 04 05 06 07 08 09 10 11 | @Overridepublic void onCreate(Bundle savedInstanceState) { super.onCreate(savedInstanceState); initData(); setContentView(R.layout.activity_main); ExpandableListView exList = (ExpandableListView) findViewById(R.id.expandableListView1); ExpandableAdapter exAdpt = new ExpandableAdapter(catList, this); exList.setIndicatorBounds(0, 20); exList.setAdapter(exAdpt);} |
In the code above we simply get the ExpandableListView widget reference in our main layout and create the Adapter. One thing you should notice is
1 | exList.setIndicatorBounds(0, 20); |
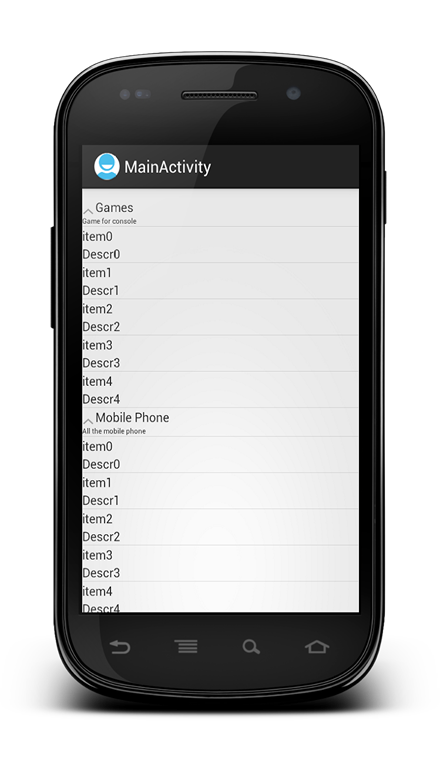
Using this method we set the indicator bounds. The indicator is the icon that is drawn near the group that change if the group is open or close. Here some images:
Image of items inside each category


Would love to see the code for the initData method in OnCreate.
I will post the full source code at github in a few hours. Thx
Can you please provide link for github source code ?
The source code is available at Surviving w/ android blog
Thanks a lot :)
Can you Provide Source Code Link for the Above example…
here is another helpful code forr expandable list view
http://custom-android-dn.blogspot.com/2013/01/how-to-create-custom-expandablelistview.html
Thanks
Thank you, thank you! Helped me A LOT!
How can we show database records in expandable list view?