Add JSON capabilities into your GWT application
Introduction to JSON
While working on web applications, the issue of client-server data exchange always arises. There are various approaches on this matter, with a lot of them using XML for the exchange. A not so well known format for performing this task is JSON. JSON (JavaScript Object Notation) is a lightweight data-interchange format. It is easy for humans to read and write, and easy for machines to parse and generate. JSON is considered less verbose and bloated than XML and more readable, even though those might vary on the transmitted data. There are multiple resources online to kick start you with JSON.
JSON libraries
JSON is a text format that is completely language independent and there are libraries available for a huge number of programming languages. For JSON in Java, the source code of the implementation is available. Note that the site does not provide binaries in an archive file, but we have compiled the classes and bundled them in a JAR file, which you can directly download here.
GWT and JSON integration
In this tutorial, I am going to show you how to manipulate JSON in GWT so that you can communicate with a JSON enabled web application. Note that in GWT applications, the most common way to achieve client-server communication is via RPC calls. So using JSON applies mostly in the case when an external server is reached via plain old HTTP calls.
Creating the application
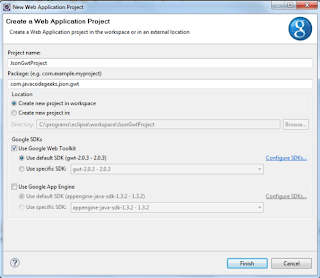
Let’s get started by creating a new Eclipse project (“File ? New ? Web Application Project”) and name it “JsonGwtProject”. Select support only for Google’s Web Toolkit and not for the App Engine. The role of the server will be played by the embedded Jetty container that is provided by the GWT SDK.
After the project skeleton is created, edit the modules declaration file (named “JsonGwtProject.gwt.xml” in our case). Add the following line after the line that reads “Other modules inherits” in order to make your GWT application JSON enabled.
1 | <inherits name="com.google.gwt.json.JSON" /> |
The domain model object
Now, let’s create the model object that will be used to hold the data. Our model is a “Product” class with various fields:
- Name
- Company
- Serial Number
- Prices
Multiple prices will be used in order to show you how to use nested JSON expressions.
The corresponding Java class (plain old Java object) is the following:
01 02 03 04 05 06 07 08 09 10 11 12 13 14 15 16 17 18 19 20 21 22 23 24 25 26 27 28 29 30 31 32 33 34 35 36 37 38 39 40 41 42 43 44 45 46 | package com.javacodegeeks.json.gwt.server.model;import java.util.LinkedList;import java.util.List;public class Product { private String name; private String company; private String serialNumber; private List<Double> prices = new LinkedList<Double>(); public Product(String name, String company, String serialNumber, List<Double> prices) { super(); this.name = name; this.company = company; this.serialNumber = serialNumber; this.prices = prices; } public String getName() { return name; } public void setName(String name) { this.name = name; } public String getCompany() { return company; } public void setCompany(String company) { this.company = company; } public String getSerialNumber() { return serialNumber; } public void setSerialNumber(String serialNumber) { this.serialNumber = serialNumber; } public List<Double> getPrices() { return prices; } public void setPrices(List<Double> prices) { this.prices = prices; }} |
Application’s server side
Now let’s create the server side code of the application. We will create a servlet that will be used to simulate an external server from which the data will be retrieved. The servlet creates a JSON response to the client using a static list of products (in a real-life application, the products would be fetched from a DAO or even better from an other service). Make sure you include the json.jar you downloaded into your project’s classpath and that it is also copied in the “war\WEB-INF\lib” folder. The servlet code is the following:
01 02 03 04 05 06 07 08 09 10 11 12 13 14 15 16 17 18 19 20 21 22 23 24 25 26 27 28 29 30 31 32 33 34 35 36 37 38 39 40 41 42 43 44 45 46 47 48 49 50 51 52 53 54 55 56 57 58 59 60 61 62 63 64 65 66 67 68 69 70 71 72 73 74 | package com.javacodegeeks.json.gwt.server;import java.io.IOException;import java.io.PrintWriter;import java.util.Arrays;import java.util.LinkedList;import java.util.List;import javax.servlet.ServletException;import javax.servlet.http.HttpServlet;import javax.servlet.http.HttpServletRequest;import javax.servlet.http.HttpServletResponse;import org.json.JSONObject;import com.javacodegeeks.json.gwt.server.model.Product;public class ProductsServlet extends HttpServlet { private static final long serialVersionUID = 8032611514671727168L; private static List<Product> products = new LinkedList<Product>(); static { Product product1 = new Product("Prod1", "Company1", "12345", Arrays.asList(123.2, 123.6)); Product product2 = new Product("Prod2", "Company2", "67890", Arrays.asList(234.2, 234.6)); products.add(product1); products.add(product2); } @Override protected void doGet(HttpServletRequest req, HttpServletResponse resp) throws ServletException, IOException { try { JSONObject responseObj = new JSONObject(); List<JSONObject> productObjects = new LinkedList<JSONObject>(); for (Product product : products) { JSONObject productObj = new JSONObject(); productObj.put("name", product.getName()); productObj.put("company", product.getCompany()); productObj.put("serialNumber", product.getSerialNumber()); List<JSONObject> pricesObjects = new LinkedList<JSONObject>(); for (Double price : product.getPrices()) { JSONObject priceObj = new JSONObject(); priceObj.put("price", price); pricesObjects.add(priceObj); } productObj.put("prices", pricesObjects); productObjects.add(productObj); } responseObj.put("products", productObjects); PrintWriter writer = resp.getWriter(); writer.write(responseObj.toString()); writer.flush(); } catch (Exception e) { e.printStackTrace(); throw new ServletException(e); } } } |
Java JSON response generation
Let me explain how the JSON response is produced. Make sure you are importing the JSON classes from the org.json package and not the com.google.gwt.json. The first step is to create a JSONObject which will be the one that will hold the response. Since we most probably have a number of products, we also create a List of JSONObjects. We loop through the existing products and create a separate object for each one of them. In that object, we add key-value pairs, just like we would do with a Map. For the prices, we also create a List of JSONObjects and then we add the whole list in the product’s JSONObject. Finally we add the List of product objects into the response’s JSONObject. The toString() method of the JSONObject is used to create the string representation. For that example, the result is:
{“products”:
[
{“company”:”Company1″,”name”:”Prod1″,”prices”:[{“price”:123.2},{“price”:123.6}],”serialNumber”:”12345″}
{“company”:”Company2″,”name”:”Prod2″,”prices”:[{“price”:234.2},{“price”:234.6}],”serialNumber”:”67890″}
]
}
Servlet configuration in web.xml
Now let’s configure the application so that the servlet responds to a specific URL. Edit the web.xml file (located in “war/WEB-INF”) and paste the following contents (the original contents with the declaration of the greetingService are all removed):
01 02 03 04 05 06 07 08 09 10 11 12 13 14 15 16 17 18 19 20 21 22 23 24 25 26 | <?xml version="1.0" encoding="UTF-8"?><!DOCTYPE web-app PUBLIC "-//Sun Microsystems, Inc.//DTD Web Application 2.3//EN"<web-app> <!-- Servlets --> <servlet> <servlet-name>ProductsServlet</servlet-name> <servlet-class> com.javacodegeeks.json.gwt.server.ProductsServlet </servlet-class> </servlet> <servlet-mapping> <servlet-name>ProductsServlet</servlet-name> <url-pattern>/jsongwtproject/products.json</url-pattern> </servlet-mapping> <!-- Default page to serve --> <welcome-file-list> <welcome-file>JsonGwtProject.html</welcome-file> </welcome-file-list></web-app> |
Client side with GWT
Finally, let’s create the GWT application’s entry point named “JsonGwtProject” (the original contents are completely removed). The client will invoke an HTTP GET call to the server, will receive the response in JSON format and then will parse the response. The code is:
001 002 003 004 005 006 007 008 009 010 011 012 013 014 015 016 017 018 019 020 021 022 023 024 025 026 027 028 029 030 031 032 033 034 035 036 037 038 039 040 041 042 043 044 045 046 047 048 049 050 051 052 053 054 055 056 057 058 059 060 061 062 063 064 065 066 067 068 069 070 071 072 073 074 075 076 077 078 079 080 081 082 083 084 085 086 087 088 089 090 091 092 093 094 095 096 097 098 099 100 101 102 103 | package com.javacodegeeks.json.gwt.client;import com.google.gwt.core.client.EntryPoint;import com.google.gwt.event.dom.client.ClickEvent;import com.google.gwt.event.dom.client.ClickHandler;import com.google.gwt.http.client.Request;import com.google.gwt.http.client.RequestBuilder;import com.google.gwt.http.client.RequestCallback;import com.google.gwt.http.client.RequestException;import com.google.gwt.http.client.Response;import com.google.gwt.json.client.JSONArray;import com.google.gwt.json.client.JSONObject;import com.google.gwt.json.client.JSONParser;import com.google.gwt.json.client.JSONValue;import com.google.gwt.user.client.Window;import com.google.gwt.user.client.ui.Button;import com.google.gwt.user.client.ui.RootPanel;public class JsonGwtProject implements EntryPoint { public void onModuleLoad() { final Button fetchDataButton = new Button("Fetch data"); fetchDataButton.addStyleName("sendButton"); RootPanel.get("fetchDataButtonContainer").add(fetchDataButton); fetchDataButton.addClickHandler(new ClickHandler() { public void onClick(ClickEvent event) { fetchDataFromServer(); } }); } private void fetchDataFromServer() { try { RequestBuilder rb = new RequestBuilder( RequestBuilder.GET, "/jsongwtproject/products.json"); rb.setCallback(new RequestCallback() { @Override public void onResponseReceived(Request request, Response response) { parseJsonData(response.getText()); } @Override public void onError(Request request, Throwable exception) { Window.alert("Error occurred" + exception.getMessage()); } }); rb.send(); } catch (RequestException e) { Window.alert("Error occurred" + e.getMessage()); } } private void parseJsonData(String json) { JSONValue value = JSONParser.parse(json); JSONObject productsObj = value.isObject(); JSONArray productsArray = productsObj.get("products").isArray(); if (productsArray != null) { for (int i=0; i<=productsArray.size()-1; i++) { JSONObject productObj = productsArray.get(i).isObject(); String name = productObj.get("name").isString().stringValue(); String company = productObj.get("company").isString().stringValue(); String serialNumber = productObj.get("serialNumber").isString().stringValue(); StringBuffer priceSb = new StringBuffer(); JSONArray pricesArray = productObj.get("prices").isArray(); if (pricesArray != null) { for (int j=0; j<=pricesArray.size()-1; j++) { JSONObject priceObj = pricesArray.get(j).isObject(); double price = priceObj.get("price").isNumber().doubleValue(); if (j!=pricesArray.size()-1) { priceSb.append("-"); } } } String message = "Product -- " + "\nName: " + name + "\nCompany: " + company + "\nSerial: " + serialNumber + "\nPrices: " + priceSb.toString(); Window.alert(message); } } }} |
For the HTTP call, the RequestBuilder class is used. The HTTP method (GET) is defined along with the endpoint URL (where the servlet is configured to respond). Then, an asynchronous callback method is provided using the RequestCallback class. Finally, the request is sent. When the response arrives from the server (if no errors have occurred), our parseJsonData method is invoked. Parsing JSON data with GWT Let’s see now how to parse the received data using GWT built in methods. Make sure you are importing the JSON classes from the com.google.gwt.json package and not the org.json. First, we use the JSONParser to create a JSONValue object from the string response. From that we retrieve a JSONObject instance using the method isObject(). Since we know that the response is actually a list of products, we create a JSONArray class by invoking the isArray() method of JSONValue. A loop is then used and we extract the model’s fields by using the stringValue() method of the occurring JSONString object. Note that in order to extract the multiple price values, we use the same procedure looping through a JSONArray object. Preparing the HTML file The “JsonGwtProject.html”has also to be changed in order to provide a placeholder for the interface’s button. Edit it and add the following lines after the “noscript” declaration:
01 02 03 04 05 06 07 08 09 10 11 12 | ... <h1>Web Application Starter Project</h1> <table align="center"> <tr> <td id="fetchDataButtonContainer"></td> </tr> <tr> <td colspan="2" style="color:red;" id="errorLabelContainer"></td> </tr> </table>... |
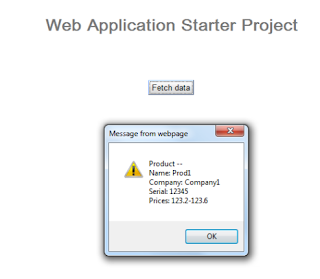
Running the example If we run the project, the interface appears, actually there is only a button. Clicking on the button. the JSON data are retrieved, the parsing is performed and the results are printed on the screen:  That would be all. As always, you can download the Eclipse project from here.
Enjoy!
- GWT EJB3 Maven JBoss 5.1 integration tutorial
- Securing GWT apps with Spring Security
- GWT 2 Spring 3 JPA 2 Hibernate 3.5 Tutorial – Eclipse and Maven 2 showcase
- Building your own GWT Spring Maven Archetype
- Adding CAPTCHA to your GWT application


thank you
Good Share +1 … Quick question though….
Why are you calling super() in class Product when Product doesn’t extend anything? All the field values are defined in the constructor …
Just sayin’
;-)
its a call to super class Object(he made constructor with alt shift s …..eclipse put default…:)
thank you for your great article
it is very useful
i want to ask a question
if i have a json file stored on disk ,,, how can i store it on server and parse it’s content from client
the main differnce is that in your example , you build the json file in server but in my case i have the json file on my disk and i want to read it from server not locally
thanks in advance