Launching and Debugging Tomcat from Eclipse without complex plugins
Therefore I prefer to start my Tomcat just like any other Java application from within Eclipse. Here’s how it works:
This article addresses experienced Eclipse users. You should already know how to create projects, change their built path and how to run classes. If you need any help, feel free to leave a comment or contact me.
We’ll add the Tomcat as additional Eclipse project, so that paths and all remain platform independent. (I even keep this project in our SVN so that everybody works with the same setup).
Step 1 – Create new Java project named “Tomcat7”
Step 2 – Remove the “src” source folder
Step 3 – Download Tomcat (Core Version) and unzip into our newly created project. This should now look something like this:
Step 4 – If you havn’t, create a new Test project which contains your sources (servlets, jsp pages, jsf pages…). Make sure you add the required libraries to the built path of the project
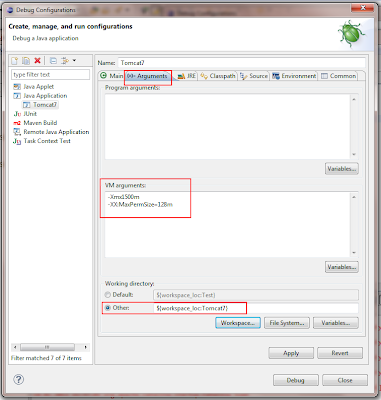
Step 5.1 – Create a run configuration. Select our Test project as base and set org.apache.catalina.startup.Bootstrap as main class.
Step 5.2 – Optionally specify larger heap settings as VM arguments. Important: Select the “Tomcat” project as working directory (Click on the “Workspace” button below the entry field.
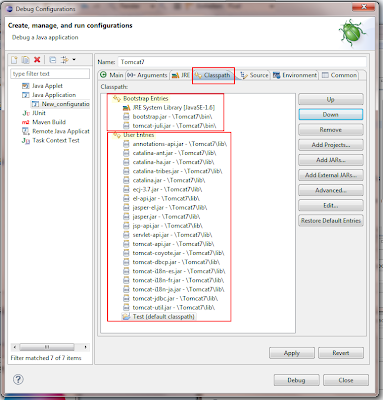
Step 5.3 – Add bootstrap.jar and tomcat-juli.jar from the Tomcat7/bin directory as bootstrap classpath.Add everything in Tomcat7/lib as user entries. Make sure the Test project and all other classpath entries (i.e. maven dependencies) are below those.
Now you can “Apply” and start Tomcat by hitting “Debug”. After a few seconds (check the console output) you can go to http://localhost:8080/examples/ and check out the examples provided by Tomcat.
Step 6 – Add Demo-Servlet – Go to our Test project, add a new package called “demo” and a new servlet called “TestServlet”. Be creative with some test output – like I was…
Step 7 – Change web.xml – Go to the web.xml of the examples context and add our servlet (as shown in the image). Below all servlets you also have to add a servlet-mapping (not shown in the image below). This looks like that:
<servlet-mapping>
<servlet-name>test</servlet-name>
<url-pattern>/demo/test</url-pattern>
</servlet-mapping>
Hit save and restart tomcat. You should now see your debug output by surfing to http://localhost:8080/examples/demo/test – You now can set breakpoints, change the output (thanks to hot code replacement) and do all the other fun stuff you do with other debugging sessions.
Hint: Keeping your JSP/JSF files as well as your web.xml and other resources already in another project? Just create a little ANT script which copies them into the webapps folder of the tomcat – and you get re-deployment with a single mouse click. Even better (this is what we do): You can modify/override the ResourceResolver of JSF. Therefore you can simply use the classloader to resolve your .xhtml files. This way, you can keep your Java sources and your JSF sources close to each other. I will cover that in another post – The fun stuff starts when running multi tenant systems with custom JSF files per tenant. The JSF implementation of Sun/Oracle has some nice gotchas built-in for that case ;-)
Reference: Launching and Debugging Tomcat from Eclipse without complex plugins from our JCG partner Andreas Haufler at the Andy’s Software Engineering Corner blog.


