Now that we are familiarized bit with terms and stuff we can move on to writing our own GWT application.
Step 1: Installing GWT plugin for eclipse
If you have already installed eclipse all you have to do is go to “Help” menu, under that “Install New Software” and give the URL as http://dl.google.com/eclipse/plugin/3.6 and click next and complete installation.

step 2: Creating a new project
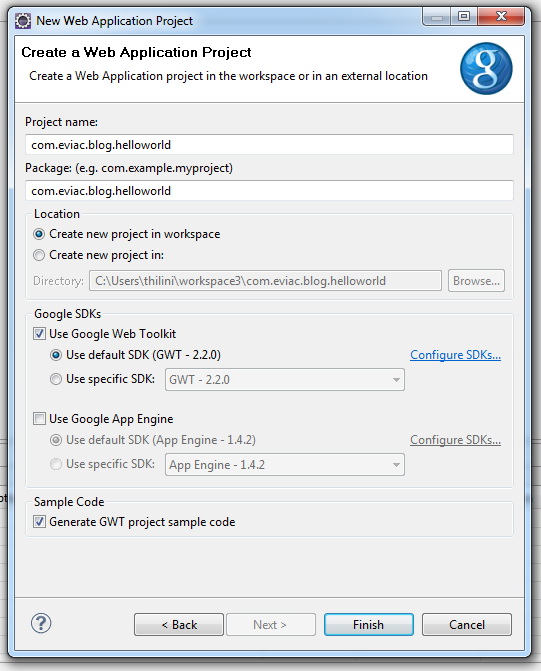
Select File > New > Web Application Project. Enter the name “com.eviac.blog.helloworld” for the project name and package. By default it will select both “Use Google Web Toolkit” and “Use Google App Engine” as we only using Google Web Toolkit here you will have to deselect Google App Engine.
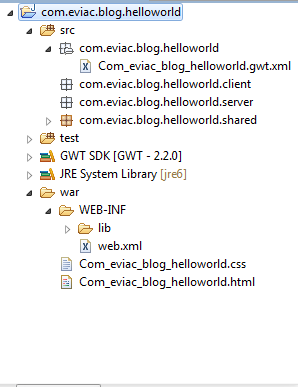
Now eclipse will create you a project with a package structure as shown below.
step 3: Creating the entry point
Inside the package com.eviac.blog.helloworld.client package create a java class named
“HelloWorldGwt”
01 02 03 04 05 06 07 08 09 10 11 12 13 14 15 16 17 18 19 20 21 22 23 24 25 26 27 28 29 | package com.eviac.blog.helloworld.client; import com.google.gwt.core.client.EntryPoint; import com.google.gwt.event.dom.client.ClickEvent; import com.google.gwt.event.dom.client.ClickHandler; import com.google.gwt.user.client.Window; import com.google.gwt.user.client.ui.Button; import com.google.gwt.user.client.ui.Label; import com.google.gwt.user.client.ui.RootPanel; public class HelloWorldGwt implements EntryPoint { @Override public void onModuleLoad() { final Label label = new Label("Hello World GWT !!!"); final Button button = new Button("Click Here"); button.addClickHandler(new ClickHandler() { @Override public void onClick(ClickEvent event) { label.setVisible(false); button.setText("welcome back again!"); Window.alert("Welcome to GWT"); } }); RootPanel.get().add(label); RootPanel.get().add(button); } } |
Inside the package com.eviac.blog.helloworld create Com_eviac_blog_helloworld.gwt.xml file.
Com_eviac_blog_helloworld.gwt.xml
01 02 03 04 05 06 07 08 09 10 | <?xml version="1.0" encoding="UTF-8"?> <module rename-to='com_eviac_blog_helloworld'> <!-- Inherits Web Toolkit utilities. --> <inherits name='com.google.gwt.user.User'/> <inherits name='com.google.gwt.user.theme.standard.Standard'/> <!-- Specify the app entry point class. --> <entry-point class='com.eviac.blog.helloworld.client.HelloWorldGwt'/> </module> |
Step 3: Creating html page
Inside the folder war create Com_eviac_blog_helloworld.html file
Com_eviac_blog_helloworld.html
01 02 03 04 05 06 07 08 09 10 11 12 13 14 15 16 17 18 | <!DOCTYPE HTML PUBLIC "-//W3C//DTD HTML 4.01 Transitional//EN"> <html> <head> <meta http-equiv="content-type" content="text/html; charset=UTF-8"> <link type="text/css" rel="stylesheet" href="Com_eviac_blog_helloworld.css"> <title>Hello World GWT</title> <script type="text/javascript" language="javascript" src="com_eviac_blog_helloworld/com_eviac_blog_helloworld.nocache.js"></script> </head> <body> <!-- optional tag: add this if needs history support --> <iframe src="javascript:''" id="__gwt_historyFrame" tabIndex='-1' style="position:absolute;width:0;height:0;border:0"></iframe> <h1><center>Hello World GWT</center></h1> </body> </html> |
Step 4: creating web.xml file
Inside the folder war/WEB-INF create a xml file called web.xml
web.xml
01 02 03 04 05 06 07 08 09 10 11 | <?xml version="1.0" encoding="UTF-8"?> <!DOCTYPE web-app PUBLIC "-//Sun Microsystems, Inc.//DTD Web Application 2.3//EN" <web-app> <!-- Default page to serve --> <welcome-file-list> <welcome-file>Com_eviac_blog_helloworld.html</welcome-file> </welcome-file-list> </web-app> |
Step 5: Creating css file
Inside war falder create a css file named Com_eviac_blog_helloworld.css
Com_eviac_blog_helloworld.css
01 02 03 04 05 06 07 08 09 10 11 12 13 14 15 16 17 18 19 20 | h1 { font-size: 2em; font-weight: bold; color: #6495ED; } .gwt-Label { color: #0000FF; font: normal 12px tahoma, arial, helvetica, sans-serif; height:3.5em; width: 10.7em; } .gwt-Button { color: #0000FF; height:3.5em; width: 10.7em; font-size: 12px; font-family: arial, sans-serif; } |
Alright now we are done with coding steps but wait for it, one more step to go
Step 6: Running GWT Application
To run right click on the project select Run As->Web Application then it will bring up a new view “Development Mode” copy the url generated.

Install GWT plugin for your web browser using this link.
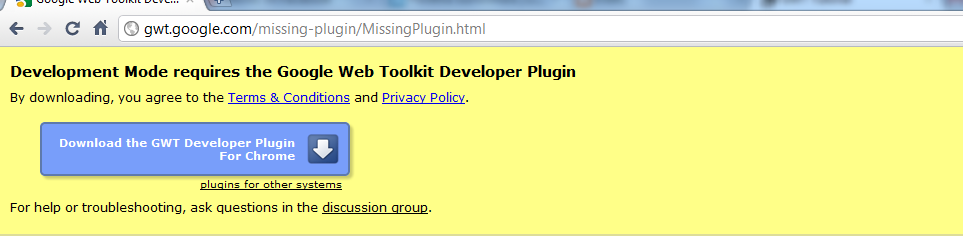
Now paste the url in the browser and you’ll see something like following and that’s it.

Now that you know how to build a basic GWT application you can improve it by adding more functionalities and changing the look and feel using css file.
Reference: Getting started with GWT from our JCG partner Pavithra Siriwardena at the EVIAC blog.
