The Java EE 6 Example – Galleria
So, I was very pleased to stumble over a more complex example done by Vineet Reynolds. It’s called “Java EE 6 Galleria” and you can download the source code from bitbucket. Vineet is a software engineer contributing to the Arquillian project; more specifically, he contributed bugs fixes and worked on a few feature requests for Arquillian Core, and the GlassFish, WebLogic and Tomcat integrations for Arquillian. This is where I first came across his name. And following the Arquillian guys and him a little closer directly send me to this example. A big thanks to Vineet for a helping hand during my first tries to get this up and running. Follow him if you like on twitter @VineetReynolds.
Here is a brief explanation about it’s background and this is also kicking of a series about running it in different settings and pointing you to a few more details under the hood. This is the basic introduction.
About the Galleria
The high level description of the project is the following: The Java EE 6-Galleria is a demo application demonstrating the use of JSF 2.0 and JPA 2.0 in a Java EE project using Domain Driven Design. It was written to serve as a showpiece for domain driven design in Java EE 6. The domain model of the application is not anemic, and is constituted of JPA entities. The entities are then used in session EJBs that act as the application layer. JSF facelets are used in the presentation tier, using Mojarra and PrimeFaces. The project seeks to achieve comprehensive coverage through the use of both unit and integration tests, written in JUnit 4. The unit and integration tests for EJBs and the domain model rely on the EJB 3.1 container API. The integration tests for the presentation layer relies on the Arquillian project and its Drone extension (for execution of Selenium tests).
Domain driven design using Java EE 6
DDD as an architectural approach, is feasible in Java EE 6. This is primarily due to the changes made in EJB 3.x and in the introduction of JPA. The improvements made in the EJB 3.x and JPA specifications allow for a domain and application layer to be modeled in Java EE 6 using DDD. The basic idea here is to design an application ensuring that persistence services are injected into the application layer, and used to access/persist the entities within a transactional context established by the application layer.
Domain Layer
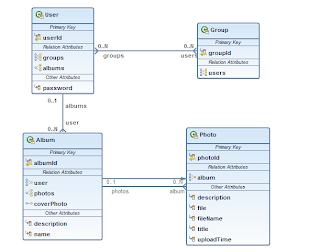
The application contains four domain entities for now – User, Group, Album and Photo which are the same as the JPA entities in the logical data model.
Repository Layer
On top of the logical data model you can find four repositories – UserRepository, GroupRepository, AlbumRepository and PhotoRepository. Each for one of the four domain entities. Even if the DDD requires that you only have repositories for an aggregated root, and not for all domain entities it is designed this way to allow the application layer to access the Album and Photo domain entities without having to navigate Albums and Photos via the UserRepository. The repositories are Stateless Session Beans with a no-interface view and are constructed using the Generic CRUD Service pattern published by Adam Bien.
Application layer
The application layer exposes services to be consumed by the presentation layer. It is also responsible for transaction management, while also serving as a fault barrier for the below layer(s). The application layer co-ordinates with the domain repositories and the domain objects to fulfill the desired objectives of the exposed services. In a way, this layer is the equivalent to a service layer in traditional applications. The application layer exposes it’s services through the UserService, GroupService, AlbumService and PhotoService interfaces and is also responsible for validating the providing domain objects from the above layers, before co-ordinating actions among objects in the domain layer. This is done via JSR-303 constraints on the domain objects.
How it looks like
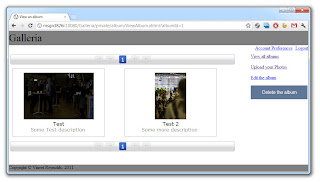
And this is, how this example looks like if you are running it on latest GlassFish 3.1.2. Curious to set this up yourself? Wait for the next post or give it a try yourself ;)
Below we are going to setup the example as it is directly with latest GlassFish 3.1.2, Hibernate and Derby.
Preparation
Get yourself in the mood for some configuration. Grep the latest NetBeans 7.1 (the Java EE edition already includes the needed GlassFish 3.1.2) and install it. I also assume you have a decent Java SDK 7 (6 would do the job, too) in place somewhere. Depending on the development strategy you also need a Mercurial Client and Maven. At least Maven is also included in NetBeans, so … I mean … why make your life harder than it already is? ;)
Environments
Some few more words about the environments. This example was setup for supporting different environments. Starting with the plain “development” environment you also need to configure your “test” and last but not least the “production” environment. All of the different environments are handled by maven profiles, so you might have to configure a bit during the following minutes.
Create the Database instances
First thing to do is to decide where to put all your stuff. The examples use derby out of the box and therefore you should either have the Java DB installed (part of the JDK) or use the GlassFish derby instance which is pre-configured with NetBeans. Let’s make it harder here and assume we use the Java DB installation that comes with your JDK. Go ahead, open a CMD prompt and navigate to your %JAVA_HOME% folder and further down the db folder/bin. Execute the “startNetWorkServer” script and watch out for the derby instance to start. Now open another CMD prompt also navigate to the db/bin folder and execute the “ij” script. This should come up with a prompt ” ij>. Now enter the following connect string:
1 | connect 'jdbc:derby://localhost:1527/GALLERIATEST;create=true'; |
This command connects you to the derby instance and creates a GALLERIATEST database if it doesn’t already exist. The Galleria example uses a handy little tool called dbdeploy as a database change management tool. It let’s you do incremental updates to the physical database model which get tracked in a changelog table. (More about this later in the series). You have to create the changelog table:
CREATE TABLE changelog (
  change_number DECIMAL(22,0) NOT NULL,
  complete_dt TIMESTAMP NOT NULL,
  applied_by VARCHAR(100) NOT NULL,
  description VARCHAR(500) NOT NULL
);

ALTER TABLE changelog ADD CONSTRAINT Pkchangelog PRIMARY KEY (change_number);
You can redo the steps for any other instance you need (production, etc.) by simply changing the database name in the connect statement. And don’t forget to create the changelog table in every instance.
And if you don’t like this approach. Fire up NetBeans, switch to the services tab, select “New Connection” and add a new Java DB Network Connection with host:localhost, port:1527 and Database: GALLERIATEST;create=true. Set both user and password to “APP” and click “Test Connection”. Select APP as the schema for your new DB. And you are done!
Create the GlassFish domain
We are running this from latest GlassFish. First thing to do now is to create a new domain. navigate to your GlassFish installation directory and goto glassfish3/bin and execute the following:
asadmin create-domain --portbase 10000 --nopassword test-domain
This creates a new test-domain for you. Now navigate to that domain folder (“glassfish3/glassfish/domains/test-domain”) and open the config/domain.xml file.
We are now going to add the created derby database as a connection pool to you newly created GlassFish domain. Navigate to the <resources> element and add the following connection pool and jdbc-resource under the last closing </jdbc-connection-pool> element:
01 02 03 04 05 06 07 08 09 10 11 12 13 14 | <jdbc-connection-pool driver-classname="" datasource-classname="org.apache.derby.jdbc.ClientDataSource40" res-type="javax.sql.DataSource" description="" name="GalleriaPool" ping="true"> <property name="User" value="APP"></property> <property name="DatabaseName" value="GALLERIATEST"></property> <property name="RetrieveMessageText" value="true"></property> <property name="Password" value="APP"></property> <property name="ServerName" value="localhost"></property> <property name="Ssl" value="off"></property> <property name="SecurityMechanism" value="4"></property> <property name="TraceFileAppend" value="false"></property> <property name="TraceLevel" value="-1"></property> <property name="PortNumber" value="1527"></property> <property name="LoginTimeout" value="0"></property> </jdbc-connection-pool> <jdbc-resource pool-name="GalleriaPool" description="" jndi-name="jdbc/galleriaDS"></jdbc-resource> |
Now find the : <config name=”server-config”> element and inside it look for the last <resource-ref entry. Add the following line there:
1 | <resource-ref ref="jdbc/galleriaDS"></resource-ref> |
One last thing to do until we are ready to fire up our instance. We need to add the JDBC Realm for the Galleria example. again, find the <config name=”server-config”> and inside it, look for a </auth-realm>. Under this, put the following:
01 02 03 04 05 06 07 08 09 10 11 12 | <auth-realm classname="com.sun.enterprise.security.auth.realm.jdbc.JDBCRealm" name="GalleriaRealm"> <property name="jaas-context" value="jdbcRealm"></property> <property name="encoding" value="Hex"></property> <property name="password-column" value="PASSWORD"></property> <property name="datasource-jndi" value="jdbc/galleriaDS"></property> <property name="group-table" value="USERS_GROUPS"></property> <property name="charset" value="UTF-8"></property> <property name="user-table" value="USERS"></property> <property name="group-name-column" value="GROUPID"></property> <property name="digest-algorithm" value="SHA-512"></property> <property name="user-name-column" value="USERID"></property> </auth-realm> |
Be sure not to put the new realm under the default-config. This will not work. Fine. Let’s get the sources :)
Getting the Source and opening it in NetBeans
Vineet is hosting the Galleria example on bitbucket.org. So, you have to go there and visit the java-ee-6-galleria project. There are three ways you can bring the sources to your local HDD. Either via the hg command line:
hg clone https://bitbucket.org/VineetReynolds/java-ee-6-galleria
or via the website download (upper right “get sources”) or directly via NetBeans. You need a Mercurial client for your OS for the first and the third option. I am using TortoiseHg for Windows. You should have this installed and configured with NetBeans before doing the following. Lets try the last alternative here. Select “Team > Clone Other”. Enter the Repository URL and leave user/password empty. Click “next” two times (we don’t need to change default paths ;)) and select a parent directory to put the stuff in. Click “Finish” and let the Mercurial client do the work. You are asked to open the found projects after it finished. This should look similar to the picture on the right. If you run into connection troubles make sure to update your proxy settings accordingly.
If you try to build the project you will run into trouble. It is still missing some configuration which we are going to do next.
Adding a Development Profile
Next is to add some stuff to the Maven pom.xml of the galleria-ejb project. Open it and scroll down to the <profiles> section. You find two (sonar and production). We are going to add a development profile by adding the following lines to it (make sure to adjust the GlassFish paths to your environment):
01 02 03 04 05 06 07 08 09 10 11 12 13 14 15 16 17 18 | <profile><id>development</id><activation><activeByDefault>true</activeByDefault></activation><properties><galleria.derby.testInstance.jdbcUrl>jdbc:derby://localhost:1527/GALLERIATEST</galleria.derby.testInstance.jdbcUrl><galleria.derby.testInstance.user>APP</galleria.derby.testInstance.user><galleria.derby.testInstance.password>APP</galleria.derby.testInstance.password><galleria.glassfish.testDomain.user>admin</galleria.glassfish.testDomain.user><galleria.glassfish.testDomain.passwordFile>D:/glassfish-3.1.2-b22/glassfish3/glassfish/domains/test-domain/config/local-password</galleria.glassfish.testDomain.passwordFile><galleria.glassfish.testDomain.glassfishDirectory>D:/glassfish-3.1.2-b22/glassfish3/glassfish/</galleria.glassfish.testDomain.glassfishDirectory><galleria.glassfish.testDomain.domainName>test-domain</galleria.glassfish.testDomain.domainName><galleria.glassfish.testDomain.adminPort>10048</galleria.glassfish.testDomain.adminPort><galleria.glassfish.testDomain.httpPort>10080</galleria.glassfish.testDomain.httpPort><galleria.glassfish.testDomain.httpsPort>10081</galleria.glassfish.testDomain.httpsPort></properties></profile> |
Ok. As you can see a couple of stuff is defined here. And the profile is activated by default. That’s it. For now.
Testing the ejb-Galleria Project
Lets try to run the testcases in the ejb-Galleria project. Right click it and issue a “clean and build”.Follow the console output to see what is actually going on. We are going to investigate this a little bit further with one of the next posts. Today we are only doing this to make sure, you have everything setup the right way. It should finish with:
Tests run: 49, Failures: 0, Errors: 0, Skipped: 0
BUILD SUCCESS
That is a “Green-Bar” :-) Congratulations!
Build and Deploy the Project
Now go to NetBeans “Tools > Options > Miscellaneous > Maven” and check the box that says: “Skip Tests for any build executions not directly related to testing”. Return to the main window and right click the Galleria project and make a clean and build there.
Reactor Summary:

Galleria ................................. SUCCESS [0.431s]
galleria-ejb ............................. SUCCESS [5.302s]
galleria-jsf ............................. SUCCESS [4.486s]
Galleria EAR ............................. SUCCESS [1.308s]
------------------------------------------------------------
BUILD SUCCESS
------------------------------------------------------------
Total time: 11.842s
Fine. Now lets fire up the GlassFish domain. Switch to your GlassFish installation and find the glassfish3/bin folder. Open a command line prompt there and run:
asadmin start-domain test-domain
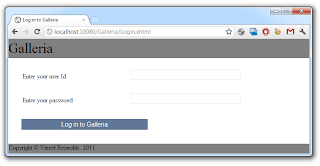
You can see the domain starting up. Now open a browser and navigate to http://localhost:10048/. After a few seconds this is going to show you the admin console of your GlassFish server. Now you need to install Hibernate. Select the “Update Tool” (bottom left) and switch to the “Available Add-Ons” tab. Select “hibernate” and click install (top right). Stop the server after you installed it and restart it with the command above. Open the admin console again and click on “Applications”. Click the little “deploy” button on top and browse for the “java-ee-6-galleria/galleria-ear/target/galleria-ear-0.0.1-SNAPSHOT.ear”. Click on “OK” (top right). You are done after a few seconds. Now switch to http://localhost:10080/Galleria/ and you will see the welcome screen. Congratulations. You setup the Galleria example on GlassFish! Sign up, Login and play with the application a bit!
The next parts in the series will dive you into the details of the application. I am going to cover the tests and overall concepts. And we are also going to change both JPA provider and database in a future post.
Want to know what it takes to get it up and running on latest WebLogic 12c ? Read on!
Reference: The Java EE 6 Example – Galleria – Part 1 & The Java EE 6 Example – Running Galleria on GlassFish 3.1.2 – Part 2 from our JCG partner Markus Eisele at the Enterprise Software Development with Java blog.


