In brief, we can say Dashboard is a page containing large and clear symbols of main functionality and optionally an area for relevant new information.
Go through these articles:
1. UI Design Pattern – Dashboard (From Juhani Lehtimaki)
2. Android UI design patterns
The main agenda of this article is to implement Dashboard design patter same as below:

Step 1: Create Title bar layout
Yes we define title bar (header) layout only once but it requires in every screens. We will just show/hide home button and other buttons whenever needed. Once you are done with defining title bar layout, we can use the same layout in other layouts by using ViewStub.
Here is example of Title bar (header) xml layout:
header.xml
01 02 03 04 05 06 07 08 09 10 11 12 13 14 15 16 17 18 19 20 21 22 23 24 25 26 27 28 29 30 31 32 33 34 35 36 37 38 39 40 41 42 43 44 45 46 47 48 49 50 51 52 53 54 55 56 57 58 | <?xml version="1.0" encoding="utf-8"?> android:layout_width="fill_parent" android:layout_height="wrap_content" android:background="@color/title_background" > <LinearLayout android:id="@+id/panelIconLeft" android:layout_width="wrap_content" android:layout_height="wrap_content" android:layout_alignParentLeft="true" android:layout_centerVertical="true" android:layout_margin="5dp" > <Button android:id="@+id/btnHome" android:layout_width="wrap_content" android:layout_height="wrap_content" android:background="@drawable/ic_home" android:onClick="btnHomeClick" /> </LinearLayout> <TextView android:id="@+id/txtHeading" style="@style/heading_text" android:layout_width="fill_parent" android:layout_height="wrap_content" android:layout_centerInParent="true" android:layout_marginLeft="5dp" android:layout_marginRight="5dp" android:layout_toLeftOf="@+id/panelIconRight" android:layout_toRightOf="@id/panelIconLeft" android:ellipsize="marquee" android:focusable="true" android:focusableInTouchMode="true" android:gravity="center" android:marqueeRepeatLimit="marquee_forever" android:singleLine="true" android:text="" android:textColor="@android:color/white" /> <LinearLayout android:id="@+id/panelIconRight" android:layout_width="wrap_content" android:layout_height="wrap_content" android:layout_alignParentRight="true" android:layout_centerVertical="true" android:layout_margin="5dp" > <Button android:id="@+id/btnFeedback" android:layout_width="wrap_content" android:layout_height="wrap_content" android:background="@drawable/ic_feedback" android:onClick="btnFeedbackClick" /> </LinearLayout></RelativeLayout> |
In above layout code, i have referenced style from styles.xml and dimentions from dimen.xml:
styles.xml
01 02 03 04 05 06 07 08 09 10 11 12 13 14 15 16 17 18 19 20 21 | <?xml version="1.0" encoding="utf-8"?><resources><style name="heading_text"> <item name="android:textColor">#ff000000</item> <item name="android:textStyle">bold</item> <item name="android:textSize">16sp</item> <item name="android:padding">5dp</item> </style><style name="HomeButton"> <item name="android:layout_gravity">center_vertical</item> <item name="android:layout_width">fill_parent</item> <item name="android:layout_height">wrap_content</item> <item name="android:layout_weight">1</item> <item name="android:gravity">center_horizontal</item> <item name="android:textSize">@dimen/text_size_medium</item> <item name="android:textStyle">normal</item> <item name="android:textColor">@color/foreground1</item> <item name="android:background">@null</item> </style></resources> |
dimen.xml
1 2 3 4 5 6 7 | <?xml version="1.0" encoding="utf-8"?><resources> <dimen name="title_height">45dip</dimen> <dimen name="text_size_small">14sp</dimen> <dimen name="text_size_medium">18sp</dimen> <dimen name="text_size_large">22sp</dimen></resources> |
Step 2: Create super (abstract) class
Actually, In this abstract super class, we will define:
1) event handlers for both the buttons: Home and Feedback
2) other methods
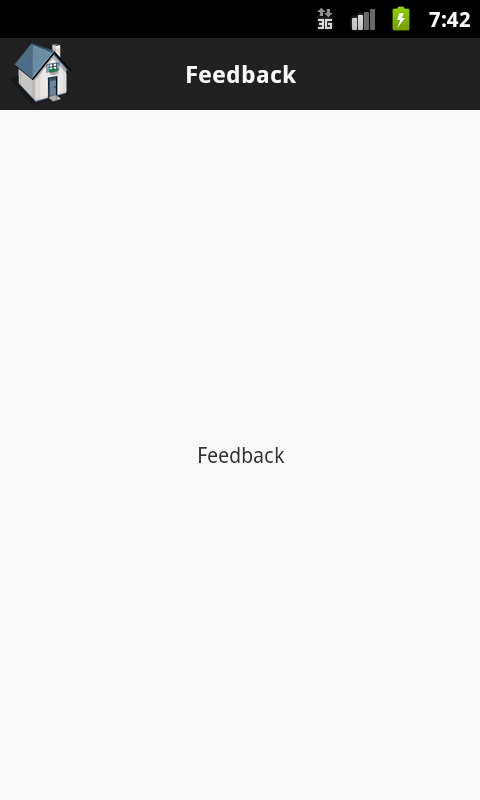
The Home and Feedback buttons, which are going to be visible in almost every activities and require the same actions to perform (i.e. take user to home activity), So instead of writing the same code in every activity, we write event handler only once in the abstract class which is going to be a super class for every activity.
You may have noticed in above header.xml layout: android:onClick=”btnHomeClick” (Home button) and android:onClick=”btnFeedbackClick” (Feedback button), so we will define this method only once in super class (abstract).
Please refer ViewStub example if you dont know about it.
Now, here is the code for Abstract (super) class, i call it as DashboardActivity.java
01 02 03 04 05 06 07 08 09 10 11 12 13 14 15 16 17 18 19 20 21 22 23 24 25 26 27 28 29 30 31 32 33 34 35 36 37 38 39 40 41 42 43 44 45 46 47 48 49 50 51 52 53 54 55 56 57 | package com.technotalkative.viewstubdemo;import android.app.Activity;import android.content.Intent;import android.os.Bundle;import android.view.View;import android.view.ViewStub;import android.widget.Button;import android.widget.TextView;public abstract class DashBoardActivity extends Activity { /** Called when the activity is first created. */ @Override public void onCreate(Bundle savedInstanceState) { super.onCreate(savedInstanceState); } public void setHeader(String title, boolean btnHomeVisible, boolean btnFeedbackVisible) { ViewStub stub = (ViewStub) findViewById(R.id.vsHeader); View inflated = stub.inflate(); TextView txtTitle = (TextView) inflated.findViewById(R.id.txtHeading); txtTitle.setText(title); Button btnHome = (Button) inflated.findViewById(R.id.btnHome); if(!btnHomeVisible) btnHome.setVisibility(View.INVISIBLE); Button btnFeedback = (Button) inflated.findViewById(R.id.btnFeedback); if(!btnFeedbackVisible) btnFeedback.setVisibility(View.INVISIBLE); } /** * Home button click handler * @param v */ public void btnHomeClick(View v) { Intent intent = new Intent(getApplicationContext(), HomeActivity.class); intent.setFlags (Intent.FLAG_ACTIVITY_CLEAR_TOP); startActivity(intent); } /** * Feedback button click handler * @param v */ public void btnFeedbackClick(View v) { Intent intent = new Intent(getApplicationContext(), FeedbackActivity.class); startActivity(intent); }} |
Step 3: Define Dashboard layout
01 02 03 04 05 06 07 08 09 10 11 12 13 14 15 16 17 18 19 20 21 22 23 24 25 26 27 28 29 30 31 32 33 34 35 36 37 38 39 40 41 42 43 44 45 46 47 48 49 50 51 52 53 54 55 56 57 58 59 60 61 62 63 64 65 66 67 68 69 70 71 72 73 74 75 76 77 78 79 80 81 82 83 84 85 86 87 | <?xml version="1.0" encoding="utf-8"?> android:layout_width="fill_parent" android:layout_height="fill_parent" android:orientation="vertical" > <ViewStub android:id="@+id/vsHeader" android:layout_width="fill_parent" android:layout_height="wrap_content" android:inflatedId="@+id/header" android:layout="@layout/header" /> <LinearLayout android:layout_width="fill_parent" android:layout_height="wrap_content" android:layout_weight="1" android:orientation="vertical" android:padding="6dip" > <LinearLayout android:layout_width="fill_parent" android:layout_height="wrap_content" android:layout_weight="1" android:orientation="horizontal" > <Button android:id="@+id/main_btn_eclair" style="@style/HomeButton" android:drawableTop="@drawable/android_eclair_logo" android:onClick="onButtonClicker" android:text="@string/EclairActivityTitle" /> <Button android:id="@+id/main_btn_froyo" style="@style/HomeButton" android:drawableTop="@drawable/android__logo_froyo" android:onClick="onButtonClicker" android:text="@string/FroyoActivityTitle" /> </LinearLayout> <LinearLayout android:layout_width="fill_parent" android:layout_height="wrap_content" android:layout_weight="1" android:orientation="horizontal" > <Button android:id="@+id/main_btn_gingerbread" style="@style/HomeButton" android:drawableTop="@drawable/android_gingerbread_logo" android:onClick="onButtonClicker" android:text="@string/GingerbreadActivityTitle" /> <Button android:id="@+id/main_btn_honeycomb" style="@style/HomeButton" android:drawableTop="@drawable/android_honeycomb_logo" android:onClick="onButtonClicker" android:text="@string/HoneycombActivityTitle" /> </LinearLayout> <LinearLayout android:layout_width="fill_parent" android:layout_height="wrap_content" android:layout_weight="1" android:orientation="horizontal" > <Button android:id="@+id/main_btn_ics" style="@style/HomeButton" android:drawableTop="@drawable/android_ics_logo" android:onClick="onButtonClicker" android:text="@string/ICSActivityTitle" /> <Button android:id="@+id/main_btn_jellybean" style="@style/HomeButton" android:drawableTop="@drawable/android_jellybean_logo" android:onClick="onButtonClicker" android:text="@string/JellyBeanActivityTitle" /> </LinearLayout> </LinearLayout></LinearLayout> |
Step 4: Define activity for handling this dashboard layout buttons click events.
In this activity, you will find the usage of setHeader() method to set the header for home activity, yes in this method i have passed “false” for home button because its already a home activity, but i have passed “true” for feedback button because feedback is needed to be visible. Other process are same as defining button click handlers.
01 02 03 04 05 06 07 08 09 10 11 12 13 14 15 16 17 18 19 20 21 22 23 24 25 26 27 28 29 30 31 32 33 34 35 36 37 38 39 40 41 42 43 44 45 46 47 48 49 50 51 52 53 54 55 56 57 58 | package com.technotalkative.viewstubdemo;import android.content.Intent;import android.os.Bundle;import android.view.View;public class HomeActivity extends DashBoardActivity { /** Called when the activity is first created. */ @Override public void onCreate(Bundle savedInstanceState) { super.onCreate(savedInstanceState); setContentView(R.layout.main); setHeader(getString(R.string.HomeActivityTitle), false, true); } /** * Button click handler on Main activity * @param v */ public void onButtonClicker(View v) { Intent intent; switch (v.getId()) { case R.id.main_btn_eclair: intent = new Intent(this, Activity_Eclair.class); startActivity(intent); break; case R.id.main_btn_froyo: intent = new Intent(this, Activity_Froyo.class); startActivity(intent); break; case R.id.main_btn_gingerbread: intent = new Intent(this, Activity_Gingerbread.class); startActivity(intent); break; case R.id.main_btn_honeycomb: intent = new Intent(this, Activity_Honeycomb.class); startActivity(intent); break; case R.id.main_btn_ics: intent = new Intent(this, Activity_ICS.class); startActivity(intent); break; case R.id.main_btn_jellybean: intent = new Intent(this, Activity_JellyBean.class); startActivity(intent); break; default: break; } }} |
Step 5: Define other activities and their UI layouts
Now, its time to define activities that we want to display based on the particular button click from dashboard. So define every activities and their layouts. Don’t forget to call setHeader() method wherever necessary.
Here is one example for such activity – Activity_Eclair.java
01 02 03 04 05 06 07 08 09 10 11 12 13 | package com.technotalkative.viewstubdemo;import android.os.Bundle;public class Activity_Eclair extends DashBoardActivity { /** Called when the activity is first created. */ @Override public void onCreate(Bundle savedInstanceState) { super.onCreate(savedInstanceState); setContentView(R.layout.activity_eclair); setHeader(getString(R.string.EclairActivityTitle), true, true); }} |
activity_eclair.xml
01 02 03 04 05 06 07 08 09 10 11 12 13 14 15 16 17 18 19 20 21 22 23 24 | <?xml version="1.0" encoding="utf-8"?> android:layout_width="fill_parent" android:layout_height="fill_parent" android:orientation="vertical" > <ViewStub android:id="@+id/vsHeader" android:layout_width="fill_parent" android:layout_height="wrap_content" android:inflatedId="@+id/header" android:layout="@layout/header" /> <TextView android:id="@+id/textView1" android:layout_width="match_parent" android:layout_height="match_parent" android:gravity="center" android:text="@string/EclairActivityTitle" /></LinearLayout> |
Step 6: Declare activities inside the AnroidManifest.xml file
Now you are DONE ![]()
Output:
.png)
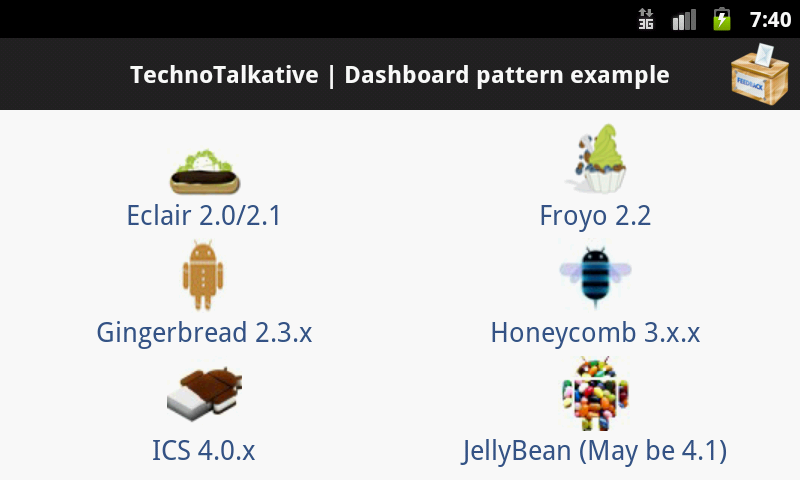 |
| Home screen _ Landscape |
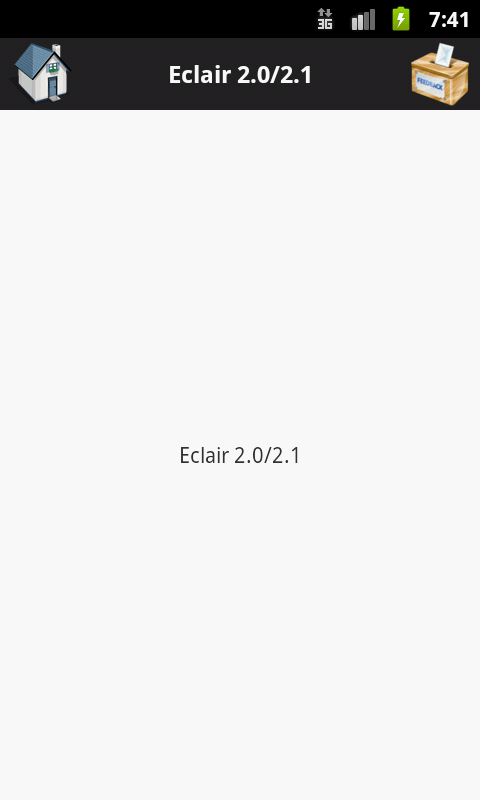 |
| inner screen |
 | |
|
You can download source code from here: Android – Dashboard pattern implementation
Feedback/review are always welcome ![]()
Reference: Android – Dashboard design pattern implementation from our JCG partner Paresh N. Mayani at the TechnoTalkative blog.

thanks friend 100% utility
Welcome :) Cheers
thanks for sharing :-)
Welcome :) Cheers.
yo bro ur man!!
nice tutorial
Thanks! Really useful both for using and learning.
Nice Tutorial