Turbo-charge your Android emulator for faster development
My tools:
- Android SDK r20.0.3
- Intellij Community Edition 11.1.3
Basically, the special ‘enhancement’ provided by Intel is a special x86 Atom system image which utilizes the HAXM driver that enables better emulator performance. I’ll not repeat the technical details here, you can access the links below for more info.
Caveat: This trick only works on Intel hardware and with the Virtualization Technology for Directed I/O (VT-d) enabled (usually via BIOS).
Also, Intel x86 system images are currently (as of this blog posting) available for Android versions 2.3.3 (Gingerbread), 4.0.3 (ICD), and 4.1 (Jelly Bean) only.
To avoid headaches, set the environment variable ANDROID_SDK_HOME to point to your Android SDK root folder before proceeding.
High-level steps:
1. Download & install relevant packages via Android SDK Manager
2. Create Android Virtual Devices (AVD)
3. Create an Android Module project in IntelliJ CE
4. Test launching the Android application using the AVDs
1. Download relevant packages via Android SDK Manager
Launch the SDK Manager and ensure the following is installed:
- Intel x86 Atom System Images (shown below is for Android 2.3.3)
- Intel x86 Emulator Accelerator (HAXM)
Next, you’ll need to install the HAXM driver manually. Go to the Android SDK root folder and navigate to extras\intel\Hardware_Accelerated_Execution_Manager. Execute file IntelHaxm.exe to install.
2. Create Android Virtual Devices (AVD)
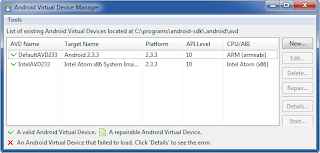
Launch the AVD Manager and create 2 AVDs with the same options but different Target:
- DefaultAVD233 – Android 2.3.3 – API Level 10
- IntelAVD233 – Intel Atom x86 System Image (Intel Corporation) – API Level 10
3. Create an Android Module project in IntelliJ CE
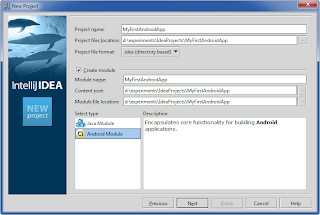
In IntelliJ, create a new project of type ‘Android Module’, as shown:
Under ‘Android SDK’, select the appropriate Android platform. You’ll need to point to your Android SDK root folder in order to choose the appropriate build target. As shown below, ‘Android 2.3.3’ is chosen:
Ensure that the ‘Target Device’ option is set to Emulator, then click ‘Finish’ to complete the project creation.
4. Test launching the Android application using the AVDs
Ok, we’ll test using the default Android 2.3.3 AVD first.
At the IntelliJ menubar, select ‘Run’ > ‘Edit Configurations…’. Go to the ‘Target Device’ section. At the ‘Prefer Android Virtual Device’ option, select ‘DefaultAVD233’. Then Run the Android application. After a while, you should see the emulator window with the ‘Hello World’ message.
To run with the Intel AVD, choose the ‘IntelAVD233’ instead.
What’s most exciting is the speed of the emulator launch (timed from clicking ‘Run’ in IntelliJ up to the ‘Hello World’ message is shown in the emulator). The rough timings recorded using my notebook (Intel i3 380M, 3GB RAM):
- DefaultAVD233 – 1m 7s
- IntelAVD233 – 35s
Wow, that’s fast (~50% faster), without tuning other parameters to speed things up even further.
Reference: Turbo-charge your Android emulator for faster development from our JCG partner Allen Julia at the YK’s Workshop blog.


an alternative would be to use VirtualBox with AndroidVM, which gives the same performance boost on Vt-d enabled hardware.