Use reCaptcha in a Spring MVC web application
A CAPTCHA is a program that can generate and grade tests that humans can pass but computer programs ‘cannot‘. One of strategies followed are showing an image to user with distorted text, and user should write text in input area. If showed text is the same as input by user, then we can ‘assure‘ that a human is on computer.
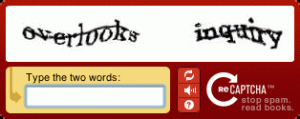
A captcha example:
Captchas have several applications for practical security, for example:
- Preventing Spam in comment fields.
- Protecting from Massive User Registration.
- Preventing Dictionary Attacks.
- …
These distorted texts are acquired as follows:
- Digitizing physical books/newspaper.
- Pages are photographically scanned, and then transformed into text using ‘Optical Character Recognition‘ (OCR).
- OCR is not perfect, each word that cannot be read correctly by OCR is placed on an image and used as a CAPTCHA.
- Word that cannot be read correctly by OCR is given to a user with another word for which the answer is already known. Then is asked to read both words, if user solves the one for which the answer is known, the system assumes their answer is correct for the new one. The system then gives the new image to a number of other people to determine, with higher confidence, whether the original answer was correct.
Now you know how captcha works, the problem is that if you want to use captchas in your website, you should implement yourself process described above, and of course this is not easy and tedious work is required digitalizing works. For this reason there are some ‘captcha providers‘ that have done this work for us. One of these providers is reCaptcha http://www.google.com/recaptcha. reCaptcha is a free captcha service that provides us these captchas ready to be used in our site. As developers we only have to embedded a piece of code in client side for showing captcha image and text area, and in server side, calling a function for resolving input data. reCaptcha provides plugins for dealing with lot of programming languages like Java, PHP, Perl, …
This post will guide you on how to use reCaptcha in Spring MVC web application. The application consists in a form to register a new user. This form contains a captcha for avoiding a bot starts a massive registration attack.
First step is open an account to reCaptcha site (you can use yourgoogle account or create a new one).
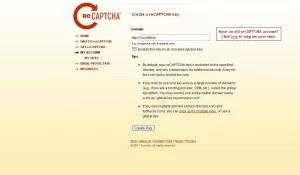
Once you have entered go to My Account – Add New Site.
Then at domain box you should write the domain which will contain captcha validation. For this example I have entered localhost and I have checked Enable this key on all domains (global key). Of course information provided here is for testing porpoise and in production environment should be different. After you have registered your site, two keys are provided, private key (XXXX) and a public key (YYYY).
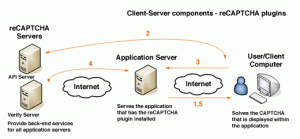
Before coding, let me show basic life-cycle of a reCAPTCHA challenge. Diagram is from reCaptcha web:
Second step is create a Spring MVC application, no secret here, I am going to explain only parts that are implied in reCaptcha integration. Apart from SpringMVC dependencies, recaptcha4j API should be added:
1 2 3 4 5 | <dependency> <groupId>net.tanesha.recaptcha4j<groupId> <artifactId>recaptcha4j<artifactId> <version>0.0.7<version><dependency> |
recaptcha4j.jar is an API that provides a simple way to place a captcha on your Java-based website. The library wraps the reCAPTCHA API.
Integrating reCaptcha into a form, requires two modifications:
- One in client side, for connecting to reCaptcha server and get the challenge.
- Second one in server-side for connecting to reCaptcha server to send the user’s answer, and give back a response.
Client side:
For client side a tagfile has been created to encapsulate all logic of reCaptcha API in a single point, so can be reused in all JSP forms.
1 2 3 4 5 6 7 8 9 | <%@ tag import='net.tanesha.recaptcha.ReCaptcha' %><%@ tag import='net.tanesha.recaptcha.ReCaptchaFactory' %><%@ attribute name='privateKey' required='true' rtexprvalue='false' %><%@ attribute name='publicKey' required='true' rtexprvalue='false' %><% ReCaptcha c = ReCaptchaFactory.newReCaptcha(publicKey, privateKey, false); out.print(c.createRecaptchaHtml(null, null));%> |
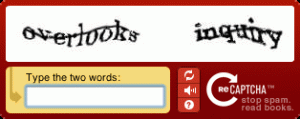
reCaptcha class requires the private key (XXXX) and the public key (YYYY) provided by reCaptcha in step one. The method createRecaptchaHtml(…) creates a piece of html code to show the challenge. In fact it generates something like:
And finally a JSP page with a form and captcha information:
01 02 03 04 05 06 07 08 09 10 11 12 13 14 15 16 17 18 19 20 21 22 23 24 25 26 27 28 29 30 31 32 33 34 35 36 37 38 39 40 | <%@ taglib uri='http:java.sun.comjspjstlcore' prefix='c' %><%@ taglib prefix='form' uri='http:www.springframework.orgtagsform' %><%@ taglib prefix='tags' tagdir='WEB-INFtags' %><%@ page session='false' %><html><head> <title>Register User<title><head><body><h1> <form:form id='register' modelAttribute='userInfo'> <table> <tr> <td>Username: <td> <td><form:input path='username'><td> <tr> <tr> <td>Password: <td> <td><form:password path='password'><td> <tr> <tr> <td>Age: <td> <td><form:input path='age'><td> <tr> <tr> <td colspan='2'> <tags:captcha privateKey='XXXX' publicKey='YYYY'><tags:captcha> <td> <tr> <tr> <td colspan='2'> <input id='submit' type='submit' value='Submit' > <td> <tr> <table> <form:form><h1><body><html> |
See that form is generated as usual using Spring MVC taglib, but also we are using created tagfile (<tags:captcha>) for embedding captcha into form.
Server Side:
Server side is even simpler than client side. When a captcha is created using createRecaptchaHtml, two form element fields are created, recaptcha_challenge_field that contains information about the challenge presented to user, and recaptcha_response_field that contains the user answer to the challenge.
Apart from these two parameters, recaptcha4j requires remote address too. ServletRequest interface has a method (getRemoteAddr()) for this porpoise.
01 02 03 04 05 06 07 08 09 10 11 12 | @RequestMapping(value='', method=RequestMethod.POST) public String submitForm(@ModelAttribute('userInfo') UserInfo userInfo, @RequestParam('recaptcha_challenge_field') String challangeField, @RequestParam('recaptcha_response_field') String responseField, ServletRequest servletRequest) { String remoteAddress = servletRequest.getRemoteAddr(); ReCaptchaResponse reCaptchaResponse = this.reCaptcha.checkAnswer(remoteAddress, challangeField, responseField); if(reCaptchaResponse.isValid()) { return 'success'; } else { return 'home'; }} |
reCaptcha object is injected using Spring. It is important to note that UserInfo (data entered by user in form) does not contain any information about captcha, it only contains ‘business’ data. Using @RequestParam reCaptcha information is retrieved by Spring and can be used directly into reCaptcha object.
The other important part is isValid() method. This method simply checks if response of reCaptcha site is that user has been passed the challenge or not. Depending on result you should act consequently, if challenge is not passed returning to previous page is a good practice.
1 2 3 | <bean id='recaptcha' class='net.tanesha.recaptcha.ReCaptchaImpl'> <property name='privateKey' value='XXXX'><property><bean> |
This bean definition is simply for instantiating reCaptcha class with your private key. Using @Autowire bean is injected into controller.
Step Three:
Last step is watch that created form shows the captcha image and controller redirects you to page depending on what you have entered into captcha text area.
Extra Step:
Now you have a basic notion of how to work with reCaptcha, next step (out of scope of this post) is instead of showing again form without any error message, you could use BindingResult in Controller for notifying to user an error message:
1 2 3 4 5 6 7 | if (!reCaptchaResponse.isValid()) { FieldError fieldError = new FieldError( 'userInfo', 'captcha', 'Please try again.'); result.addError(fieldError);} |
result variable is an attribute passed to submitForm of type BindingResult. Of course JSP should be changed with <form:errors path=’captcha’/> for showing the error message.
Another improvement is creating a HandlerInterceptor for validating forms with captchas. For example ReCaptchaHandlerInterceptorAdapter would contain reCaptcha management. preHandle method would return true if captcha challenge is resolved correctly by user (allowing defined controller do its work), or false and redirecting to an error page.
1 2 3 4 5 6 | <mvc:interceptors> <mvc:interceptor> <mapping path='*.form'> <bean class='org.springsource.mvc.ReCaptchaHandlerInterceptorAdapter' > <mvc:interceptor><mvc:interceptors> |
With previous handler configuration all forms would have captcha validation.
Hope you find useful this post, and now you can start protecting your web forms from spam or bots. Download Eclipse Project.
Reference: Mornië Utúlië, Believe And You Will Find Your Way (May It Be – Enya) from our JCG partner Alex Soto at the One Jar To Rule Them All blog.


Hello,
Why don’t you create complete example in order to get login by entering Captcha’s? It will be worth for all your followers. Looking for great response.
It Would be Great if you would provide the entire project along with project structure
Thank you very much