Hand and Finger Detection using JavaCV
This post is part of a series on Natural User Interfaces (NUIs) published by Dr. Andrew Davison and deals with detecting hands from a webcam video feed using JavaCV.
Note: all the source code for this chapter is available for download from http://fivedots.coe.psu.ac.th/~ad/jg/nui055/
The colored blob detection code of chapter 5 (available at http://fivedots.coe.psu.ac.th/~ad/jg/nui05/) can be used as the basis of other shape analyzers, which I’ll illustrate here by extending it to detect a hand and fingers. In Figure 1, I’m wearing a black glove on my left hand. My Handy application attempts to find and label the thumb, index, middle, ring, and little finger. Yellow lines are drawn between the fingertips and the center-of-gravity (COG) of the hand.
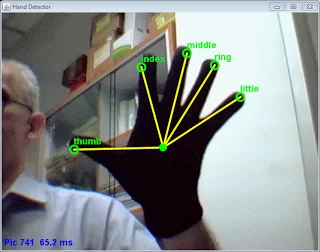
I utilized the HSVSelector application of chapter 5 to determine suitable HSV ranges for the black glove. These ranges are loaded by Handy prior to executing the steps shown in Figure 2 to obtain the hand’s contour, its COG, and orientation relative to the horizontal.
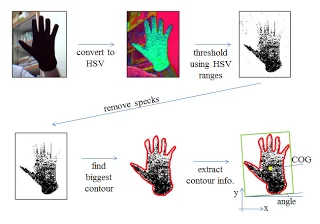
The various stages in Figure 2 are almost identical to those carried out by the ColorRectDetector.findRect() method in section 4.1 of chapter 5. However, Handy continues processing, employing a convex hull and convexity defects to locate and label the fingertips within the hand contour. These additional steps are shown in Figure 3.
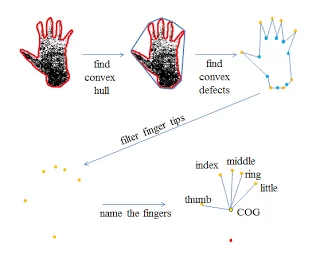
The hull and defects are obtained from the contour with standard OpenCV operations, which I’ll explain below. However, the final step of naming the fingers utilizes a rather hacky strategy that assumes the contour’s defects are for an out-stretched left hand. The thumb and index finger are located based on their angular position relative to the COG, and the other fingers are identified based on their position relative to those fingers. This process is rather fragile, and can easily become confused, as shown in Figure 4.
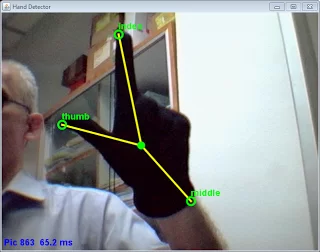
Nevertheless, the technique is fairly reliable, usually identifying at least the thumb and index finger irrespective of the hand’s orientation, which should be enough for basic gesture processing. However, the application doesn’t identify gestures, which will hopefully be the subject of a later chapter.
Class diagrams for Handy are shown in Figure 5, with only the public methods listed.
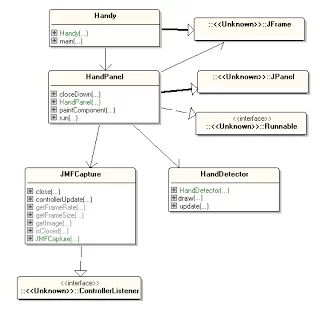
The top-levels of Handy parallel those of the BlobsDrumming application in chapter 5 (e.g. see chapter 5’s Figure 11), with the Handy class managing the JFrame and HandPanel displaying the annotated webcam image. The image analyses summarized in Figures 2 and 3 are performed by the HandDetector class, which is passed the current webcam snap via a call to update(). It draws the current labeled fingertips, COG, and connecting lines when HandPanel calls HandDetector.draw().
1. Analyzing the Webcam Image
The update() method is essentially a series of calls that implement Figures 2 and 3.
01 02 03 04 05 06 07 08 09 10 11 12 13 14 15 16 17 18 19 20 21 22 23 24 25 26 27 28 29 30 31 32 33 34 35 36 37 38 39 40 41 42 43 44 45 46 47 48 49 | // globalsprivate static final int IMG_SCALE = 2; // scaling applied to webcam image// HSV ranges defining the glove colorprivate int hueLower, hueUpper, satLower, satUpper, briLower, briUpper;// OpenCV elementsprivate IplImage hsvImg; // HSV version of webcam imageprivate IplImage imgThreshed; // threshold for HSV settings// hand detailsprivate Point cogPt; // center of gravity (COG) of contourprivate int contourAxisAngle; // contour's main axis angle relative to the horiz (in degrees)private ArrayList fingerTips;public void update(BufferedImage im){ BufferedImage scaleIm = scaleImage(im, IMG_SCALE); // reduce the size of the image to make processing faster // convert image format to HSV cvCvtColor(IplImage.createFrom(scaleIm), hsvImg, CV_BGR2HSV); // threshold image using loaded HSV settings for user's glove cvInRangeS(hsvImg, cvScalar(hueLower, satLower, briLower, 0), cvScalar(hueUpper, satUpper, briUpper, 0), imgThreshed); cvMorphologyEx(imgThreshed, imgThreshed, null, null, CV_MOP_OPEN, 1); // erosion followed by dilation on the image to remove // specks of white while retaining the image size CvSeq bigContour = findBiggestContour(imgThreshed); if (bigContour == null) return; extractContourInfo(bigContour, IMG_SCALE); // find the COG and angle to horizontal of the contour findFingerTips(bigContour, IMG_SCALE); // detect the fingertips positions in the contour nameFingers(cogPt, contourAxisAngle, fingerTips);} // end of update() |
update() begins by scaling the supplied webcam image to improve processing speeds. It then converts the picture into HSV format so it can generate a threshold image using the black glove’s HSV ranges. This corresponds to the first line of Figure 2, although the threshold is actually rendered as white pixels against a black background.
The threshold, minus small specks, is passed to findBiggestContour(); the resulting contour is assumed to be the user’s hand in subsequent processing stages. extractContourInfo() analyzes the contour to find the hand’s center-of-gravity (COG), and its orientation relative to the horizontal, which are stored in the cogPt and contourAxisAngle globals. The completion of extractContourInfo() corresponds to the end of Figure 2.
The findFingerTips() method wraps a convex hull around the contour to identify the shape’s defects (the top line of Figure 3), which we assume are the hand’s fingers. After a little filtering to reduce the number of defects, the remaining ones are treated as fingertip coordinates, and stored in the global fingerTips list.
nameFingers() labels the fingers (assuming that the thumb and index finger are on the left side of the hand), completing Figure 3’s stages.
1.1 Finding the Biggest Contour
findBiggestContour() uses the OpenCV function cvFindContours() to create a list of contours. For my binary threshold image, a contour is a region (or blob) of white pixels. Each blob is approximated by a bounding box, and the contour corresponding to the largest box is selected and returned.
01 02 03 04 05 06 07 08 09 10 11 12 13 14 15 16 17 18 19 20 21 22 23 24 25 26 27 28 29 30 31 32 33 34 35 | // globalsprivate static final float SMALLEST_AREA = 600.0f; // ignore smaller contour areasprivate CvMemStorage contourStorage;private CvSeq findBiggestContour(IplImage imgThreshed){ CvSeq bigContour = null; // generate all the contours in the threshold image as a list CvSeq contours = new CvSeq(null); cvFindContours(imgThreshed, contourStorage, contours, Loader.sizeof(CvContour.class), CV_RETR_LIST, CV_CHAIN_APPROX_SIMPLE); // find the largest contour in the list based on bounded box size float maxArea = SMALLEST_AREA; CvBox2D maxBox = null; while (contours != null && !contours.isNull()) { if (contours.elem_size() > 0) { CvBox2D box = cvMinAreaRect2(contours, contourStorage); if (box != null) { CvSize2D32f size = box.size(); float area = size.width() * size.height(); if (area > maxArea) { maxArea = area; bigContour = contours; } } } contours = contours.h_next(); } return bigContour;} // end of findBiggestContour() |
cvFindContours() can return different types of contours, collected together in different kinds of data structures. I generate the simplest kind of contours, storing them in a linear list which can be searched with a while loop.
After some experimentation, I placed a lower bound on the bounded box size of 600 square pixels which filters out small boxes surrounding patches of image noise. This means that findBiggestContour() may return null if it doesn’t find a large enough box.
1.2 Calculating the COG and Horizontal Angle
The next step shown in Figure 2 is to find the COG and angle to the horizontal of the hand contour by calling extractContourInfo(). This is where the code in HandDetector starts to part company from the analysis carried out by ColorRectDetector.findRect() in chapter 5. In section 4.2 of that chapter, the enclosing box around the contour is utilized to obtain a center and orientation. This is adequate because the underlying shape is a rectangular card, and so the contour and box are almost identical. However, a bounding box around a hand can easily have a very different COG or angle from the hand itself; in this case, it’s necessary to directly analyze the hand contour rather than a bounding box, by utilizing moments.
I used spatial moments back in chapter 3 to find the COG of a binary image. The same technique can be applied to a contour to find its center (or centroid). I can also calculate second order mixed moments, which give information about the spread of pixels around the centroid. Second order moments can be combined to return the orientation (or angle) of the contour’s major axis relative to the x-axis.
Referring back to the OpenCV moments notation from chapter 3, the m() moments function is defined as:
![]()
The function takes two arguments, p and q, which are used as powers for x and y. The I() function is the intensity for a pixel defined by its (x, y) coordinate. n is the number of pixels that make up the shape.
If I consider a contour like the one in Figure 6, then θ is the angle of its major axis to the horizontal, with the +y-axis pointing downwards.
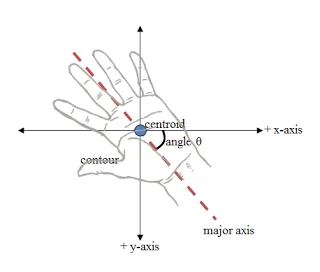
In terms of the m() function, it can be shown that:
![]()
The extractContourInfo() method shown below uses spatial moments to obtain the contour’s centroid, and cvGetCentralMoment() to calculate the major axis angle according to the above equation; these results are stored in the globals cogPt and contourAxisAngle for use later.
01 02 03 04 05 06 07 08 09 10 11 12 13 14 15 16 17 18 19 20 21 22 23 24 25 26 27 28 29 30 31 32 33 34 35 36 37 38 39 40 41 42 43 44 45 46 47 48 49 50 51 52 53 54 55 56 57 58 59 60 61 62 63 64 65 66 67 68 69 70 71 72 73 74 75 76 77 78 79 | // globalsprivate Point cogPt; // center of gravity (COG) of contourprivate int contourAxisAngle; // contour's main axis angle relative to horizontal (in degrees)private ArrayList fingerTips;private void extractContourInfo(CvSeq bigContour, int scale){ CvMoments moments = new CvMoments(); cvMoments(bigContour, moments, 1); // center of gravity double m00 = cvGetSpatialMoment(moments, 0, 0) ; double m10 = cvGetSpatialMoment(moments, 1, 0) ; double m01 = cvGetSpatialMoment(moments, 0, 1); if (m00 != 0) { // calculate center int xCenter = (int) Math.round(m10/m00)*scale; int yCenter = (int) Math.round(m01/m00)*scale; cogPt.setLocation(xCenter, yCenter); } double m11 = cvGetCentralMoment(moments, 1, 1); double m20 = cvGetCentralMoment(moments, 2, 0); double m02 = cvGetCentralMoment(moments, 0, 2); contourAxisAngle = calculateTilt(m11, m20, m02); // deal with hand contour pointing downwards /* uses fingertips information generated on the last update of the hand, so will be out-of-date */ if (fingerTips.size() > 0) { int yTotal = 0; for(Point pt : fingerTips) yTotal += pt.y; int avgYFinger = yTotal/fingerTips.size(); if (avgYFinger > cogPt.y) // fingers below COG contourAxisAngle += 180; } contourAxisAngle = 180 - contourAxisAngle; /* this makes the angle relative to a positive y-axis that runs up the screen */} // end of extractContourInfo()private int calculateTilt(double m11, double m20, double m02){ double diff = m20 - m02; if (diff == 0) { if (m11 == 0) return 0; else if (m11 > 0) return 45; else // m11 < 0 return -45; } double theta = 0.5 * Math.atan2(2*m11, diff); int tilt = (int) Math.round( Math.toDegrees(theta)); if ((diff > 0) && (m11 == 0)) return 0; else if ((diff < 0) && (m11 == 0)) return -90; else if ((diff > 0) && (m11 > 0)) // 0 to 45 degrees return tilt; else if ((diff > 0) && (m11 < 0)) // -45 to 0 return (180 + tilt); // change to counter-clockwise angle else if ((diff < 0) && (m11 > 0)) // 45 to 90 return tilt; else if ((diff < 0) && (m11 < 0)) // -90 to -45 return (180 + tilt); // change to counter-clockwise angle System.out.println("Error in moments for tilt angle"); return 0;} // end of calculateTilt() |
Moments in OpenCV are explained in depth in ‘Simple Image Analysis by Moments’ by Johannes Kilian at http://public.cranfield.ac.uk/c5354/teaching/dip/opencv/SimpleImageAnalysisbyMoments.pdf. The code inside calculateTilt() is based on the special cases for θ listed in Table 1 of Kilian’s paper.
Unfortunately, the axis angle doesn’t distinguish between a hand with fingers pointing upwards and one facing down, and so it’s necessary to examine the relative position of the fingertips with respect to the COG to decide whether the angle should be adjusted. The problem is that this information isn’t available until after the hand contour’s convex hull has been examined for defects, which occurs after extractContourInfo() has finished.
My solution is to use the fingertip coordinates calculated in the previous call to update() which analyzed the webcam frame before the current one. The data will be out-of-date, but the hand won’t have moved much in the 200 ms interval between snaps.
1.3 Finding the Fingertips
Identifying the fingertips is carried out in the first row of Figure 3; in the code, a convex hull is wrapped around the contour by OpenCV’s cvConvexHull2() and this polygon is compared to the contour by cvConvexityDefects() to find its defects.
Hull creation and defect analysis are speeded up by utilizing a low-polygon approximation of the contour rather than the original.
These stages are performed in the first half of the findFingerTips() method:
01 02 03 04 05 06 07 08 09 10 11 12 13 14 15 16 17 18 19 20 21 22 23 24 25 26 27 28 29 30 31 32 33 34 35 36 37 38 39 40 41 42 43 44 45 46 47 48 49 50 51 52 53 54 55 56 | // globalsprivate static final int MAX_POINTS = 20; // max number of points stored in an array// OpenCV elementsprivate CvMemStorage contourStorage, approxStorage, hullStorage, defectsStorage;// defects data for the hand contourprivate Point[] tipPts, foldPts; private float[] depths;private void findFingerTips(CvSeq bigContour, int scale){ CvSeq approxContour = cvApproxPoly(bigContour, Loader.sizeof(CvContour.class), approxStorage, CV_POLY_APPROX_DP, 3, 1); // reduce number of points in the contour CvSeq hullSeq = cvConvexHull2(approxContour, hullStorage, CV_COUNTER_CLOCKWISE, 0); // find the convex hull around the contour CvSeq defects = cvConvexityDefects(approxContour, hullSeq, defectsStorage); // find the defect differences between the contour and hull int defectsTotal = defects.total(); if (defectsTotal > MAX_POINTS) { System.out.println("Processing " + MAX_POINTS + " defect pts"); defectsTotal = MAX_POINTS; } // copy defect information from defects sequence into arrays for (int i = 0; i < defectsTotal; i++) { Pointer pntr = cvGetSeqElem(defects, i); CvConvexityDefect cdf = new CvConvexityDefect(pntr); CvPoint startPt = cdf.start(); tipPts[i] = new Point( (int)Math.round(startPt.x()*scale), (int)Math.round(startPt.y()*scale)); // array contains coords of the fingertips CvPoint endPt = cdf.end(); CvPoint depthPt = cdf.depth_point(); foldPts[i] = new Point( (int)Math.round(depthPt.x()*scale), (int)Math.round(depthPt.y()*scale)); //array contains coords of the skin fold between fingers depths[i] = cdf.depth()*scale; // array contains distances from tips to folds } reduceTips(defectsTotal, tipPts, foldPts, depths);} // end of findFingerTips() |
The latter half of findFingerTips() extracts the tip and fold coordinates and depths from the defects sequence. The earlier call to the convex hull method, cvConvexHull2(), with a CV_COUNTER_CLOCKWISE argument means that the coordinates will be stored in a counter-clockwise order, like that of Figure 7.
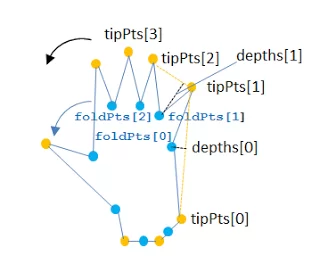
The fingertips are stored in a tipPts[] array, the finger folds (the indentations between the fingers) in foldPts[], and their depths in depths[].
As Figure 7 suggests, the analysis often generates too many defects, and so reduceTips() is called at the end of findFingerTips(). It applies two simple tests to filter out defects that are unlikely to be fingertips – it discards points with shallow defect depths, and coordinates with too great an angle between their neighboring fold points. Examples of both are shown in Figure 8.

reduceTips() stores the remaining tip points in the global fingerTips list:
01 02 03 04 05 06 07 08 09 10 11 12 13 14 15 16 17 18 19 20 21 22 23 24 25 26 27 28 29 30 31 32 33 34 35 36 37 38 39 | // globalsprivate static final int MIN_FINGER_DEPTH = 20;private static final int MAX_FINGER_ANGLE = 60; // degreesprivate ArrayList fingerTips;private void reduceTips(int numPoints, Point[] tipPts, Point[] foldPts, float[] depths){ fingerTips.clear(); for (int i=0; i < numPoints; i++) { if (depths[i] < MIN_FINGER_DEPTH) // defect too shallow continue; // look at fold points on either side of a tip int pdx = (i == 0) ? (numPoints-1) : (i - 1); // predecessor of i int sdx = (i == numPoints-1) ? 0 : (i + 1); // successor of i int angle = angleBetween(tipPts[i], foldPts[pdx], foldPts[sdx]); if (angle >= MAX_FINGER_ANGLE) continue; // angle between finger and folds too wide // this point is probably a fingertip, so add to list fingerTips.add(tipPts[i]); }} // end of reduceTips()private int angleBetween(Point tip, Point next, Point prev)// calculate the angle between the tip and its neighboring folds// (in integer degrees){ return Math.abs( (int)Math.round( Math.toDegrees( Math.atan2(next.x - tip.x, next.y - tip.y) - Math.atan2(prev.x - tip.x, prev.y - tip.y)) ));} |
1.4 Naming the Fingers
nameFingers() uses the list of fingertip coordinates, and the contour’s COG and axis angle to label the fingers in two steps. First, it calls labelThumbIndex() to label the thumb and index finger based on their likely angles relative to the COG, assuming that they are on the left side of the hand. nameFingers() attempts to label the other fingers in labelUnknowns(), based on their known order relative to the thumb and index finger.
01 02 03 04 05 06 07 08 09 10 11 12 13 14 | // globalsprivate ArrayList namedFingers;private void nameFingers(Point cogPt, int contourAxisAngle, ArrayList fingerTips){ // reset all named fingers to unknown namedFingers.clear(); for (int i=0; i < fingerTips.size(); i++) namedFingers.add(FingerName.UNKNOWN); labelThumbIndex(fingerTips, namedFingers); labelUnknowns(namedFingers);} // end of nameFingers() |
The Finger IDs and their relative order are maintained in a FingerName enumeration:
01 02 03 04 05 06 07 08 09 10 11 12 13 14 15 16 17 18 19 20 21 22 | public enum FingerName { LITTLE, RING, MIDDLE, INDEX, THUMB, UNKNOWN; public FingerName getNext() { int nextIdx = ordinal()+1; if (nextIdx == (values().length)) nextIdx = 0; return values()[nextIdx]; } // end of getNext() public FingerName getPrev() { int prevIdx = ordinal()-1; if (prevIdx < 0) prevIdx = values().length-1; return values()[prevIdx]; } // end of getPrev()} // end of FingerName enum |
One of the possible finger names is UNKNOWN, which is used to label all the fingertips prior to the calls to the naming methods.
labelThumbIndex() attempts to label the thumb and index fingers based on the angle ranges illustrated in Figure 9.
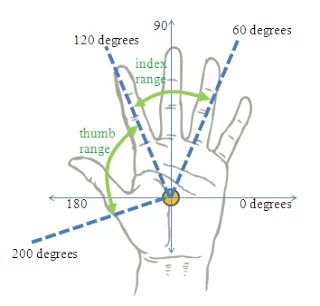
The index finger can turn between 60 and 120 degrees around the COG, while the thumb can move between 120 and 200 degrees. I arrived at these angles through trial-and-error, and they assume that the hand is orientated straight up.
labelThumbIndex() also assumes that the thumb and index fingers will most likely be stored at the end of the fingerTips list, since the contour hull was built in a counter-clockwise order. It therefore increases its chances of matching against the right defects by iterating backwards through the list.
01 02 03 04 05 06 07 08 09 10 11 12 13 14 15 16 17 18 19 20 21 22 23 24 25 26 27 28 29 30 31 32 33 34 35 | // globalsprivate static final int MIN_THUMB = 120; // angle rangesprivate static final int MAX_THUMB = 200;private static final int MIN_INDEX = 60;private static final int MAX_INDEX = 120;// hand detailsprivate Point cogPtprivate int contourAxisAngle; private void labelThumbIndex(ArrayList fingerTips, ArrayList nms){ boolean foundThumb = false; boolean foundIndex = false; int i = fingerTips.size()-1; while ((i >= 0)) { int angle = angleToCOG(fingerTips.get(i), cogPt, contourAxisAngle); // check for thumb if ((angle <= MAX_THUMB) && (angle>MIN_THUMB) && !foundThumb) { nms.set(i, FingerName.THUMB); foundThumb = true; } // check for index if ((angle <= MAX_INDEX) && (angle > MIN_INDEX) && !foundIndex) { nms.set(i, FingerName.INDEX); foundIndex = true; } i--; }} // end of labelThumbIndex() |
angleToCOG() calculates the angle of a fingertip relative to the COG, remembering to factor in the contour axis angle so that the hand is orientated straight up.
01 02 03 04 05 06 07 08 09 10 | private int angleToCOG(Point tipPt, Point cogPt, int contourAxisAngle){ int yOffset = cogPt.y - tipPt.y; // make y positive up screen int xOffset = tipPt.x - cogPt.x; double theta = Math.atan2(yOffset, xOffset); int angleTip = (int) Math.round( Math.toDegrees(theta)); return angleTip + (90 - contourAxisAngle); // this ensures that the hand is orientated straight up} // end of angleToCOG() |
labelUnknowns() is passed a list of finger names which hopefully contains THUMB and INDEX at certain positions and UNKNOWNs everywhere else. Using a named finger as a starting point, the UNKNOWNs are changed to finger names based on their ordering in the FingerName enumeration.
01 02 03 04 05 06 07 08 09 10 11 12 13 | private void labelUnknowns(ArrayList nms){ // find first named finger int i = 0; while ((i < nms.size()) && (nms.get(i) == FingerName.UNKNOWN)) i++; if (i == nms.size()) // no named fingers found, so give up return; FingerName name = nms.get(i); labelPrev(nms, i, name); // fill-in backwards labelFwd(nms, i, name); // fill-in forwards} // end of labelUnknowns() |
labelPrev() and labelFwd() differ only in the direction they move through the list of names. labelPrev() moves backwards trying to change UNKNOWNS to named fingers, but only if the name hasn’t already been assigned to the list.
2. Drawing the Named Fingers
The analysis performed by update() will result in a list of fingertip points (in the fingerTips global), an associated list of named fingers (in namedFingers), and a contour COG and axis angle. All of these, apart from the angle, are utilized by draw() to add named finger labels to the webcam image, as shown in Figure 1 and Figure 10 below.
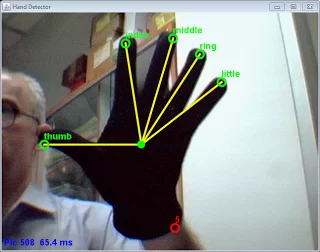
An unknown finger ‘tip’ (labeled as UNKNOWN in namedFingers) is drawn as a red circle.
01 02 03 04 05 06 07 08 09 10 11 12 13 14 15 16 17 18 19 20 21 22 23 24 25 26 27 28 29 30 31 32 33 34 35 36 37 38 39 40 | // globalsprivate Point cogPt;private ArrayList fingerTips;private ArrayList namedFingers;public void draw(Graphics2D g2d){ if (fingerTips.size() == 0) return; g2d.setRenderingHint(RenderingHints.KEY_ANTIALIASING, RenderingHints.VALUE_ANTIALIAS_ON); // line smoothing g2d.setPaint(Color.YELLOW); g2d.setStroke(new BasicStroke(4)); // thick yellow pen // label tips in red or green, and draw lines to named tips g2d.setFont(msgFont); for (int i=0; i < fingerTips.size(); i++) { Point pt = fingerTips.get(i); if (namedFingers.get(i) == FingerName.UNKNOWN) { g2d.setPaint(Color.RED); // unnamed fingertip is red g2d.drawOval(pt.x-8, pt.y-8, 16, 16); g2d.drawString("" + i, pt.x, pt.y-10); // label with a digit } else { // draw yellow line to the named fingertip from COG g2d.setPaint(Color.YELLOW); g2d.drawLine(cogPt.x, cogPt.y, pt.x, pt.y); g2d.setPaint(Color.GREEN); // named fingertip is green g2d.drawOval(pt.x-8, pt.y-8, 16, 16); g2d.drawString(namedFingers.get(i).toString().toLowerCase(), pt.x, pt.y-10); } } // draw COG g2d.setPaint(Color.GREEN); g2d.fillOval(cogPt.x-8, cogPt.y-8, 16, 16);} // end of draw() |
3. Gesture Detection
The Handy application stops short at converting the named fingertips into gestures, which would require an analysis of how the fingers move through space over time.
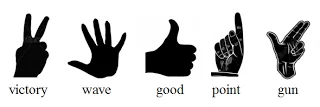
Preliminary tests show that Handy can only identify gestures reliably when they involve an outstretched thumb and/or index finger, perhaps combined with other fingers. Gestures of this type include ‘victory’, ‘wave’, ‘good’, ‘point’, and ‘gun’ shown in Figure 11.
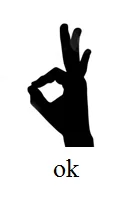
A common gesture that cannot be detected by Handy is ‘ok’ (see Figure 12) because it requires the fingers be brought together, which cannot be detected solely in terms of contour defects.
Reference: Hand and Finger Detection using JavaCV from our JCG partner Attila-Mihaly Balazs at the Java Advent Calendar blog.






i have got very much idea from these codes but i required these codes for opencv 2.1 so, plz… help me. & thanks
Please send the project in ny email wijayamerta@gmail.com
Because i can this your project for my refrens on my last project at my school
sir i saw you code and i am executing the code in netbeans by in that i am getting a exception can u please check it and let me know what could be the problem Exception in thread “main” java.lang.UnsatisfiedLinkError: no jniopencv_objdetec t in java.library.path at java.lang.ClassLoader.loadLibrary(Unknown Source) at java.lang.Runtime.loadLibrary0(Unknown Source) at java.lang.System.loadLibrary(Unknown Source) at com.googlecode.javacpp.Loader.loadLibrary(Loader.java:711) at com.googlecode.javacpp.Loader.load(Loader.java:586) at com.googlecode.javacpp.Loader.load(Loader.java:540) at com.googlecode.javacv.cpp.opencv_objdetect.(opencv_objdetect. java:91) at java.lang.Class.forName0(Native Method) at java.lang.Class.forName(Unknown Source) at com.googlecode.javacpp.Loader.load(Loader.java:561) at Handy.(Handy.java:36) at Handy.main(Handy.java:58) Caused by: java.lang.UnsatisfiedLinkError: C:\Users\maxpro\AppData\Local\Temp\ja vacpp12427852476568\jniopencv_objdetect.dll: Can’t find dependent libraries at java.lang.ClassLoader$NativeLibrary.load(Native Method) at java.lang.ClassLoader.loadLibrary0(Unknown Source) at java.lang.ClassLoader.loadLibrary(Unknown Source) at java.lang.Runtime.load0(Unknown Source) at java.lang.System.load(Unknown Source) at… Read more »
Did you find a solution to this problem?
have you been resolved this problem? i have it too
Please send the project in code in my email malisampats@gmail.com
Because this project code is refering for me
Can you send me this project code, please?. my email a_caliskan_42@windowslive.com
Hi, thanks for tutorial.
Can u send the project code on my email tarasxmelko@gmail.com
Thanks
I tried to implement the code but getting problem in finding fingerTip. Please can you send me the same for reference.
Great tutorial!
Can you send me the project code to my email? mt29@rice.edu
thanks for the tuto..
can you plss send the code to my email yogibagadul@gmail.com
thank u for the tutorial, could you send the code to my email roaa1993.5@gmail.com
Can you please send the code to my email?
will you please send me the code for this to my email? smithandrewscott@gmail.com
plzzz i need the code project plzzzzzzzzzzzzzzzzzzzzzzzzzzzzzzzzzzzzzzzzzz
Helpful tutorial.I need this project source code in opencv python.Can you help me?.
Please send me the code of the project at akithebest@live.in thank u……
Please send me the code at swathilaksmi.ramakrishnan@gmail.com
Hi thanks a lot for your explanation please can you send project to my mail omererkanomeroglu@gmail.com
Please send me the code on abundavia@hotmail.com
Nice! pls share your project if can. Email: maksimkondratskiy@gmail.com
It’s for my refrens on my last project at my university.
Excuse me, I found the link above. Tks!
Can you please send me the project code at varun.y.n@gmail.com
Hi!
Thanks a lot for your explanation please can you send project to my mail zunisattar@gmail.com.