Virtual Host + Nginx + Tomcat
In my Virtual Host + Apache httpd server + Tomcat + mod_jk connector post has lots of comments. and i hope everyone like that. But problem is very difficult to install and configure the Apache httpd server with mod_jk connector. Recently i learned nginx. and i walked through the Nginx server as Load balancer. This post is same as Virtual Host + Apache httpd server + Tomcat + mod_jk connector but i am going to replace Apache httpd web server by Nginx.
Why Nginx?
Nginx is also open source web server. its easy to configure and it can handle huge volume of web traffic with minimal memory (RAM) footprint.
Why we need Virtual Host?
In post (Virtual Host in Tomcat) we discussed about how setup the virtual host in Tomcat. Its cost effective technique because only one public IP is enough to host multiple domain. If we have big organization and each department want to host their website in locally in different machine. then how to achieve the virtual host concept?. In this post we will see the how we do this through Nginx.
Problem Scenario:
In big organization they have multiple department, each department want to host their website in different machine. so these websites are accessed locally with different local IP address.
When we mapping to public address then we face the problem. We have two choice either purchase as many public address or Put one server front and delegate these request.
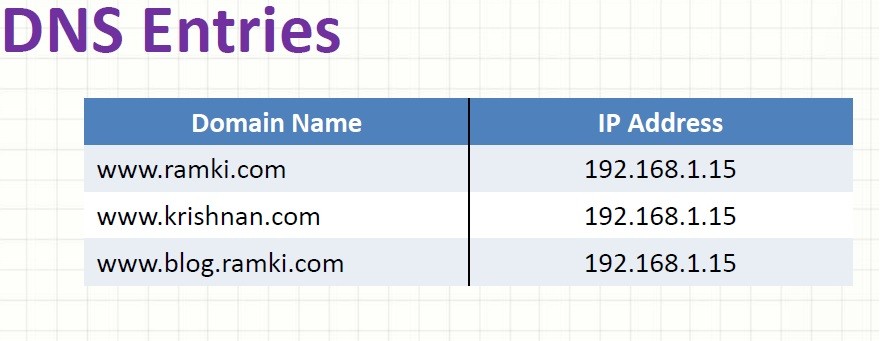
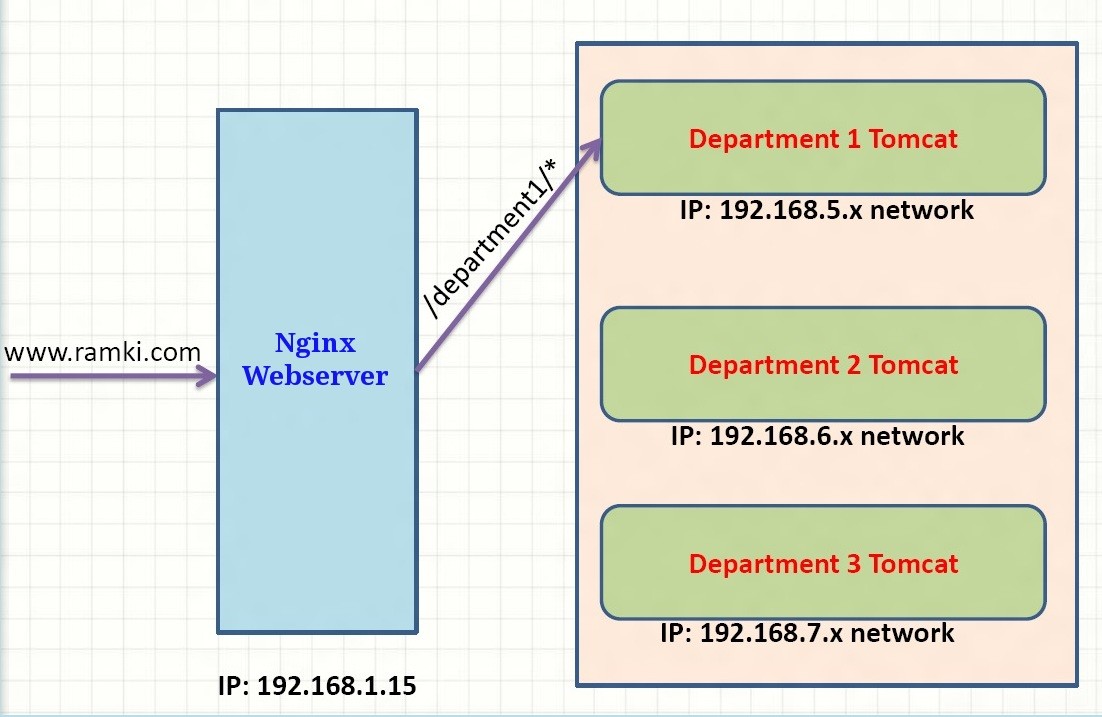
We going to use 2nd option. we put Nginx web server in front of all department servers. so only one public IP is enough. All domain DNS entries are pointed to Nginx server. Here i am using local DNS (/etc/hosts file) for simulating the same environment. so i added these entries in
Then Nginx server delegates these request to corresponding tomcat server. This process is completely transparent from users(browser) perspective. Suppose we consider there are 3 department each one have own tomcat and they deployed own web application in their respective tomcat. (department1,department2,department3). Now URL and corresponding web apps name:
- ramki.com is department1webapp in Tomcat1
- blog.ramki.com is department2webapp in Tomcat2
- www.krishnan.com department3webapp in Tomcat3
In my Virtual Host + Apache httpd server + Tomcat + mod_jk connector post we saw the 4 step to make the virtual host
- Install Apache httpd Web Server
- Install mod_jk connector
- Configure JK Connector
- Configure Apache httpd server apply virtual host concepts
These steps are so complex and very difficult to debug(troubleshoot). Today i m going to use Nginx server.
Install Nginx
We can install nginx through either repository (apt-get,yum) or from source. Here i am building nginx from source from here. Then i extract the compressed file.
./configure --help
The command above shows possible command line options available for compile. In order to configure use this command:
./configure --prefix=/home/ramki/nginx --with-http_ssl_module
As we can see:
–prefix used to specify where nginx server want to install, here i m using my home folder (like /usr/local/nginx)
–with-http_ssl_module here i specified install SSL module (https), its not necessary. If we want secure webpage then this module is needed. Now we compile the source make and install the nginx based on our configuration sudo make install. When installation is done, to start the nginx:
 cd /home/ramki/nginx/sbin
sudo ./nginx
Now open browser and go to http://localhost to get nginx default page. To stop the nginx, we need to pass stop signal via -s option
sudo ./nginx -s stop
Add Virtual Host into Nginx
If we want to add virtual Host then we need to add more server blocks in nginx configuration file(conf/nginx.conf). each server block represent the one virtual host. Each server blocks looks like:
server {
                  listen       80;
                  server_name  blog.ramki.com;

                 location / {
                             proxy_pass http://127.0.0.1:8282;
                 }
        }
here each server blocks bind (listen) the port 80. and this server block is only resonds when the server_name value (here blog.ramki.com) is matched the HTTP header Host field. Location directive matches the pattern to URL. If its matched then location block is executed. proxy_pass directive is delegate the request to back end server. In this dirceive we need to mention back-end server IP and port.
Suppose client make request http://blog.ramki.com then this block is matched the requested resource. so this block is executed then location directive / is matched our URL, so proxy_pass is executed our request is delegated to back-end server.
Like this we need to add another 2 server blocks for other 2 virtual hosts. change the IP address and port number accordingly.
Now everything is works. If u try to access http://ramki.com/department1/ then nginx server select the server block and forward the request to tomcat1. In tomcat1 department1 context root is present so it respond back. Like that we can access http://blog.ramki.com/department2/ and http://www.krishnan.com/department3/ and we will see that URL’s are working fine. But we don’t want to access the website with extra context root. i want to access http://ramki.com/, so we need to use rewrite dirctive to reqrite the URL on the fly in nginx server. In order to do that, we modify the server block (add rewrite line ):
server {
                        listen       80;
                         server_name  blog.ramki.com;


                          rewrite_log  on;

                        error_log    logs/error_ramki.log   notice;
                          rewrite   ^/(.*)$   /department1/$1;

                          location / {
                                    proxy_pass http://127.0.0.1:8282;
                          }
        }
Here we add rewrite directive its capture the URL and modify it (add department1 to URL) and we add 2 optional statement for rewrite log its help for easy debugging, so we add same rewrite line in all server blocks(modify the department).
If client make the request http://ramki.com/ then nginx takes this request and matches with rewrite directive. so its change the URL http://ramki.com/department1/. then its delegates to tomcat1.
I hope everything is clear. If anything is missed then please let me know.
Screen Cast :
Reference: Virtual Host + Nginx + Tomcat from our JCG partner Rama Krishnan at the Ramki Java Blog blog.


EmailOcean is a brand new platform to cater to your email marketing needs. It has been launched under the patronage of KOONK TECHNOLOGIES PVT. LTD. and is one of a kind platform for email marketing. There is not point in harping on about the advantages of email marketing,as at this point in time,email marketing is the sole way of marketing or promoting your product,service or message in an efficient and quick manner. EmailOcean provides you with the following advantages: Highly Economical: It provides promotional emailing at an amazingly low rate of $0.10 per 1000 emails. The customer only pay for… Read more »
Worked like charm. Thanks ram:)
Thank you for sharing this, however I am having difficulties on similar approach to get the subdomain to work. I have installed nginx and tomcat. My site- available (also linked to site-enabled) is as follow server { listen 80; server_name domain.com; location / { root /var/www/html; index index.html; } } server { listen 80; server_name subdomain.domain.com; location / { proxy_pass http://127.0.0.1:8080; proxy_set_header Host $http_host; proxy_set_header X-Real-IP $remote_addr; proxy_set_header X-Forwarded-For $proxy_add_x_forwarded_for; } } I can access domain.com, which is hosted by nginx. But I cannot access subdomain.domain.com which is hosted by tomcat. Although I can access domain.com:8080. My goal is to… Read more »