Today we are going to discuss ExpandableListView in Android. Here I’ve used Eclipse with ADT plugin to build this example. The example is straightforward. Create a new Android Application Project in your workspace. Extend your main Activity from ExpandableListActivity.
For your reference please find the following code :
001 002 003 004 005 006 007 008 009 010 011 012 013 014 015 016 017 018 019 020 021 022 023 024 025 026 027 028 029 030 031 032 033 034 035 036 037 038 039 040 041 042 043 044 045 046 047 048 049 050 051 052 053 054 055 056 057 058 059 060 061 062 063 064 065 066 067 068 069 070 071 072 073 074 075 076 077 078 079 080 081 082 083 084 085 086 087 088 089 090 091 092 093 094 095 096 097 098 099 100 | package com.example.expandablelistviewdemo;import android.app.ExpandableListActivity;import android.content.Context;import android.os.Bundle;import android.view.LayoutInflater;import android.view.View;import android.view.ViewGroup;import android.widget.BaseExpandableListAdapter;import android.widget.TextView;public class MainActivity extends ExpandableListActivity {private static final String arrGroupElements[] = { "Item1", "Item2", "Item3","Item4", "Item5", "Item6", "Item7", "Item8", "Item9" };/*** strings for child elements*/private static final String arrChildElements[][] = {{ "Details1 A","Details1 B", "Details1 C" },{ "Details2 A","Details2 B", "Details2 C" },{ "Details3 A","Details3 B", "Details3 C" },{ "Details4 A","Details4 B", "Details4 C" },{ "Details5 A","Details5 B", "Details5 C" },{ "Details6 A","Details6 B", "Details6 C" },{ "Details7" },{ "Details8" },{ "Details9" }};@Overridepublic void onCreate(Bundle savedInstanceState) {super.onCreate(savedInstanceState);setContentView(R.layout.article_screen);setListAdapter(new ExpandableListAdapter(this));}public class ExpandableListAdapter extends BaseExpandableListAdapter {private Context myContext;public ExpandableListAdapter(Context context) {myContext = context;}@Overridepublic Object getChild(int groupPosition, int childPosition) {return null;}@Overridepublic long getChildId(int groupPosition, int childPosition) {return 0;}@Overridepublic View getChildView(int groupPosition, int childPosition,boolean isLastChild, View convertView, ViewGroup parent) {if (convertView == null) {LayoutInflater inflater = (LayoutInflater) myContext.getSystemService(Context.LAYOUT_INFLATER_SERVICE);convertView = inflater.inflate(R.layout.article_list_child_item_layout, null);}TextView yourSelection = (TextView) convertView.findViewById(R.id.articleContentTextView);yourSelection.setText(arrChildElements[groupPosition][childPosition]);return convertView;}@Overridepublic int getChildrenCount(int groupPosition) {return arrChildElements[groupPosition].length;}@Overridepublic Object getGroup(int groupPosition) {return null;}@Overridepublic int getGroupCount() {return arrGroupElements.length;}@Overridepublic long getGroupId(int groupPosition) {return 0;}@Overridepublic View getGroupView(int groupPosition, boolean isExpanded,View convertView, ViewGroup parent) {if (convertView == null) {LayoutInflater inflater = (LayoutInflater) myContext.getSystemService(Context.LAYOUT_INFLATER_SERVICE);convertView = inflater.inflate(R.layout.article_list_item_layout, null);}TextView groupName = (TextView) convertView.findViewById(R.id.articleHeaderTextView);groupName.setText(arrGroupElements[groupPosition]);return convertView;}@Overridepublic boolean hasStableIds() {return false;}@Overridepublic boolean isChildSelectable(int groupPosition, int childPosition) {return true;}}} |
Now we need to create the layout files. Here we’ll create 3 layout files. The first one for the main layout, the second one for the expandable list item and the third one for the expandable list sub item.
Please find the following codes :
Main Layout file (article_screen.xml)
01 02 03 04 05 06 07 08 09 10 11 12 13 14 15 16 17 18 19 20 21 22 23 24 25 26 27 28 | <?xml version="1.0" encoding="utf-8"?><RelativeLayout xmlns:android="http://schemas.android.com/apk/res/android"android:layout_width="match_parent"android:layout_height="match_parent"android:padding="5dp"><TextView android:id="@+id/articleListHeaderTextView"android:layout_width="wrap_content"android:layout_height="wrap_content"android:layout_alignParentTop="true"android:layout_centerHorizontal="true"android:layout_marginTop="10dp"android:text="List Header"android:textAppearance="?android:attr/textAppearanceMedium"android:textColor="#0585C4"android:textSize="14dp"android:textStyle="bold" /><ExpandableListViewandroid:id="@android:id/list"android:layout_width="match_parent"android:layout_height="match_parent"android:layout_below="@id/articleListHeaderTextView"android:layout_margin="10dp"android:divider="@android:color/darker_gray"android:childDivider="@android:color/white"android:dividerHeight="2dp"android:fadingEdge="none"></ExpandableListView></RelativeLayout> |
Expandable list item layout file (article_list_item_layout.xml)
01 02 03 04 05 06 07 08 09 10 11 12 13 14 15 16 17 18 19 20 21 | <?xml version="1.0" encoding="utf-8"?><RelativeLayout xmlns:android="http://schemas.android.com/apk/res/android"android:layout_width="match_parent"android:layout_height="wrap_content"android:background="#FFFFFFFF"android:paddingBottom="10dp"android:paddingLeft="25dp"android:paddingTop="10dp"><TextView android:id="@+id/articleHeaderTextView"android:layout_width="wrap_content"android:layout_height="wrap_content"android:layout_alignParentLeft="true"android:layout_alignParentTop="false"android:layout_centerHorizontal="false"android:layout_centerVertical="true"android:layout_margin="10dp"android:textAppearance="?android:attr/textAppearanceMedium"android:textColor="#0585C4"android:textSize="12sp"android:textStyle="bold" /></RelativeLayout> |
Expandable list item child layout file(article_list_child_item_layout.xml)
01 02 03 04 05 06 07 08 09 10 11 12 13 14 | <?xml version="1.0" encoding="utf-8"?><RelativeLayout xmlns:android="http://schemas.android.com/apk/res/android"android:layout_width="match_parent"android:layout_height="wrap_content"android:background="#FFE4DEDE"android:padding="10dp"><TextView android:id="@+id/articleContentTextView"android:layout_width="wrap_content"android:layout_height="wrap_content"android:layout_alignParentLeft="true"android:layout_alignParentTop="true"android:layout_centerHorizontal="true"android:textColor="#FF000000" /></RelativeLayout> |
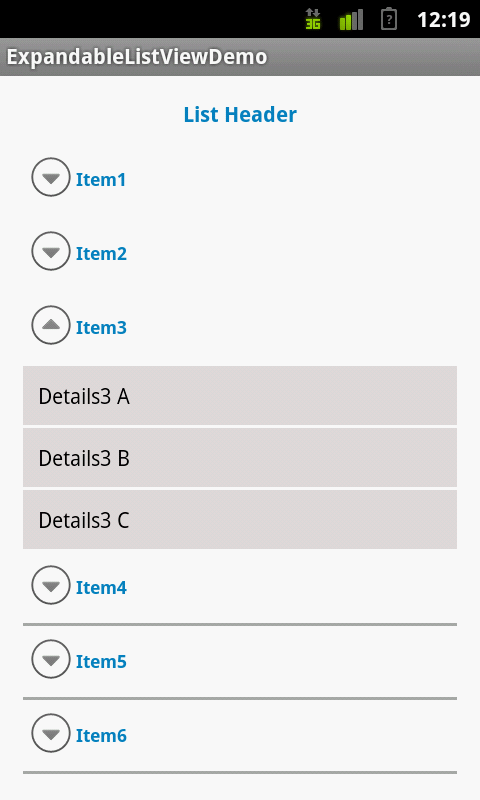
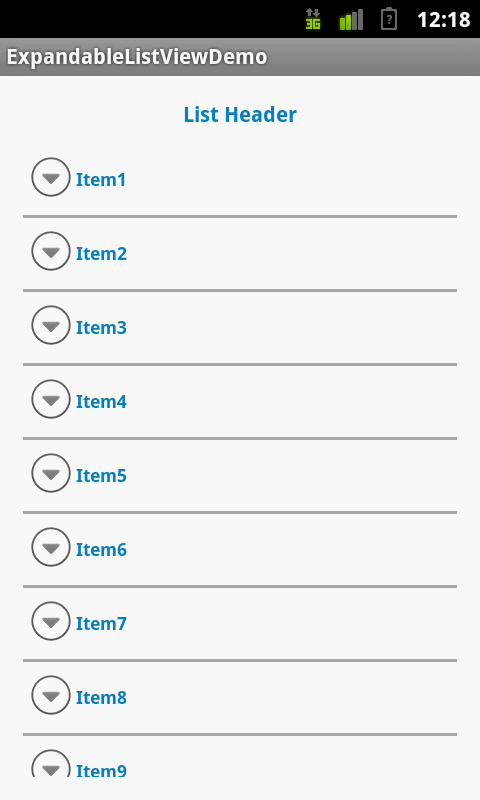
That’s it. Now you can run this application either on emulator or on real device. It should look like the following images :

I followed your tutorial which works perfectly, so thank you. I am trying to pass the child item to a new activity once it has been clicked. However, I cannot figure out how to do this. my intent works, I just dont know what data to pass. can you help me?
Here I’ve written this example using simple String elements which can be passed simply via Intent to other activity using Intent.putExtra(String key, String value). In case you have any other custom object please implement Parcelable interface and send it the same way via intent.