Android fixed Header and Footer with scrollable content layout example
In this tutorial we are going to see how you can create a simple Android Layout with a fixed header and footer but with a scrollable content. You may find this particularly useful when some components of your layout should always be visible to the user despite the number of items to be displayed. Menu bars, option buttons, widgets or simply titles could be such components. For example, when creating an Image Gallery application, you want the user to be able to scroll up and down the image list, but you also want your image processing menu bar to be always visible. This tutorial will provide the basic infrastructure to produce such layouts.
For this tutorial, we will use the following tools in a Windows 64-bit platform:
- JDK 1.7
- Eclipse 4.3 Kepler
- Android SKD 4.3
1. Create a new Android Project
Open Eclipse IDE and go to File -> New -> Project -> Android -> Android Application Project.
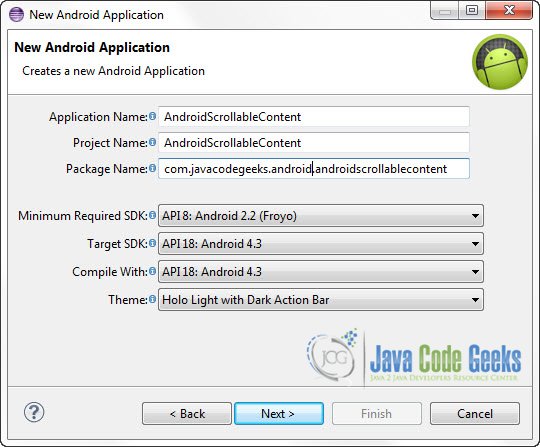
You have to specify the Application Name, the Project Name and the Package name in the appropriate text fields and then click Next.
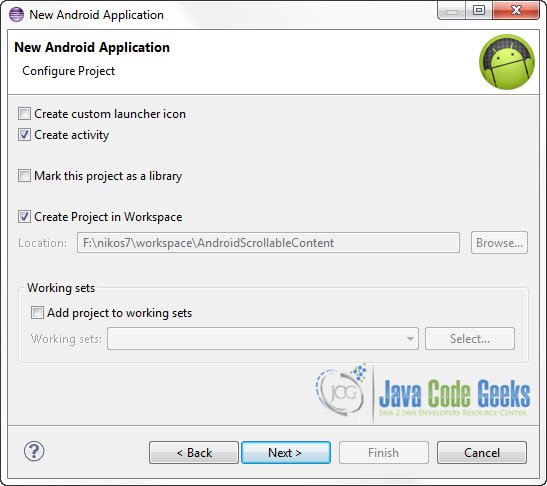
In the next window make sure the “Create activity” option is selected in order to create a new activity for your project, and click Next. This is optional as you can create a new activity after creating the project, but you can do it all in one step.
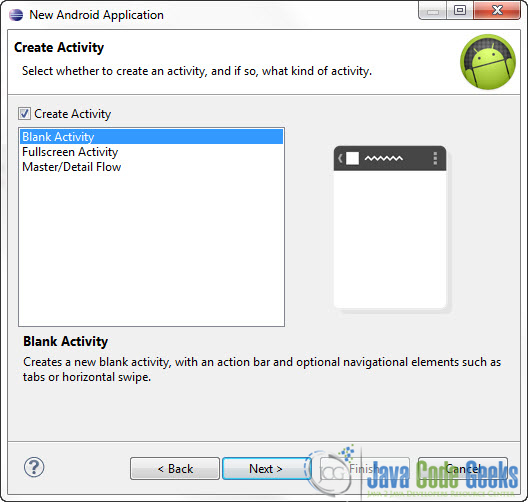
Select “BlankActivity” and click Next.
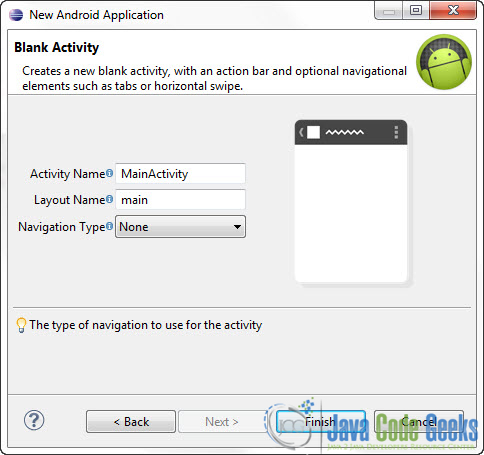
You will be asked to specify some information about the new activity. In the Layout Name text field you have to specify the name of the file that will contain the layout description of your app. In our case the file res/layout/main.xml will be created. Then, click Finish.
2. Creating the layout of the Main Activity
Open res/layout/main.xml file :
And paste the following code :
main.xml:
001 002 003 004 005 006 007 008 009 010 011 012 013 014 015 016 017 018 019 020 021 022 023 024 025 026 027 028 029 030 031 032 033 034 035 036 037 038 039 040 041 042 043 044 045 046 047 048 049 050 051 052 053 054 055 056 057 058 059 060 061 062 063 064 065 066 067 068 069 070 071 072 073 074 075 076 077 078 079 080 081 082 083 084 085 086 087 088 089 090 091 092 093 094 095 096 097 098 099 100 101 102 103 104 105 106 107 108 109 110 111 112 113 114 115 116 117 118 119 120 121 122 123 124 125 126 127 128 129 130 131 132 133 134 135 136 137 138 139 140 141 142 143 144 145 146 147 148 149 150 151 152 | <?xml version="1.0" encoding="utf-8"?> android:layout_width="match_parent" android:layout_height="match_parent" > <!-- Header aligned to top --> <RelativeLayout android:id="@+id/header" android:layout_width="match_parent" android:layout_height="wrap_content" android:layout_alignParentTop="true" android:background="#FC9" android:gravity="center" > <TextView android:layout_width="wrap_content" android:layout_height="wrap_content" android:layout_margin="5dp" android:text="Fixed Header" android:textColor="#000" android:textSize="20sp" /> </RelativeLayout> <!-- Footer aligned to bottom --> <RelativeLayout android:id="@+id/footer" android:layout_width="match_parent" android:layout_height="wrap_content" android:layout_alignParentBottom="true" android:background="#FC0" android:gravity="center" > <TextView android:layout_width="wrap_content" android:layout_height="wrap_content" android:layout_margin="5dp" android:text="Fixed Footer" android:textColor="#000" android:textSize="20sp" /> </RelativeLayout> <!-- Scrollable Item below header and above footer --> <ScrollView android:id="@+id/scrollableContents" android:layout_width="fill_parent" android:layout_height="fill_parent" android:layout_above="@id/footer" android:background="#005" android:layout_below="@id/header" > <LinearLayout android:layout_width="fill_parent" android:layout_height="wrap_content" android:gravity="center_horizontal" android:orientation="vertical" > <TextView android:layout_width="wrap_content" android:layout_height="wrap_content" android:layout_marginBottom="22dp" android:layout_marginTop="22dp" android:text="Item 1" android:textColor="#CCCCCC" android:textSize="19sp" /> <TextView android:layout_width="wrap_content" android:layout_height="wrap_content" android:layout_marginBottom="22dp" android:layout_marginTop="22dp" android:text="Item 2" android:textColor="#CCCCCC" android:textSize="19sp" /> <TextView android:layout_width="wrap_content" android:layout_height="wrap_content" android:layout_marginBottom="22dp" android:layout_marginTop="22dp" android:text="Item 3" android:textColor="#CCCCCC" android:textSize="19sp" /> <TextView android:layout_width="wrap_content" android:layout_height="wrap_content" android:layout_marginBottom="22dp" android:layout_marginTop="22dp" android:text="Item 4" android:textColor="#CCCCCC" android:textSize="19sp" /> <TextView android:layout_width="wrap_content" android:layout_height="wrap_content" android:layout_marginBottom="22dp" android:layout_marginTop="22dp" android:text="Item 5" android:textColor="#CCCCCC" android:textSize="19sp" /> <TextView android:layout_width="wrap_content" android:layout_height="wrap_content" android:layout_marginBottom="22dp" android:layout_marginTop="22dp" android:text="Item 6" android:textColor="#CCCCCC" android:textSize="19sp" /> <TextView android:layout_width="wrap_content" android:layout_height="wrap_content" android:layout_marginBottom="22dp" android:layout_marginTop="22dp" android:text="Item 7" android:textColor="#CCCCCC" android:textSize="19sp" /> <TextView android:layout_width="wrap_content" android:layout_height="wrap_content" android:layout_marginBottom="22dp" android:layout_marginTop="22dp" android:text="Item 8" android:textColor="#CCCCCC" android:textSize="19sp" /> <TextView android:layout_width="wrap_content" android:layout_height="wrap_content" android:layout_marginBottom="22dp" android:layout_marginTop="22dp" android:text="Item 9" android:textColor="#CCCCCC" android:textSize="19sp" /> <TextView android:layout_width="wrap_content" android:layout_height="wrap_content" android:layout_marginBottom="22dp" android:layout_marginTop="22dp" android:text="Item 10" android:textColor="#CCCCCC" android:textSize="19sp" /> </LinearLayout> </ScrollView></RelativeLayout> |
The idea here is very simple. We have two RelativeLayouts, one aligned at the top of the screen, using android:layout_alignParentTop="true" property, and one aligned at the bottom of the screen using android:layout_alignParentBottom="true" property. Then we simply place a ScrollView between these two view using android:layout_above="@id/footer" and android:layout_below="@id/header". These properties will place our ScrollView above the element with id footer and bellow the element with id header.
2. Code the Main Activity
Use the Package Explorer to navigate to the Java file of the Activity you’ve created:
For this example you don’t have to change anything to the auto generated code so you can leave it as it is.
MainActivity.java:
01 02 03 04 05 06 07 08 09 10 11 12 13 14 15 16 17 18 19 20 21 | package com.javacodegeeks.android.androidscrollablecontent;import android.os.Bundle;import android.app.Activity;import android.view.Menu;public class MainActivity extends Activity { @Override protected void onCreate(Bundle savedInstanceState) { super.onCreate(savedInstanceState); setContentView(R.layout.main); } @Override public boolean onCreateOptionsMenu(Menu menu) { // Inflate the menu; this adds items to the action bar if it is present. getMenuInflater().inflate(R.menu.main, menu); return true; }} |
4. Run the application
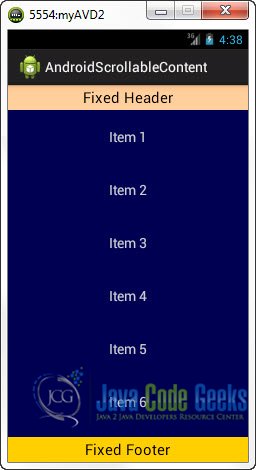
This is the main screen of our Application:
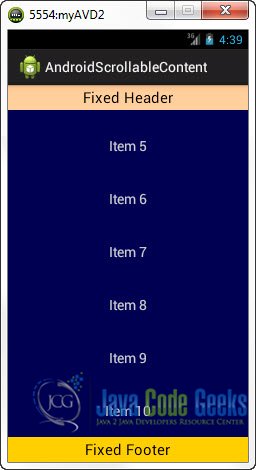
Now, if you scroll down the item list you will see that the header and the footer elements hold their positions.
Making your scrollable contents flexible
In the above code we sort of hard coded the contents of the ScrollView in the main layout of the activity. But you may want to inflate the ScrollView dynamically in your code, using a custom ArrayAdapter for example. Or, more importantly you may want to make this layout reusable to your other activities, each one having their own contents to display.
To achieve that, we are simply going to separate the main layout from the contents of the ScrollView. Go ahead and rename the main.xml file of the previous example to scrollable_contents.xml and simply erase the items from the ScrollView.
scrollable_contents.xml:
01 02 03 04 05 06 07 08 09 10 11 12 13 14 15 16 17 18 19 20 21 22 23 24 25 26 27 28 29 30 31 32 33 34 35 36 37 38 39 40 41 42 43 44 45 46 47 48 49 50 51 52 53 54 55 56 | <?xml version="1.0" encoding="utf-8"?> android:layout_width="match_parent" android:layout_height="match_parent" > <!-- Header aligned to top --> <RelativeLayout android:id="@+id/header" android:layout_width="match_parent" android:layout_height="wrap_content" android:layout_alignParentTop="true" android:background="#FC9" android:gravity="center" > <TextView android:layout_width="wrap_content" android:layout_height="wrap_content" android:layout_margin="5dp" android:text="Fixed Header" android:textColor="#000" android:textSize="20sp" /> </RelativeLayout> <!-- Footer aligned to bottom --> <RelativeLayout android:id="@+id/footer" android:layout_width="match_parent" android:layout_height="wrap_content" android:layout_alignParentBottom="true" android:background="#FC0" android:gravity="center" > <TextView android:layout_width="wrap_content" android:layout_height="wrap_content" android:layout_margin="5dp" android:text="Fixed Footer" android:textColor="#000" android:textSize="20sp" /> </RelativeLayout> <!-- Scrollable Item below header and above footer --> <ScrollView android:id="@+id/scrollableContents" android:layout_width="fill_parent" android:layout_height="fill_parent" android:layout_above="@id/footer" android:background="#005" android:layout_below="@id/header" > <!-- Inflate the contents of the ScrollView dynamicaly --> </ScrollView></RelativeLayout> |
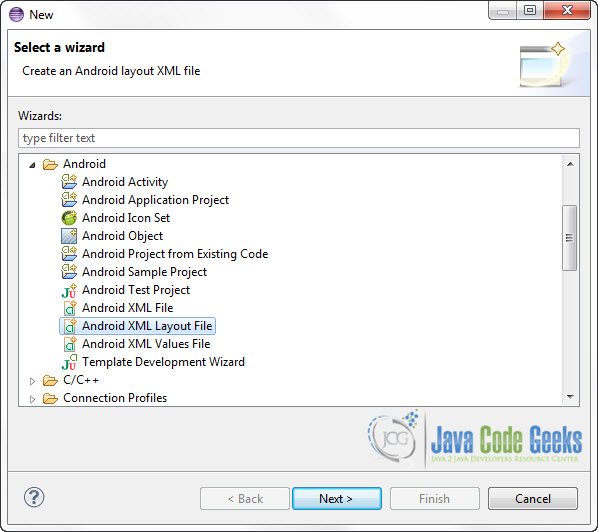
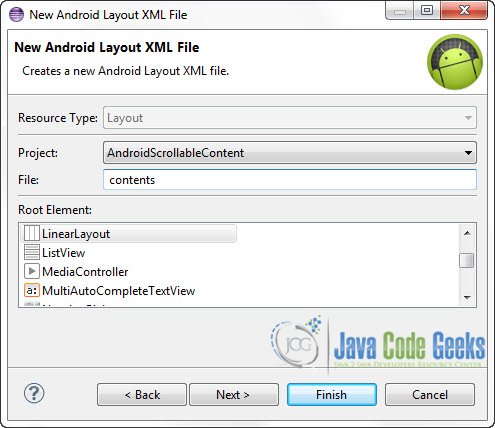
Now you can create a new XML Layout file containing the items you want to fill your ScrollView with. To create a new layout file, go to the Package Explorer and find /res/layout folder. Right Click on the folder -> New -> Other -> Android -> Android XML Layout file:
Put a name for your new layout file and click “Finish”:
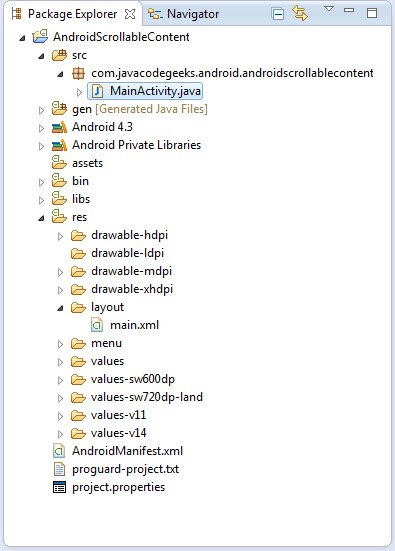
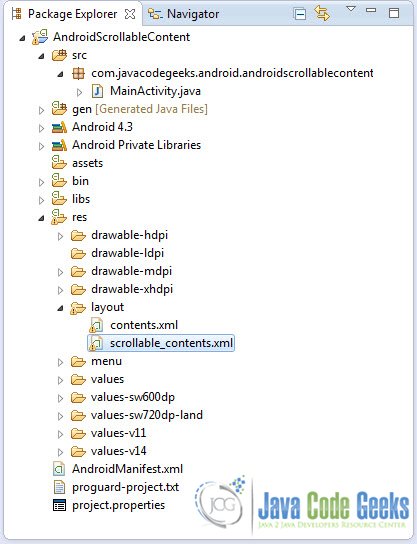
So this is the new Project Structure:
Open contents.xml and put the items you want:
contents.xml:
01 02 03 04 05 06 07 08 09 10 11 12 13 14 15 16 17 18 19 20 21 22 23 24 25 26 27 28 29 30 31 32 33 34 35 36 37 38 39 40 41 42 43 44 45 46 47 48 49 50 51 52 53 54 55 56 57 58 59 60 61 62 63 64 65 66 67 68 69 70 71 72 73 74 75 76 77 78 79 80 81 82 83 84 85 86 87 88 89 90 91 92 93 94 95 96 97 98 | <?xml version="1.0" encoding="utf-8"?> android:layout_width="match_parent" android:layout_height="match_parent" android:gravity="center_horizontal" android:orientation="vertical" > <TextView android:layout_width="wrap_content" android:layout_height="wrap_content" android:layout_marginBottom="22dp" android:layout_marginTop="22dp" android:text="Item 1" android:textColor="#CCCCCC" android:textSize="19sp" /> <TextView android:layout_width="wrap_content" android:layout_height="wrap_content" android:layout_marginBottom="22dp" android:layout_marginTop="22dp" android:text="Item 2" android:textColor="#CCCCCC" android:textSize="19sp" /> <TextView android:layout_width="wrap_content" android:layout_height="wrap_content" android:layout_marginBottom="22dp" android:layout_marginTop="22dp" android:text="Item 3" android:textColor="#CCCCCC" android:textSize="19sp" /> <TextView android:layout_width="wrap_content" android:layout_height="wrap_content" android:layout_marginBottom="22dp" android:layout_marginTop="22dp" android:text="Item 4" android:textColor="#CCCCCC" android:textSize="19sp" /> <TextView android:layout_width="wrap_content" android:layout_height="wrap_content" android:layout_marginBottom="22dp" android:layout_marginTop="22dp" android:text="Item 5" android:textColor="#CCCCCC" android:textSize="19sp" /> <TextView android:layout_width="wrap_content" android:layout_height="wrap_content" android:layout_marginBottom="22dp" android:layout_marginTop="22dp" android:text="Item 6" android:textColor="#CCCCCC" android:textSize="19sp" /> <TextView android:layout_width="wrap_content" android:layout_height="wrap_content" android:layout_marginBottom="22dp" android:layout_marginTop="22dp" android:text="Item 7" android:textColor="#CCCCCC" android:textSize="19sp" /> <TextView android:layout_width="wrap_content" android:layout_height="wrap_content" android:layout_marginBottom="22dp" android:layout_marginTop="22dp" android:text="Item 8" android:textColor="#CCCCCC" android:textSize="19sp" /> <TextView android:layout_width="wrap_content" android:layout_height="wrap_content" android:layout_marginBottom="22dp" android:layout_marginTop="22dp" android:text="Item 9" android:textColor="#CCCCCC" android:textSize="19sp" /> <TextView android:layout_width="wrap_content" android:layout_height="wrap_content" android:layout_marginBottom="22dp" android:layout_marginTop="22dp" android:text="Item 10" android:textColor="#CCCCCC" android:textSize="19sp" /></LinearLayout> |
Code the Main Activity
Now we have to inflate the ScrollView with the items form the contents.xml file. Let’s see how you can do that:
MainActivity.java:
01 02 03 04 05 06 07 08 09 10 11 12 13 14 15 16 17 18 19 | package com.javacodegeeks.android.androidscrollablecontent;import android.app.Activity;import android.os.Bundle;import android.widget.ScrollView;public class MainActivity extends Activity { @Override protected void onCreate(Bundle savedInstanceState) { super.onCreate(savedInstanceState); setContentView(R.layout.scrollable_contents); ScrollView scrollable_contents = (ScrollView) findViewById(R.id.scrollableContents); getLayoutInflater().inflate(R.layout.contents, scrollable_contents); }} |
Run the application
This is the main screen of our Application:
Now, if you scroll down the item list you will see that the header and the footer elements hold their positions.
Download Eclipse Project
This was an Android example on how to create fixed Header and Footer with scrollable content layout. Download the Eclipse Project of this tutorial: AndroidScrollableContent.zip




great,thanks so much.
Really great ideaaaa.thanks a lot
Really Appreciating ..!!!!
Nice tutor sir, thanks :)
Thank So Much Sir.
great!!!!!
nice work
This helps me a lot,i love you man :D thanks a lot
hi.
when landscape to portrait or portrait to landscape, the added views are gone. like on create.
how can we prevent it?
thanks
Very nice tutorial. Thanks very much.
Good Luck!!!
Thanks for providing such a clean structure! It really helped me! Cheers!
when you hide the title bar with
getWindow().setFlags(WindowManager.LayoutParams.FLAG_FULLSCREEN, WindowManager.LayoutParams.FLAG_FULLSCREEN); or android:theme=”@:style/Theme.NoTitleBar”
the header move again when the soft keyboard appear.
This nice!
I want to implement a recycler view with footer . The footer needs to be the last element if the list does not fill up the screen. but if the list fills up and exceeds the screen view then the footer needs to stick at the bottom of screen. CAn anyone help me with this?