Compiling and Running Java Without an IDE
A recent Java subreddit thread called “Compiling Java Packages without IDE” posed the question, “is [there] a command that compiles a group of java files that are inside a package into a separate folder (let’s just call it bin), and how would I go about running the new class files?” The post’s author, kylolink, explains that “When I started out using Java I relied on Eclipse to do all the compiling for me and just worried about writing code.” I have seen this issue many times and, in fact, it’s what prompted my (now 4 years old) blog post GPS Systems and IDEs: Helpful or Harmful? I love the powerful modern Java IDEs and they make my life easier on a daily basis, but there are advantages to knowing how to build and run simple Java examples without them. This post focuses on how to do just that.
In my blog post Learning Java via Simple Tests, I wrote about how I sometimes like to use a simple text editor and command-line tools to write, build, and run simple applications. I have a pretty good idea now how my much “overhead” my favorite Java IDEs require and make an early decision whether the benefits achieved from using the IDE are sufficient to warrant the “overhead.” In most real applications, there’s no question the IDE “overhead” is well worth it. However, for the simplest of example applications, this is not always the case. The rest of this post shows how to build and run Java code without an IDE for these situations.
The Java Code to be Built and Executed
To make this post’s discussion more concrete, I will use some very simple Java classes that are related to each other via composition or inheritance and are in the same named package (not in the unnamed package) called dustin.examples. Two of the classes do not have main functions and the third class, Main.java does have a main function to allow demonstration of running the class without an IDE. The code listings for the three classes are shown next.
Parent.java
package dustin.examples;

public class Parent
{
   @Override
   public String toString()
   {
      return "I'm the Parent.";
   }
}
Child.java
package dustin.examples;

public class Child extends Parent
{
   @Override
   public String toString()
   {
      return "I'm the Child.";
   }
}
Main.java
package dustin.examples;

import static java.lang.System.out;

public class Main
{
   private final Parent parent = new Parent();
   private final Child child = new Child();

   public static void main(final String[] arguments)
   {
      final Main instance = new Main();
      out.println(instance.parent);
      out.println(instance.child);
   }
}
The next screen snapshot shows the directory structure with these class .java source files in place. The screen snapshot shows that the source files are in a directory hierarchy representing the package name (dustin/examples because of package dustin.examples) and that this package-reflecting directory hierarchy is under a subdirectory called src. I have also created classes subdirectory (which is currently empty) to place the compiled .class files because javac will not create that directory when it doesn’t exist.
Building with javac and Running with java
No matter which approach one uses to build Java code (Ant, Maven, Gradle, or IDE), it eventually comes down to javac. The Oracle/Sun-provided javac command-line tool‘s standard options can be seen by running javac -help and additional extension options can be viewed by running javac -help -X. More details on how to apply these options can be found in the tools documentation for javac for Windows or Unix/Linux.
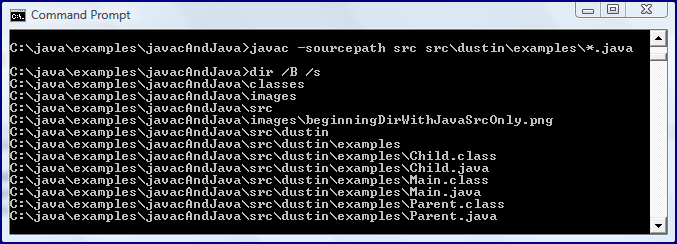
As the javac documentation states, the -sourcepath option can be use to express the directory in which the source files exist. In my directory structure shown in the screen snapshot above, this would mean that, assuming I’m running the javac command from the C:\java\examples\javacAndJava\ directory, I’d need to have something like this in my command: javac -sourcepath src src\dustin\examples\*.java. The next screen snapshot shows the results of this.
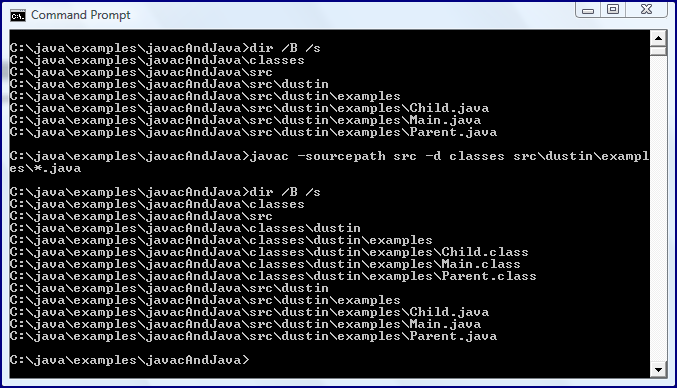
Because we did not specify a destination directory for the .class files, they were placed by default in the same directory as the source .java files from which they were compiled. We can use the -d option to rectify this situation. Our command could be run now, for example, as javac -sourcepath src -d classes src\dustin\examples\*.java. As stated earlier, the specified destination directory (classes) must already exist. When it does, the command will place the .class files in the designated directory as shown in the next screen snapshot.
With the Java source files compiled into the appropriate .class files in the specified directory, we can now run the application using the Java application launcher command line tool java. This is simply done by following the instructions shown by java -help or by the java tools page and specifying the location of the .class files with the -classpath (or -cp) option. Using both approaches to specify that the classes directory is where to look for the .class files is demonstrated in the next screen snapshot. The last argument is the fully qualified (entire Java package) name of the class who has a main function to be executed. The commands demonstrated in the next screen snapshot is java -cp classes dustin.examples.Main and java -classpath classes dustin.examples.Main.
Building and Running with Ant
For the simplest Java applications, it is pretty straightforward to use javac and java to build and execute the application respectively as just demonstrated. As the applications get a bit more involved (such as code existing in more than one package/directory or more complex classpath dependencies on third-party libraries and frameworks), this approach can become unwieldy. Apache Ant is the oldest of the “big three” of Java build tools and has been used in thousands of applications and deployments. As I discussed in a previous blog post, a very basic Ant build file is easy to create, especially if one starts with a template like I outlined in that post.
The next code listing is for an Ant build.xml file that can be use to compile the .java files into .class files and then run the dustin.examples.Main class just like was done above with javac and java.
build.xml
<?xml version="1.0" encoding="UTF-8"?>
<project name="BuildingSansIDE" default="run" basedir=".">
   <description>Building Simple Java Applications Without An IDE</description>

   <target name="compile"
           description="Compile the Java code.">
      <javac srcdir="src"
             destdir="classes"
             debug="true"
      includeantruntime="false" />
   </target>

   <target name="run" depends="compile"
           description="Run the Java application.">
      <java classname="dustin.examples.Main" fork="true">
         <classpath>
           <pathelement path="classes"/>
         </classpath>
      </java>
   </target>
</project>
I have not used Ant properties and not included common targets I typically include (such as “clean” and “javadoc”) to keep this example as simple as possible and to keep it close to the previous example using javac and java. Note also that I’ve included “debug” set to “true” for the javac Ant task because it’s not true in Ant’s default but is true with javac’s default. Not surprisingly, Ant’s javac task and java task closely resemble the command tools javac and java.
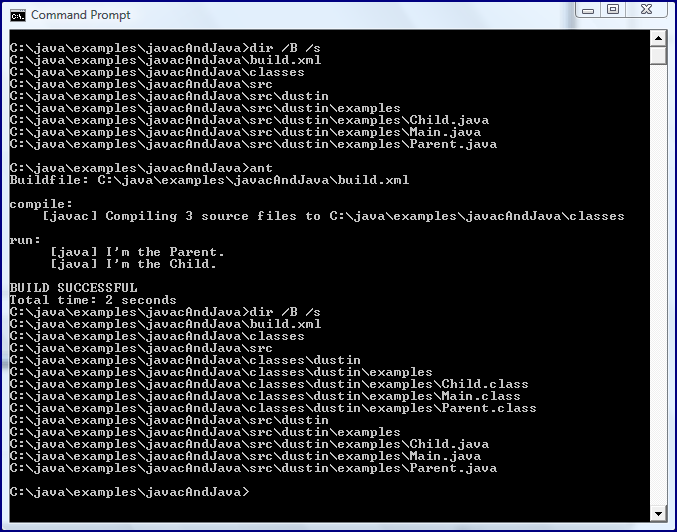
Because I used the default name Ant expects for a build file when it’s not explicitly specified (build.xml) and because I provided the “run” target as the “default” for that build file and because I included “compile” as a dependency to run the “run” target and because Ant was on my environment’s path, all I need to do on the command line to get Ant to compile and run the example is type “ant” in the directory with the build.xml file. This is demonstrated in the next screen snapshot.
Although I demonstrated compiling AND running the simple Java application with Ant, I typically only compile with Ant and run with java (or a script that invokes java if the classpath is heinous).
Building and Running with Maven
Although Ant was the first mainstream Java build tool, Apache Maven eventually gained its own prominence thanks in large part to its adoption of configuration by convention and support for common repositories of libraries. Maven is easiest to use when the code and generated objects conform to its standard directory layout. Unfortunately, my example doesn’t follow this directory structure, but Maven does allow us to override the expected default directory structure. The next code listing is for a Maven POM file that overrides the source and target directories and provides other minimally required elements for a Maven build using Maven 3.2.1.
pom.xml
<project>
   <modelVersion>4.0.0</modelVersion>
   <groupId>dustin.examples</groupId>
   <artifactId>CompilingAndRunningWithoutIDE</artifactId>
   <version>1</version>

   <build>
      <defaultGoal>compile</defaultGoal>
      <sourceDirectory>src</sourceDirectory>
      <outputDirectory>classes</outputDirectory>
      <finalName>${project.artifactId}-${project.version}</finalName>
   </build>
</project>
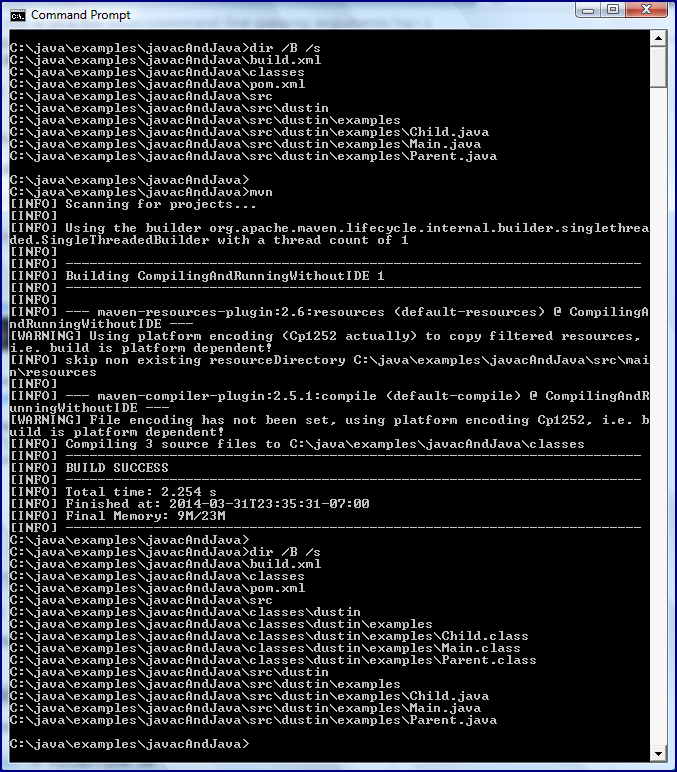
Because the above pom.xml file specifies a “defaultGoal” of “compile” and because pom.xml is the default custom POM file that the Maven executable (mvn) looks for and because the Maven installation’s bin directory is on my path, I only needed to run “mvn” to compile the .class files as indicated in the next screen snapshot.
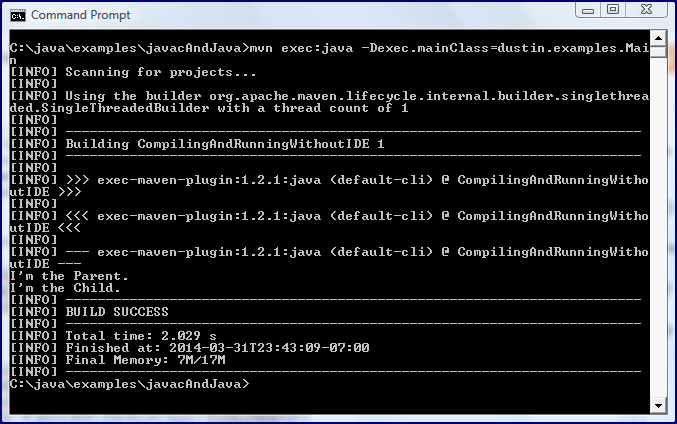
I can also run the compiled application with Maven using the command mvn exec:java -Dexec.mainClass=dustin.examples.Main, which is demonstrated in the next screen snapshot.
As is the case with Ant, I would typically not use Maven to run my simple Java application, but would instead use java on the compiled code (or use a script that invokes java directly for long classpaths).
Building and Running with Gradle
Gradle is the youngest, trendiest, and hippest of the three major Java build tools. I am sometimes skeptical of the substance of something that is trendy, but I have found many things to like about Gradle (written in Groovy instead of XML, built-in Ant support, built-in Ivy support, configuration by convention that is easily overridden, Maven repository support, etc.). The next example shows a Gradle build file that can be used to compile and run the simple application that is the primary example code for this post. It is adapted from the example I presented in the blog post Simple Gradle Java Plugin Customization.
build.gradle
apply plugin: 'java'
apply plugin: 'application'

// Redefine where Gradle should expect Java source files (*.java)
sourceSets {
    main {
        java {
            srcDirs 'src'
        }
    }
}

// Redefine where .class files are written
sourceSets.main.output.classesDir = file("classes")

// Specify main class to be executed
mainClassName = "dustin.examples.Main"

defaultTasks 'compileJava', 'run'
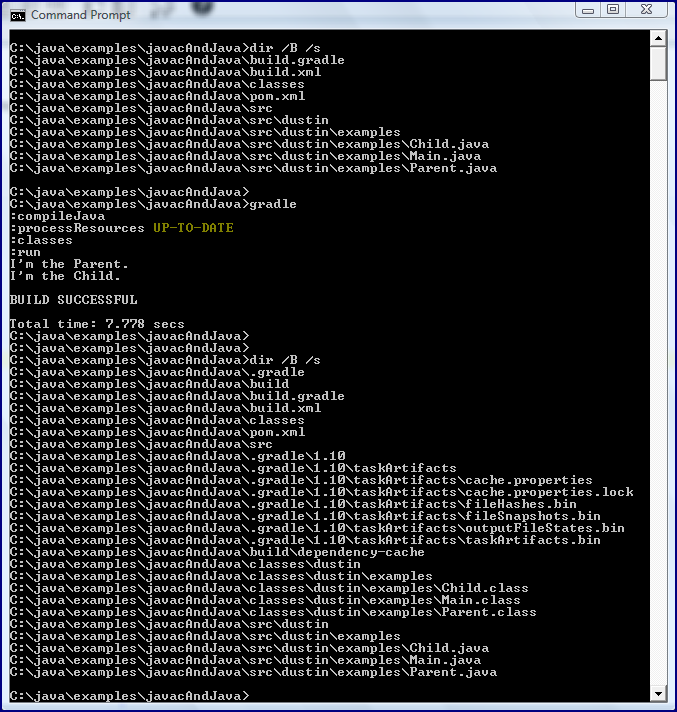
The first two lines of the build.gradle file specify application of the Java plugin and the Application plugin, bringing a bunch of functionality automatically to this build. The definition of “sourceSets” and “sourceSets.main.output.classesDir” allows overriding of Gradle’s Java plugin’s default directories for Java source code and compiled binary classes respectively. The “mainClassName” allows explicit specification of which class should be run as part of the Application plugin. The “defaultTasks” line specifies the tasks to be run by simply typing “gradle” at the command line: ‘compileJava’ is a standard task provided by the Java plugin and ‘run’ is a standard task provided by the Application plugin. Because I named the build file build.gradle and because I specified the default tasks of ‘compileJava’ and ‘run’ and because I have the Gradle installation bin directory on my path, all I needed to do to build and run the examples was to type “gradle” and this is demonstrated in the next screen snapshot.
Even the biggest skeptic has to admit that Gradle build is pretty slick for this simple example. It combines brevity from relying on certain conventions and assumptions with a very easy mechanism for overriding select defaults as needed. The fact that it’s in Groovy rather than XML is also very appealing!
As is the case with Ant and Maven, I tend to only build with these tools and typically run the compiled .class files directly with java or a script that invokes java. By the way, I typically also archive these .class into a JAR for running, but that’s outside the scope of this post.
Conclusion
An IDE is often not necessary for building simple applications and examples and can even be more overhead than it’s worth for the simplest examples. In such a case, it’s fairly easy to apply javac and java directly to build and run the examples. As the examples become more involved, a build tool such as Ant, Maven, or Gradle becomes more appealing. The fact that many IDEs support these build tools means that a developer could transition to the IDE using the build tool created earlier in the process if it was determined that IDE support was needed as the simple application grew into a full-fledged project.
| Reference: | Compiling and Running Java Without an IDE from our JCG partner Dustin Marx at the Inspired by Actual Events blog. |

