How to secure Openfire XMPP server
Introduction
Instant Messaging (IM) or chat is a service used broadly today in many applications like google talk or the more recent google Hangouts, Yahoo! Talk etc. It is based on the Extensible Messaging and Presence Protocol (XMPP) or Jabber protocol. Usually, a client-server architecture is followed, where specially-built XMPP clients exchange XMPP messages with XMPP servers who propagate the messages to other clients. Chatrooms are allowed where many clients share a common view to talk, rosters that allow your ‘friends’ to see your status, i.e. your availability etc. If you want to learn more about the XMPP protocol, take a look at reference [2].
Openfire is an XMPP enabled real-time-collaboration (RTC) server provided by Ignite Realtime under the Open Source GPL. In this article we will focus on how to make Openfire to exchange secure messages. We will show how to allow clients to exchange XMPP messages with Openfire in a secure (aka encrypted) way. We will go one step further and show how to exchange XMPP messages among Openfire servers in a secure way. If the destination client is not served by the local Openfire server, then Openfire needs to communicate with another Openfire server instance that serves the destination client. In this case, the two Openfire instances need to exchange XMPP messages in an encrypted way as shown in the following figure.

The articles in the references at the end of this article give you an introduction on how to install and configure Openfire. In this article we will focus on security issues only.
SSL Certificates
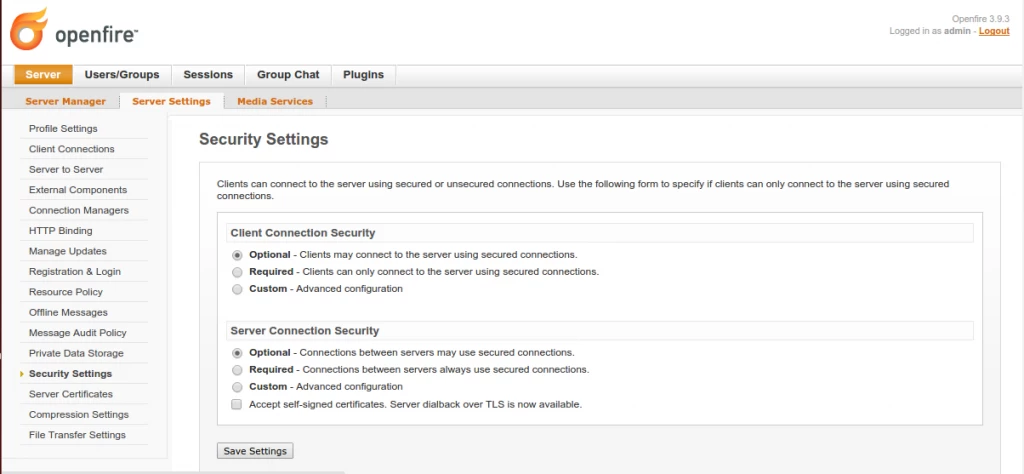
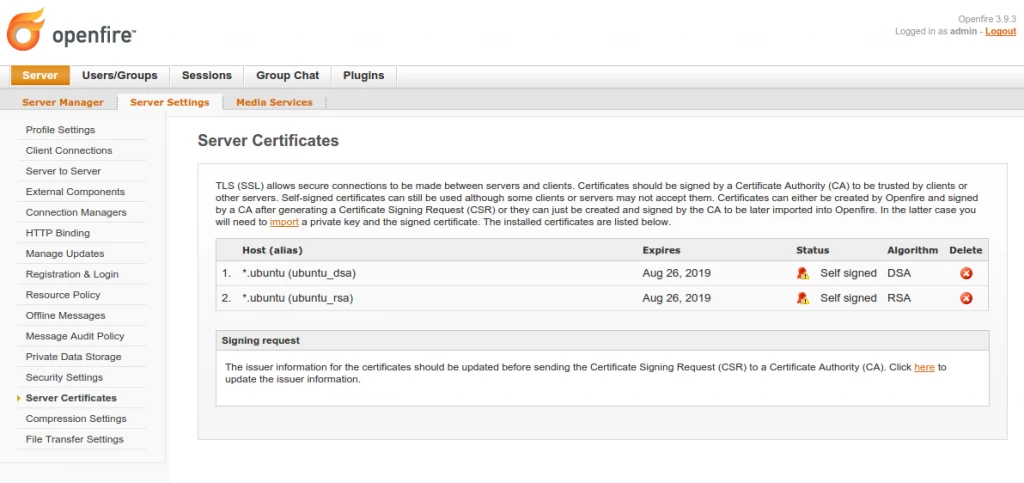
Openfire can generate self-signed DSA and RSA certificates through its Administrator Web Console (Server Settings | Server Certificates) (Figure 4). These can be used for server-to-server as well as for client-server communication (Server Settings | Security Settings) as shown in Figure 2.

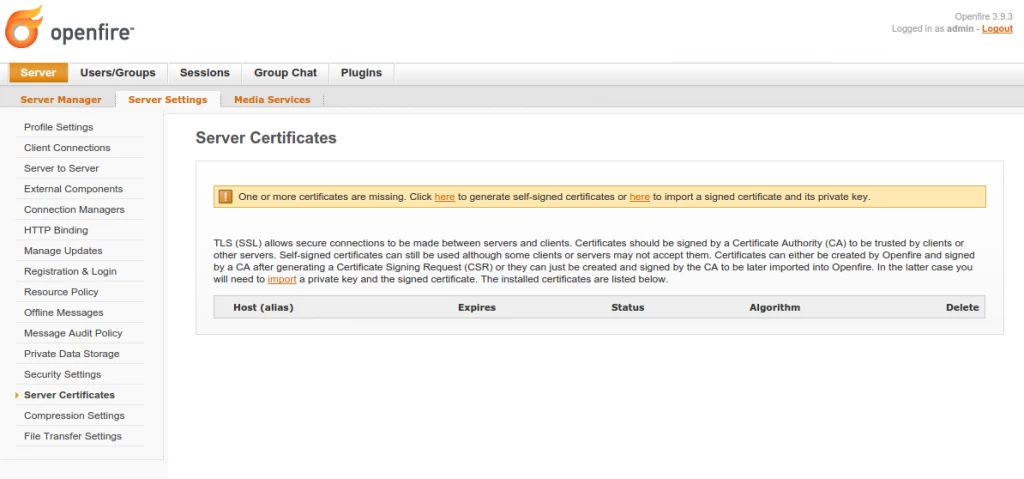
To generate self-signed certificates, click on the link (Click here to generate…) as shown in the following figure. You will need to restart Openfire for the changes to take effect.

Figure 4 shows an RSA and a DSA self-signed certificate generated by the above procedure. To allow server or client secure communication with this openfire server, make sure you have checked the Accept self-signed certificates. Server dialback over TLS is now available checkbox (see Figure 2) and select the Required radio button for both server-server and client-client communication if you want end-to-end encryption.


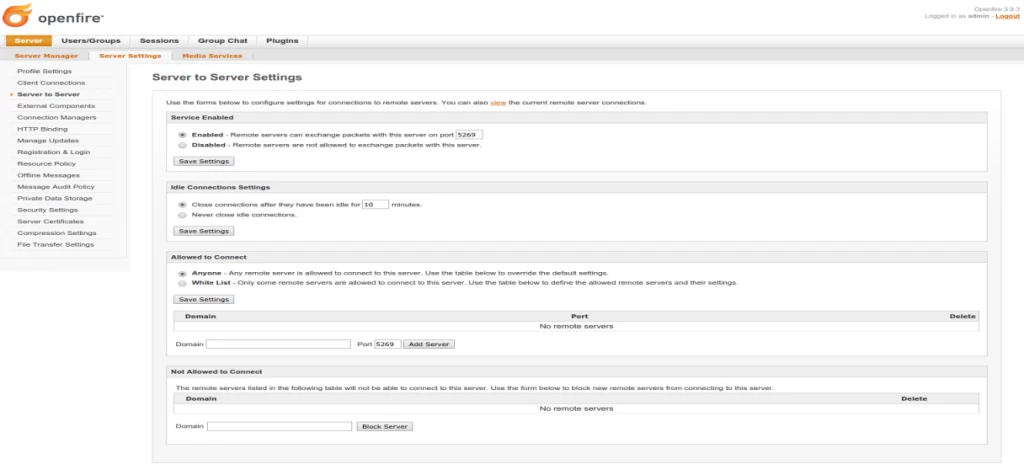
For further security you can restrict the remote servers that you can connect to (see Figure 5).
For secure client-to-server communication you must also enable TLS or SSL encryption in your client[1], something I could not find supported on Spark, the open source IM client provided by IgniteRealtime. Jitsi and Trillian are other modern IM clients that support TLS/SSL certificates.
However, self-signed certificates are vulnerable to man-in-the-middle attacks. For that reason, the most secure way is to import certificates provided by a Certification Authority (CA). Certificates can either be created by Openfire and signed by a CA after generating a Certificate Signing Request (CSR) or they can be created and signed by the CA to be later imported into Openfire. In the latter case a private key and the signed certificate need to be imported to Openfire. The issuer information for the certificates should be updated before sending the CSR to CA. Java Cryptography Extension (JCE) Unlimited Strength Jurisdiction Policy Files might be needed to be installed in the server that hosts Openfire if you get an “Invalid key size” error. The certificate size varies per CA; let’s assume that it is 2048 bytes. CAs can support both CSR and PFX/PKCS12 certificates.
Table 1. Minimum key size per year to be secure
| Year | AES | RSA, DH, ElGamal |
|---|---|---|
| 2010 | 78 | 1369 |
| 2020 | 86 | 1881 |
| 2030 | 93 | 2493 |
| 2040 | 101 | 3214 |
Examples of importing these types of certificates is shown below. The following sections explain the procedure in more detail.
- CSR:1
$ keytool -certreq -keyalg RSA -aliasmyalias -filecertreq.txt -keystore/path/to/openfire/server/instance/resources/security/keystore(a keystore must already exist)
- PKCS12:1
$ keytool -genkey -alias{desiredaliascertificate} -keystore {path to keystore.pfx} -storepass {password} -validity 365 -keyalg RSA -keysize 2048 -storetype pkcs12(problems seem to have been encountered; e.g. might need to convert them to .
pem)
Keep in mind that certificates issued by CAs are not free[2]. So, acquiring certificates from a Certification Authority (CA) for each client of your enterprise might be prohibited.
For more information on configuring SSL with Openfire see reference [1]. The following section is an adaptation of the “SSL Guide” to use for server-to-server communication.
SSL Guide
Openfire’s SSL support is built using the standard Java security SSL implementation (javax.net.ssl.SSLServerSocket).
A server SSL connection uses two sets of certificates to secure the connection. The first set is called a “keystore“. The keystore contains the keys and certificates for the server. These security credentials are used to prove to clients or other servers that the server is legitimately operating on behalf of a particular domain. If your server will only need to act as one domain, you only need one key entry and certificate in the keystore. Keys are stored in the keystore under aliases. Each alias corresponds to a domain name (e.g. “example.com”).
The second set of certificates is called the “truststore” and is used to verify that another server (or a client) is legitimately operating on behalf of a particular user. In the vast majority of cases, the truststore is empty and the server will not attempt to validate client connections using SSL. Instead, the XMPP authentication process verifies users in-band. However, for server-to-server communication you must require SSL authentication. In other words, for an Openfire server to be able to communicate with another, its truststore must contain a valid certificate for the other Openfire server.
Certificates attempt to guarantee that a particular party is who they claim to be. Certificates are trusted based on who signed the certificate. If you only require light security, are deploying for internal use on trusted networks, etc. you can use “self-signed” certificates. Self-signed certificates encrypt the communication channel between client-server or server-server. However the client or other server must verify the legitimacy of the self-signed certificate through some other channel. The most common client reaction to a self-signed certificate is to ask the user whether to trust the certificate, or to silently trust the certificate is legitimate. Unfortunately, blindly accepting self-signed certificates opens up the system to ‘man-in-the-middle’ attacks.
The advantage of a self-signed certificate is you can create them for free which is great when cost is a major concern, or for testing and evaluation. In addition, you can safely use a self-signed certificate if you can verify that the certificate you’re using is legitimate. So if a system administrator creates a self-signed certificate, then personally installs it on a client’s or another server’s truststore (so that the certificate is trusted) you can be assured that the SSL connection will only work between the client or another server and the correct server.
For higher security deployments, you should get your certificate signed by a certificate authority (CA). Servers’ truststores will usually contain the certificates of the major CA’s and can verify that a CA has signed a certificate. This chain of trust allows servers to trust certificates from other servers they’ve never interacted with before. Certificate signing is similar to a public notary (with equivalent amounts of verification of identity, record keeping, and costs).
The Oracle JDK (version 1.5.x or later) ships with all the security tools you need to configure SSL with Openfire. The most important is the keytool located in the $JAVA_HOME/bin directory of the JDK. Oracle JVMs persist keystores and truststores on the filesystem as encrypted files. The keytool is used to create, read, update, and delete entries in these files. Openfire ships with a self-signed “dummy” certificate designed for initial evaluation testing. You will need to adjust the default configuration for most deployments.
In order to configure SSL on your server you need to complete the following tasks:
- Decide on your Openfire server’s domain.
- Import CA root certificates into the truststore.
- Create new keystore and import CA root certificates into the keystore too
- Have a certificate authority (CA) certify the SSL server certificate.
- Generate a certificate signing request (CSR).
- Submit your CSR to a CA for signing.
- Import the server certificate into the keystore.
- Adjust the Openfire configuration with proper keystore and truststore
1. Decide on a Server Domain
The Openfire server domain should follow the naming convention used in your organisation (if any). For our testing FQDN is: chat.mycompany.com. Send the FQDN to the CA; this will allow them to create a reference number for this user in their system (other CAs may use different procedures to issue certificates). They will then send you the reference number which you require when you create the keystore. (E.g. FQDN: chat.mycompany.com -> Reference number: 0123456).
2. Import CA root certificates into the truststore
To be able to verify offline other Openfire servers using certificates, you need to obtain the CA’s root certificates and import them into the truststore.
- Backup and delete1
/path/to/openfire/server/instance/resources/security/truststore - Import each certificate using the keytool (a new truststore will be created when the first certificate is imported):0102030405060708091011121314151617181920212223242526
$cd/path/to/openfire/server/instance/resources/security$ keytool -printcert -file1.CA_ROOT.cerOwner: CN=RootCA, O=CAIssuer: CN=RootCA, O=CASerial number: 8968c69c7e23143cValid from: Tue Oct 06 19:10:22 CEST 2009until: Fri Oct 06 19:10:22 CEST 2034...$ keytool -printcert -file2.SCA.cerOwner: OU=SCA, O=CAIssuer: CN=RootCA, O=caSerial number: 9e95a6bad57aeValid from: Thu Oct 11 17:44:57 CEST 2012until: Fri Jan 01 05:59:00 CET 2016Certificate fingerprints:...$ keytool -importcert -aliasCA_ROOT -keystore truststore -file1.CA_ROOT.cerEnter keystore password:Re-enter new password:Owner: CN=RootCA, O=CAIssuer: CN=RootCA, O=CA...Trust this certificate? [no]:yesCertificate was added to keystore$ keytool -importcert -aliasSCA -keystore truststore -file2.SCA.cerEnter keystore password:Certificate was added to keystoreor use
importinstead ofimportcert. - Verify that your truststore contains the two certificates:010203040506070809101112
$ keytool -list -keystore truststoreEnter keystore password:Keystoretype: JKSKeystore provider: SUNYour keystore contains 2 entriesca_root, Nov 5, 2014, trustedCertEntry,Certificate fingerprint (SHA1): 8A:9E:6F:8D:2A:C1:A1:9A:1F:6C:01:85:D9:6C:08:00:69:70sca, Nov 5, 2014, trustedCertEntry,Certificate fingerprint (SHA1): AE:EB:DA:AF:4E:40:0D:00:4C:2F:66:6E:50:7E:1C:19:17:FF
3. Create new keystore
- Backup and delete:1
/path/to/openfire/server/instance/resources/security/keystore. - To create a new keystore of size 2048 bits you need to generate a new key pair (make sure to use the reference number from CA as CN):01020304050607080910111213141516171819202122
$cd/path/to/openfire/server/instance/resources/security/$ keytool -genkeypair -aliaschat.mycompany.com_rsa -keyalg RSA -keysize 2048 -keystore keystoreEnter keystore password:Re-enter keystore password:What is your first and last name?[Unknown]: 0123456What is the name of your organizational unit?[Unknown]: ITWhat is the name of your organization?[Unknown]: MyCompanyWhat is the name of your City or Locality?[Unknown]: SomewhereWhat is the name of your State or Province?[Unknown]:What is the two-letter country codeforthis unit?[Unknown]: XXIs CN=0123456, OU=IT, O=MyCompany, L=Somewhere, ST=Unknown, C=XX correct?[no]:yesEnter key passwordfor<chat.mycompany.com_rsa>(RETURNifsame as keystore password):To view it:
010203040506070809101112131415161718192021222324252627282930313233$ keytool -list -v-keystore keystoreKeystoretype: JKSKeystore provider: SUNYour keystore contains 1 entryAlias name: chat.mycompany.org_rsaCreationdate: Nov 4, 2014Entrytype: PrivateKeyEntryCertificate chain length: 1Certificate[1]:Owner: CN=0123456, OU=IT, O=MyCompany, L=Somewhere, ST=Unknown, C=XXIssuer: CN=0123456, OU=IT, O=MyCompany, L=Somewhere, ST=Unknown, C=XXSerial number: 590d8837Valid from: Tue Nov 04 17:54:18 CET 2014until: Mon Feb 02 17:54:18 CET 2015Certificate fingerprints:MD5: 60:86:13:C0:B7:26:4D:92:10:54:65:C7SHA1: 1B:14:90:EB:68:F3:CC:C1:51:1C:96:55:24:48:1E:2DSHA256: F5:1C:62:CA:D3:AF:E7A8:9E:51:B2:7F:8543:12:81:46:CD:60:A9:CESignature algorithm name: SHA256withRSAVersion: 3Extensions:#1: ObjectId: 2.5.29.14 Criticality=falseSubjectKeyIdentifier [KeyIdentifier [0000: D1 5E 5C D1 02 44 B6 47 9D DE .^\..D....P..G..0010: 1D AE 49]]************************************************************************************** - You must add the root and sub-root certificates of CA to the keystore also for the signed certificate to be verified offline.010203040506070809101112
$ keytool -importcert -aliasCA_ROOT -keystore keystore -file1.CA_ROOT.cerEnter keystore password:Re-enter new password:Owner: CN=RootCA, O=CAIssuer: CN=RootCA, O=CA...Trust this certificate? [no]:yesCertificate was added to keystore$ keytool -importcert -aliasSCA -keystore keystore -file2.SCA.cerEnter keystore password:Certificate was added to keystoreor use import instead of importcert.
- Verify that your keystore contains three certificates:01020304050607080910111213
$ keytool -list -keystore truststoreEnter keystore password:Keystoretype: JKSKeystore provider: SUNYour keystore contains 3 entriesca_root, Nov 5, 2014, trustedCertEntry,Certificate fingerprint (SHA1): 8A:9E:6F:8D:1F:6C:01:85:D9:6C:21:91:08:00:69:70sca, Nov 5, 2014, trustedCertEntry,Certificate fingerprint (SHA1): AE:EB:0D:00:4C:2F:66:6E:50:7E:7E:CC:1C:19:17:FF... - Restart the Openfire server after you have modified any of the above system properties.
4.a Generate a certificate signing request (CSR)
1 2 | $ cd /path/to/openfire/server/instance/resources/security/$ keytool -certreq -alias chat.mycompany.org_rsa -file chat.mycompany.org_rsa.csr -keystore keystore |
This command will generate the CSR chat.mycompany.org_rsa.csr. To verify the CSR issue the command:
01 02 03 04 05 06 07 08 09 10 11 12 13 14 | $ keytool -printcertreq -file chat.mycompany.org_rsa.csrPKCS #10 Certificate Request (Version 1.0)Subject: CN=0123456, OU=IT, O=MyCompany, L=Somewhere, ST=Unknown, C=XXPublic Key: X.509 format RSA keyExtension Request:#1: ObjectId: 2.5.29.14 Criticality=falseSubjectKeyIdentifier [KeyIdentifier [0000: D1 5E 5C D1 02 44 A2 B6 47 9D DE .^\..D....P..G..0010: 1D AE 49]] |
4.b Submit your CSR to a CA for signing
Send the generated CSR chat.mycompany.org_rsa.csr to your CA to get it signed.
5. Import the server certificate into the keystore
After you have received the certificate signed by the CA, you must import it using the keytool.
1 2 | $ cd /path/to/openfire/server/instance/resources/security$ keytool -importcert -alias chat.mycompany.org_rsa -keystore keystore -file chat.mycompany.org_rsa.cer |
or import instead of importcert. It is important that the alias does not already have an associated key or you’ll receive an error.
Restart openfire for the changes to take effect.
To find out more about keytool see here. To change the default truststore (keystore) password:
1 | $ keytool -storepasswd -keystore truststore (keystore) |
keytool will ask for the old password (by default it is changeit) then the new password.
Epilogue
In this article we described how to enable secure communication between two Openfire servers and between Openfire and a client. For that purpose, we saw how we can enable self-signed SSL certificates as well as how we can import certificates signed by a Certificate Authority. You can experiment with other types of certificates (like e.g. PFX/PKCS12) and adapt the procedure according to your CA. Happy (secure) chatting.
References:
- Openfire SSL Guide.
- Saint-Andre P., Smith K., Troncon R. (2009), XMPP: The Definitive Guide, O’ Reilly.
- Tsagklis I. (2010a), “Openfire server installation – Infrastructure for Instant Messaging”, Java Code Geeks.
- Tsagklis I. (2010b), “Openfire server configuration – Infrastructure for Instant Messaging”, Java Code Geeks.
- Tsagklis I. (2010c), “XMPP IM with Smack for Java applications – Infrastructure for Instant Messaging”, Java Code Geeks.
[1]See e.g. http://blog.bigdinosaur.org/securing-openfire-clients/
[2]Some free ones are CAcert, StartCom/StartSSL, Let’s Encrypt.


