Learn Apache Camel – Indexing Tweets in Real-time
There’s a point in most software development projects when the application needs to start communicating with other applications or 3rd party components.
Whether it’s sending an email notification, calling an external api, writing to a file or migrating data from one place to another, you either roll out your own solution or leverage an existing framework.
As for existing frameworks in the Java ecosystem, on one end of the spectrum we find Tibco BusinessWorks and Mule ESB, and on the other end there’s Spring Integration and Apache Camel.
In this tutorial I’m going to introduce you to Apache Camel through a sample application that reads tweets from Twitter’s sample feed and indexes those tweets in real time using Elastic Search.
What is Apache Camel?
Integrating an application with internal or external components in an ecosystem is one of the most complex tasks in software development and when it’s not done right, it can result in a huge mess and a real pain to maintain on the longer term.
Fortunately, Camel, an open-source integration framework hosted at Apache, is based on the Enterprise Integration Patterns and these patterns can help writing more readable and maintainable code. Similar to Lego, these patterns can be used as building blocks to create a solid software design.
Apache Camel also supports a wide array of connectors to integrate your application with different frameworks and technologies. And by the way, it also plays together nicely with Spring.
If you’re not familiar with Spring, you may find this post helpful: Processing Twitter feed using Spring Boot.
In the following sections we’ll go through a sample application where Camel is integrated with both Twitter sample feed and ElasticSearch.
What is ElasticSearch?
ElasticSearch similar to Apache Solr is a highly-scalable open-source, Java-based full-text search engine built on top of Apache Lucene.
In this sample application we’re going to use ElasticSearch to index tweets in real-time and also to provide full-text search capabilities on these tweets.
Other Technologies Used
Besides Apache Camel and ElasticSearch, I also included other frameworks in this application: Gradle as the build tool, Spring Boot as the web application framework and Twitter4j to read tweets from the Twitter sample feed.
Getting Started
The skeleton of the project was generated at http://start.spring.io where I checked the Web dependency option, filled out the Project Metadata section and selected ‘Gradle Project’ as the type of the project.
Once the project is generated, you can download and import it into your favourite IDE. I’m not going go into more details on Gradle now, but here’s the list of all the dependencies in the build.gradle file:
def camelVersion = '2.15.2'
dependencies {
    compile("org.springframework.boot:spring-boot-starter-web")
    compile("org.apache.camel:camel-core:${camelVersion}")
    compile("org.apache.camel:camel-spring-boot:${camelVersion}")
    compile("org.apache.camel:camel-twitter:${camelVersion}")
    compile("org.apache.camel:camel-elasticsearch:${camelVersion}")
    compile("org.apache.camel:camel-jackson:${camelVersion}")
    compile("joda-time:joda-time:2.8.2")
    testCompile("org.springframework.boot:spring-boot-starter-test")
}
Integration using Camel Routes
Camel imlements a message oriented architecture and it’s main building blocks are Routes that describe the flow of the messages.
Routes can be described in either XML (old way) or its Java DSL (new way). We’re only going to discuss the Java DSL in this post as that’s the prefered and more elegant option.
Alright, let’s look at a simple Route then:
from("file://orders").
  convertBodyTo(String.class).
  to("log:com.mycompany.order?level=DEBUG").
  to("jms:topic:OrdersTopic");
There are a few things to note here:
- Messages flow between endpoints which are represented by and configured using URIs
- A Route can only have a single message producer endpoint (in this case “file://orders” which reads files from the orders folder) and multiple message consumer endpoints:
- “log:com.mycompany.order?level=DEBUG” which logs the content of a file in a debug message under com.mycompany.order logging category,
- “jms:topic:OrdersTopic” which writes the content of the file into a JMS topic
- In between endpoints the messages can be altered, ie: convertBodyTo(String.class) which converts the message body to a String.
Also note that the same URI can be used for a consumer endpoint in one route and a producer endpoint in another:
from("file://orders").
  convertBodyTo(String.class).
  to("direct:orders");

from("direct:orders).
  to("log:com.mycompany.order?level=DEBUG").
  to("jms:topic:OrdersTopic");
The Direct endpoint is one of the generic endpoints and it allows passing messages synchronously from one route to another.
This helps creating readable code and reusing routes in multiple places in the code.
Indexing Tweets
Now let’s take a look at some routes from our code. Let’s start with something simple:
private String ES_TWEET_INDEXER_ENDPOINT = "direct:tweet-indexer-ES";

...

        from("twitter://streaming/sample?type=EVENT&consumerKey={{twitter4j.oauth.consumerKey}}&consumerSecret={{twitter4j.oauth.consumerSecret}}∾cessToken={{twitter4j.oauth.accessToken}}∾cessTokenSecret={{twitter4j.oauth.accessTokenSecret}}")
            .to(ES_TWEET_INDEXER_ENDPOINT)
        ;
This is so simple, right? By now you may have figured that this Route reads tweets from the Twitter sample feed and passes them to the “direct:tweet-indexer-ES” endpoint. Note that the consumerKey, consumerSecret, etc. are configured and passed in as system properties (see http://twitter4j.org/en/configuration.html).
Now let’s look at a slightly more complex Route that reads from the “direct:tweet-indexer-ES” endpoint and inserts Tweets to Elasticsearch in batches (see comments for detailed explanation on each step):
@Value("${elasticsearch.tweet.uri}")
    private String elasticsearchTweetUri;

...

        from(ES_TWEET_INDEXER_ENDPOINT)
            // groups tweets into separate indexes on a weekly basis to make it easier clean up old tweets:
            .process(new WeeklyIndexNameHeaderUpdater(ES_TWEET_INDEX_TYPE))
            // converts Twitter4j Tweet object into an elasticsearch document represented by a Map:
            .process(new ElasticSearchTweetConverter())
            // collects tweets into weekly batches based on index name:
            .aggregate(header("indexName"), new ListAggregationStrategy())
                // creates new batches every 2 seconds
                .completionInterval(2000)
                // makes sure the last batch will be processed before the application shuts down:
                .forceCompletionOnStop()
            // inserts a batch of tweets to elasticsearch:
            .to(elasticsearchTweetUri)
            .log("Uploaded documents to ElasticSearch index ${headers.indexName}: ${body.size()}")
        ;
Notes on this Route:
- elasticsearchTweetUri is a field whose value is taken by Spring from the application.properties file (elasticsearch.tweet.uri=elasticsearch://tweet-indexer?operation=BULK_INDEX&ip=127.0.0.1&port=9300) and injected into the field
- To implement custom processing logic within a Route, we can create classes that implement the Processor interface. See WeeklyIndexNameHeaderUpdater and ElasticSearchTweetConverter
- The tweets are aggregated using the custom ListAggregationStrategy strategy which agregates messages into an ArrayList and which will be later on passed on to the next endpoint every 2 seconds (or when the application stops)
- Camel implements an Expression Language that we’re using to log the size of the batch (“${body.size()}”) and the name of the index (${headers.indexName}) where messages were inserted from.
Searching Tweets in Elasticsearch
Now that we have tweets indexed in Elasticsearch, it’s time to run some search on them.
First let’s look at the Route that receives a search query and the maxSize param that limits the number of search results:
public static final String TWEET_SEARCH_URI = "vm:tweetSearch";

...

        from(TWEET_SEARCH_URI)
            .setHeader("CamelFileName", simple("tweet-${body}-${header.maxSize}-${date:now:yyyyMMddHHmmss}.txt"))
            // calls the search() method of the esTweetService which returns an iterator
            // to process search result - better than keeping the whole resultset in memory:
            .split(method(esTweetService, "search"))
                // converts Elasticsearch doucment to Map object:
                .process(new ElasticSearchSearchHitConverter())
                // serializes the Map object to JSON:
                .marshal(new JacksonDataFormat())
                // appends new line at the end of every tweet
                .setBody(simple("${body}\n"))
                // write search results as json into a file under /tmp folder:
                .to("file:/tmp?fileExist=Append")
            .end()
            .log("Wrote search results to /tmp/${headers.CamelFileName}")
        ;
This Route will be triggered when a message is passed to the “vm:tweetSearch” endpoint (which uses an in-memory queue to process messages asynchronously).
The SearchController class implements a REST api allowing users to run a tweet search by sending a message to the “vm:tweetSearch” endpoint using Camel’s ProducerTemplate class:
@Autowired
    private ProducerTemplate producerTemplate;

    @RequestMapping(value = "/tweet/search", method = { RequestMethod.GET, RequestMethod.POST },
            produces = MediaType.TEXT_PLAIN_VALUE)
    @ResponseBody
    public String tweetSearch(@RequestParam("q") String query,
                              @RequestParam(value = "max") int maxSize) {
        LOG.info("Tweet search request received with query: {} and max: {}", query, maxSize);
        Map<String, Object> headers = new HashMap<String, Object>();
        // "content" is the field in the Elasticsearch index that we'll be querying:
        headers.put("queryField", "content");
        headers.put("maxSize", maxSize);
        producerTemplate.asyncRequestBodyAndHeaders(CamelRouter.TWEET_SEARCH_URI, query, headers);
        return "Request is queued";
    }
This will trigger the execution of the Elasticsearch, however the result is not returned in the response but written to a file in the /tmp folder (as discussed earlier).
This Route uses the ElasticSearchService class to search tweets in ElasticSearch. When this Route is executed, Camel calls the search() method and passes in the search query and the maxSize as input parameters:
public SearchHitIterator search(@Body String query, @Header(value = "queryField") String queryField, @Header(value = "maxSize") int maxSize) {
        boolean scroll = maxSize > batchSize;
        LOG.info("Executing {} on index type: '{}' with query: '{}' and max: {}", scroll ? "scan & scroll" : "search", indexType, query, maxSize);
        QueryBuilder qb = termQuery(queryField, query);

        long startTime = System.currentTimeMillis();
        SearchResponse response = scroll ? prepareSearchForScroll(maxSize, qb) : prepareSearchForRegular(maxSize, qb);
        return new SearchHitIterator(client, response, scroll, maxSize, KEEP_ALIVE_MILLIS, startTime);
    }
Note that depending on maxSize and batchSize, the code either executes a regular search that returns a single page of results, or executes a scroll request which allows us to retrieve a large number of results. In the case of scrolling, SearchHitIterator will make subsequent calls to Elasticsearch to retrieve the results in batches.
Installing ElasticSearch
- Download Elasticsearch from https://www.elastic.co/downloads/elasticsearch.
- Install it to a local folder ($ES_HOME)
- Edit $ES_HOME/config/elasticsearch.yml and add this line:
cluster.name: tweet-indexer - Install the BigDesk plugin to monitor Elasticsearch: $ES_HOME/bin/plugin -install lukas-vlcek/bigdesk
- Run Elasticsearch: $ES_HOME/bin/elasticsearch.sh or $ES_HOME/bin/elasticsearch.bat
These steps will allow you to run a standalone Elasticsearch instance with minimal configuration, but keep in mind that they’re not intended for production use.
Running the Application
This is the entry point to the application and can be run from the command line.
package com.kaviddiss.twittercamel;

import org.springframework.boot.SpringApplication;
import org.springframework.boot.autoconfigure.SpringBootApplication;

@SpringBootApplication
public class Application {

    public static void main(String[] args) {
        SpringApplication.run(Application.class, args);
    }
}
To run the application, either run the Application.main() method from your favourite IDE or execute below line from the command line:
$GRADLE_HOME/bin/gradlew build && java -jar build/libs/twitter-camel-ingester-0.0.1-SNAPSHOT.jar
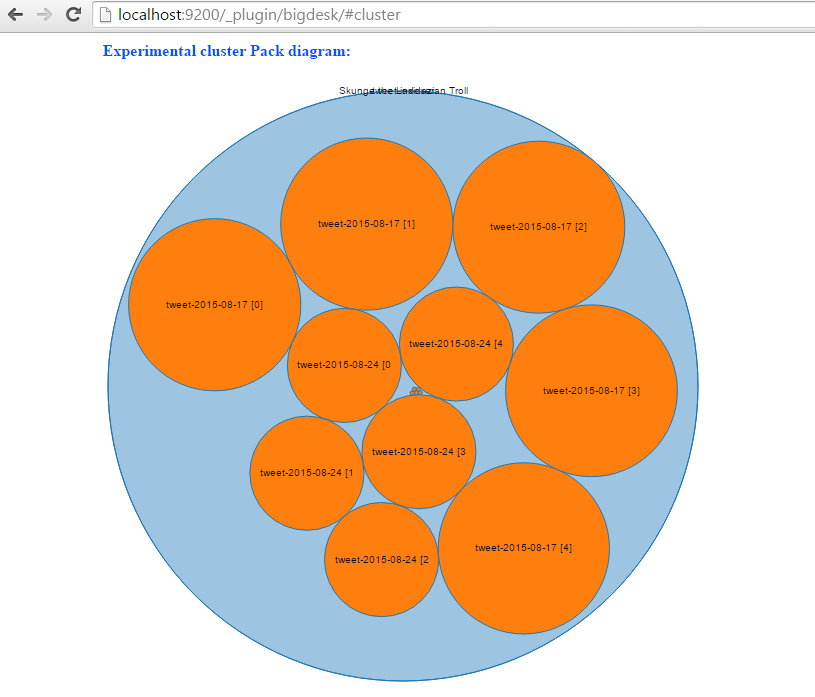
Once the application started up, it will automatically start indexing tweets. Go to http://localhost:9200/_plugin/bigdesk/#cluster to visualize your indexes:
To search tweets, enter a URL something similar to this into the browser: http://localhost:8080/tweet/search?q=toronto&max=100.
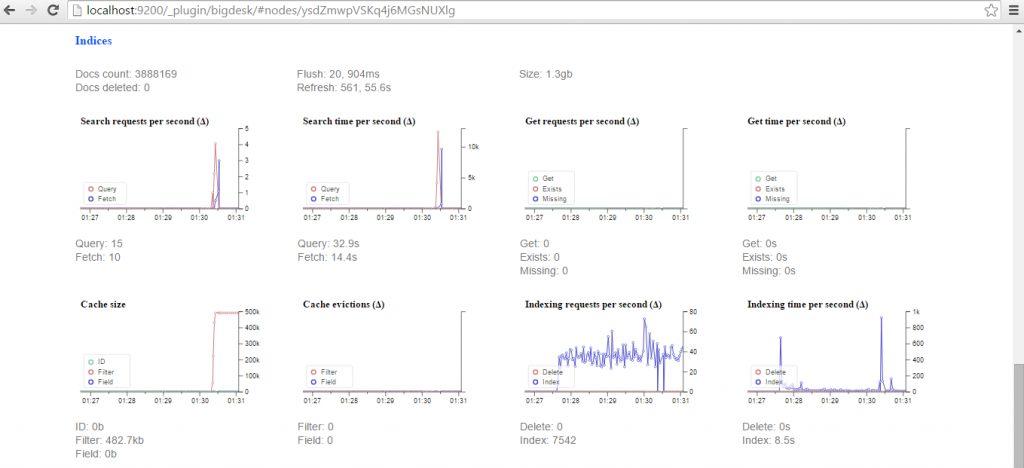
Using the BigDesk plugin, we can monitor how Elasticsearch is indexing tweets:
Conclusion
In this introduction to Apache Camel we covered how to use this integration framework to communicate with external components like Twitter sample feed and Elasticsearch to index and search tweets in real-time.
- The source code of the sample application is available at https://github.com/davidkiss/twitter-camel-ingester.
| Reference: | Learn Apache Camel – Indexing Tweets in Real-time from our JCG partner David Kiss at the Building scalable enterprise applications blog. |


