MongoDB Replication Guide
This article is part of our Academy Course titled MongoDB – A Scalable NoSQL DB.
In this course, you will get introduced to MongoDB. You will learn how to install it and how to operate it via its shell. Moreover, you will learn how to programmatically access it via Java and how to leverage Map Reduce with it. Finally, more advanced concepts like sharding and replication will be explained. Check it out here!
Table Of Contents
1. Introduction
Replication is a foundational technique to keep your data safe (by providing redundancy) and highly available all the time (by providing multiple instances serving the exact copy of the data). Replication helps a lot to recover from hardware failure and prevent service interruptions. Very often it is being used to off-load some work (for example, reporting or backup) from the primary servers to dedicated replicas.
There are server classes of replication: Master – Master (or Active – Active) and Master – Slave (or Active – Passive). At the moment, MongoDB implements Master – Slave (or Active – Passive) replication (only one node can accept write operations at a time) with automatic master (primary) election in case of failure.
MongoDB supports the replication in a form of replica sets: a group of MongoDB instances that maintain the same (synchronized) data across multiple instances (servers).
A replica set consist of a single primary MongoDB instance (which accepts all write operations) and one or more secondary instances which synchronize with primary so to have the same data set. To support replication, the primary logs all changes to its data sets in its oplog: a special capped collection that keeps a rolling record of all operations that modify the data stored in the databases. Consequently, the secondaries replicate the primary’s oplog and apply the operations to their data sets so the databases are kept in sync (please refer to official documentation for more details). Please notice that those operations are applied asynchronously so the secondary instances may not always return the most up-to-date data (please refer to official documentation for more details), the fact known as replication lag.
Optionally, each replica set could include one or more arbiters: MongoDB instances which do not maintain a data set but only exist to vote in elections by contributing to majority of votes. Interestingly, a primary instance may step down and become secondary, a secondary may be promoted to primary but arbiters never change their roles (please refer to official documentation for more details).
When a primary is not available to other members of the replica set for more than 10 seconds, the replica set will attempt to promote one of the secondary instances to become a new primary by starting the election process: the first secondary that receives a majority of the votes becomes primary (please refer to official documentation for more details).
Before introducing replica set (which is the recommended way to configure replication), MongoDB supported a bit different master / slave replication model, which at the moment is considered legacy (for more details please refer to official documentation). We are not going to cover this model in this part of the tutorial.
2. Configuring Replication
It is worth mentioning that each secondary member in the replica set might be configured to serve a particular purpose:
- priority 0 member: never becomes a primary in an elections (please refer to official documentation for more details)
- hidden member: invisible to client applications (please refer to official documentation for more details)
- delayed member: reflects an earlier, or delayed, state of the dataset (please refer to official documentation for more details)
While configuring your replica set, it is very important to have an odd number of members so to ensure that the replica set is always able to elect a primary by reaching a majority of votes (please refer to official documentation for more thorough clarification). In the sample replica set configuration we are about to configure there is one primary instance, three secondary instances and one arbiter, totaling 5 members.
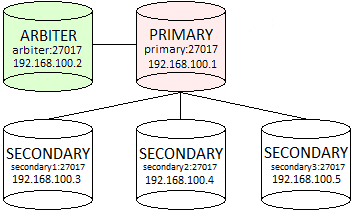
The first step in configuring a replica set is to start all MongoDB instances which are supposed to be its members. The process is very similar to the one we have covered in Part 1. MongoDB Installation – How to install MongoDB except a new command line argument --replSet which specifies the replica set name.
bin/mongod --replSet "rs-demo" --bind_ip 192.168.100.1 --dbpath data
bin/mongod --replSet "rs-demo" --bind_ip 192.168.100.2 --dbpath data
bin/mongod --replSet "rs-demo" --bind_ip 192.168.100.3 --dbpath data
bin/mongod --replSet "rs-demo" --bind_ip 192.168.100.4 --dbpath data
bin/mongod --replSet "rs-demo" --bind_ip 192.168.100.5 --dbpath data
From this point, all other configuration steps are going to be performed using MongoDB shell and a rich set of its command for replication configuration (please refer to Replication commands and command helpers for more details).
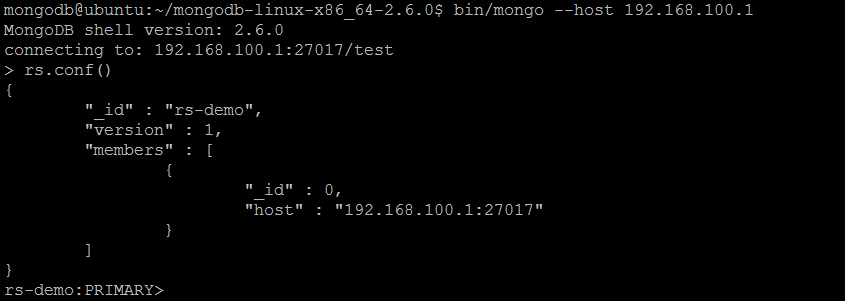
Let us connect to the first member of the replica set using MongoDB shell: bin/mongo --host 192.168.100.1. The initial command to initialize the replica set is rs.initiate(): it will initiate a new replica set that consists of the current member and uses the default configuration.

Let us immediately issue another helpful command rs.conf() to inspect current replica set members and configuration (only current instance should be listed):
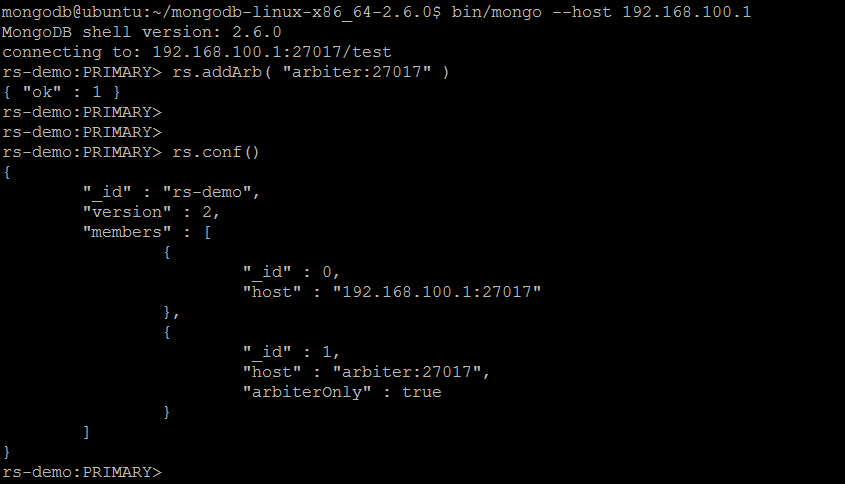
Let us move on by firstly adding an arbiter to replica set using rs.addArb() command passing the arbiter:27017 instance as a parameter: rs.addArb( "arbiter:27017" ). The call to rs.conf() shows off a new member with arbiterOnly flag set to true.
Following the same procedure let us add all other, secondary members to the replica set but this time using regular rs.add() command and providing hostname and port, very similar to rs.addArb():
rs.add( "secondary1:27017" )
rs.add( "secondary2:27017" )
rs.add( "secondary3:27017" )
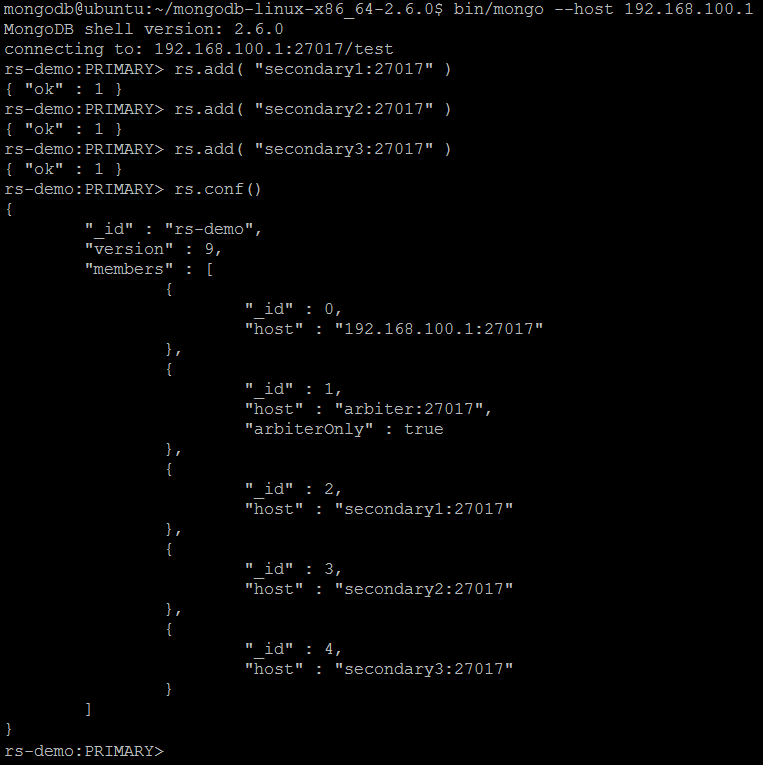
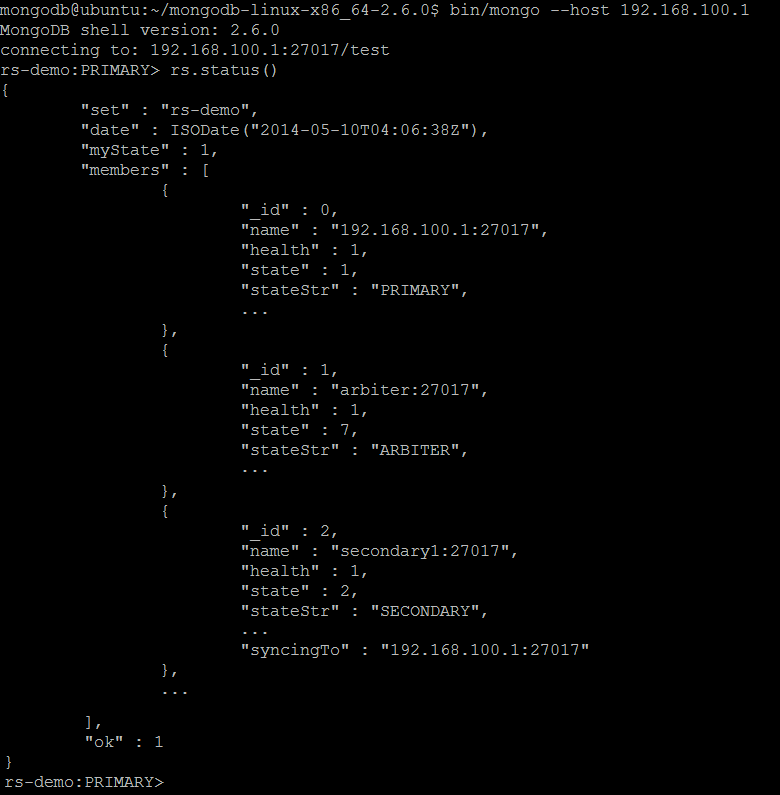
Great, the replica set is fully configured! Another very useful command rs.status() provides a verbose report about current replica set.
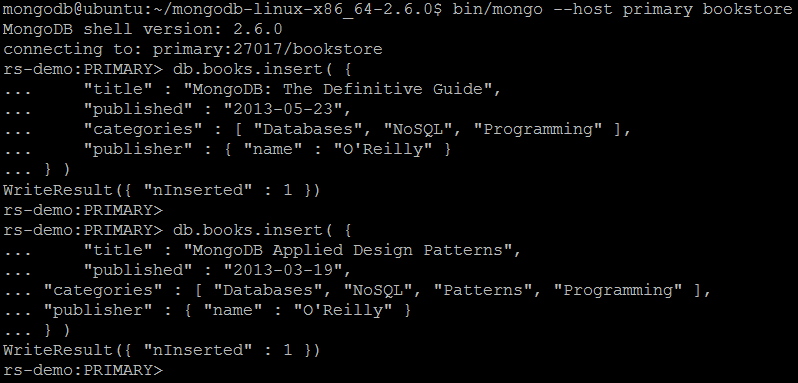
For a demonstration purposes, let us reuse the bookstore example from Part 3. MongoDB and Java Tutorial and insert couple of the documents into books collection. Please notice that those operations should be issued against primary member of the replica set (secondary members nor arbiters do not accept write operations).
db.books.insert( {
    "title" : "MongoDB: The Definitive Guide",
    "published" : "2013-05-23",
    "categories" : [ "Databases", "NoSQL", "Programming" ],
    "publisher" : { "name" : "O'Reilly" }
} )

db.books.insert( {
    "title" : "MongoDB Applied Design Patterns",
    "published" : "2013-03-19",
	"categories" : [ "Databases", "NoSQL", "Patterns", "Programming" ],
	"publisher" : { "name" : "O'Reilly" }
} )
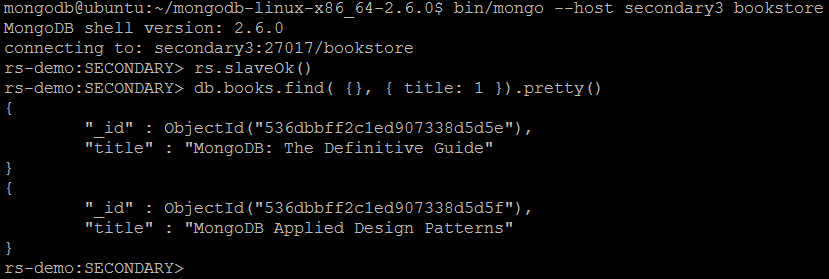
To make sure the documents have been replicated, let us connect to any secondary member of the replica set and query for all documents in books collection: bin/mongo --host secondary3 bookstore.
Please notice that for any secondary member the error will be raised if rs.slaveOk() command has not been issues before running read operations:
rs.slaveOk()
db.books.find( {}, { title: 1 }).pretty()
3. Replication and Sharding (Partitioning)
Sharding and replication go side by side. In the Part 4. MongoDB Sharding Guide of the tutorial we have mentioned that it is strongly recommended to have each shard configured as a replica set. Such deployments allow having redundant copies of every partition of your data, plus high availability in case the primary member of the shard’s replica set fails.
Luckily, it is very easy to do just by following different member naming convention while calling sh.addShard() command: each hostname should be prefixed by replica set name. For example, the commands we have seen in Part 4. MongoDB Sharding Guide are:
sh.addShard( "ubuntu:27000" )
sh.addShard( "ubuntu:27001" )
In case each shard is a replica set, the commands are going to look like this:
sh.addShard( " rs1/ubuntu:27000" )
sh.addShard( " rs1/ubuntu:27001" )
4. Replication commands and command helpers
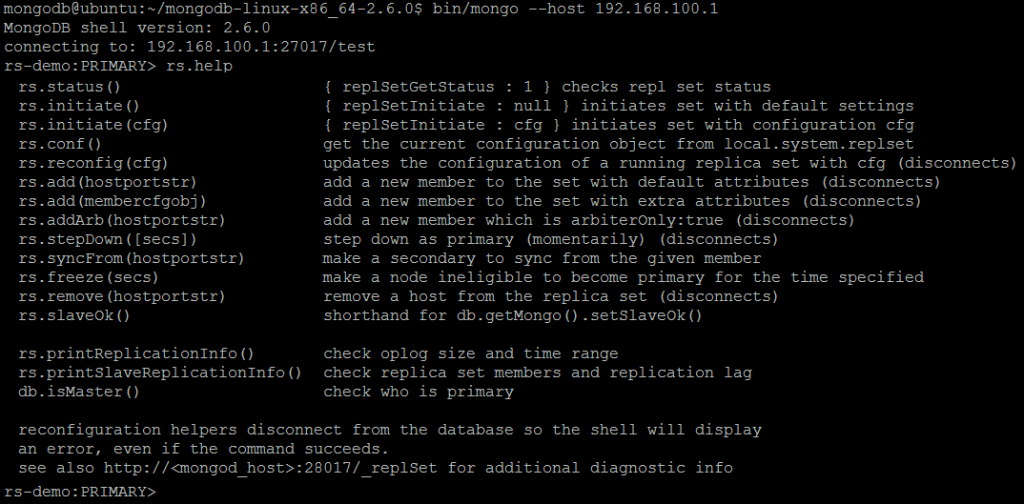
MongoDB shell provides a command helpers and rs context variable to simplify replication management and deployment.
| Command | rs.help() |
| Description | Outputs the brief description for all replication-related shell functions. |
| Example | In MongoDB shell, let us issue the command:rs.help() |
| Reference | http://docs.mongodb.org/manual/reference/method/rs.help/ |
rs.help()
| Command | replSetInitiate |
| Parameters | {
replSetInitiate : <configuration>
} |
| Wrapper | rs.initiate(configuration) |
| Description | The command initiates a new replica set. Optionally, it takes a configuration to initiate with. |
| Example | See please Configuring Replication section. |
| Reference | http://docs.mongodb.org/manual/reference/command/replSetInitiate/ http://docs.mongodb.org/manual/reference/method/rs.initiate/ |
replSetInitiate
| Command | rs.conf() |
| Description | The command returns the current replica set configuration. |
| Example | See please Configuring Replication section. |
| Reference | http://docs.mongodb.org/manual/reference/method/rs.conf/ |
rs.conf()
| Command | rs.addArb(host) |
| Description | The command adds a new arbiter to an existing replica set. |
| Example | See please Configuring Replication section. |
| Reference | http://docs.mongodb.org/manual/reference/method/rs.addArb/ |
rs.addArb(host)
| Command | rs.add(host, arbiterOnly) |
| Description | Adds a new member to an existing replica set. With arbiterOnly flag set to true, the new member will be added as an arbiter, similarly to rs.addArb() command. |
| Example | See please Configuring Replication section. |
| Reference | http://docs.mongodb.org/manual/reference/method/rs.add/ |
rs.add(host, arbiterOnly)
| Command | rs.remove(host) |
| Description | The command removes existing member from the current replica set. Please notice that this function will disconnect the MongoDB shell briefly and forces a reconnection as the replica set renegotiates which member will be primary. As a result, the shell will display an error even if this command succeeds. |
| Example | In MongoDB shell, let us issue the command:rs.remove( "secondary3:27017" ) |
| Reference | http://docs.mongodb.org/manual/reference/method/rs.remove/ |
rs.remove(host)
| Command | replSetGetStatus |
| Wrapper | rs.status() |
| Description | The command returns the status of the replica set from the point of view of the current MongoDB instance. It should be run in context of admin database. |
| Example | See please Configuring Replication section. |
| Reference | http://docs.mongodb.org/manual/reference/command/replSetGetStatus/ |
replSetGetStatus
| Command | replSetFreeze |
| Parameters | {
replSetFreeze: <seconds>
} |
| Wrapper | rs.freeze(seconds) |
| Description | The command prevents a replica set member from seeking election for the specified number of seconds. This command is often used in conjunction with the replSetStepDown command to make a different member in the replica set a new primary. |
| Example | Let us reconnect MongoDB shell to one of the secondary instances bin/mongo –host secondary1 and issue the command:rs.freeze( 10 ) |
| Reference | http://docs.mongodb.org/manual/reference/command/replSetFreeze/ |
replSetFreeze
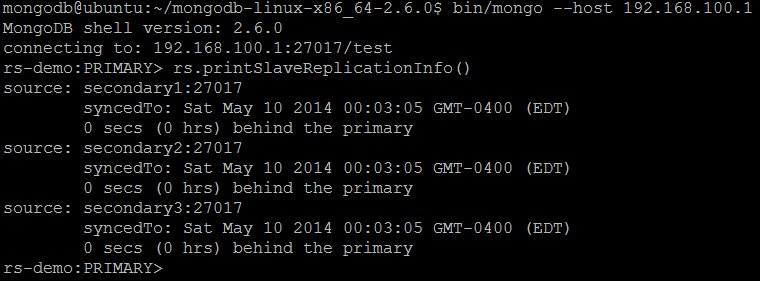
| Command | rs.printSlaveReplicationInfo() db.printSlaveReplicationInfo() |
| Description | The command outputs a status report of a replica set from the perspective of the secondary member of the set. |
| Example | In MongoDB shell, let us issue the command:rs.printSlaveReplicationInfo() |
| Reference | http://docs.mongodb.org/manual/reference/method/rs.printSlaveReplicationInfo/ http://docs.mongodb.org/manual/reference/method/db.printSlaveReplicationInfo/ |
rs.printSlaveReplicationInfo()
db.printSlaveReplicationInfo()
| Command | rs.printReplicationInfo() db.printReplicationInfo() |
| Description | The command outputs a status report of a replica set from the perspective of the primary member of the set. |
| Example | In MongoDB shell, let us issue the command:rs.printReplicationInfo() |
| Reference | http://docs.mongodb.org/manual/reference/method/rs.printReplicationInfo/ http://docs.mongodb.org/manual/reference/method/db.printReplicationInfo/ |
rs.printReplicationInfo()
db.printReplicationInfo()
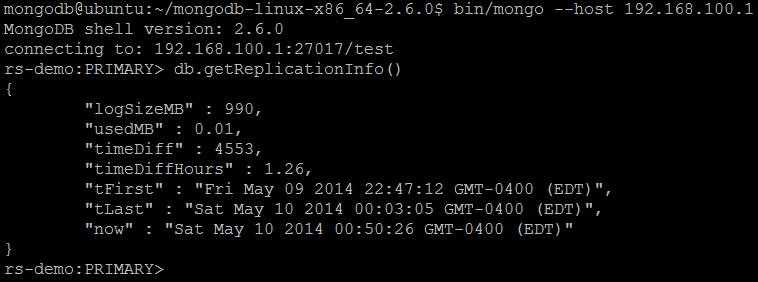
| Command | db.getReplicationInfo() |
| Description | The command outputs the status of the replica set, using data polled from the oplog. |
| Example | In MongoDB shell, let us issue the command:rs.getReplicationInfo() |
| Reference | http://docs.mongodb.org/manual/reference/method/db.getReplicationInfo/ |
db.getReplicationInfo()
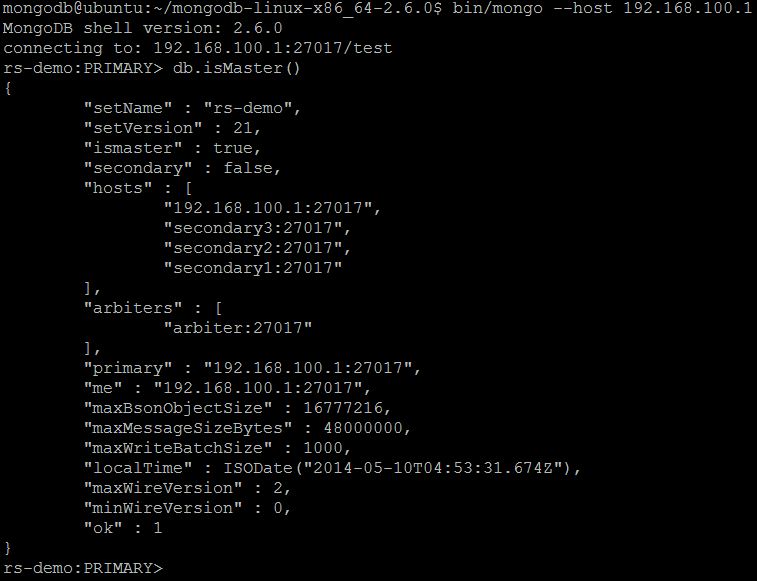
| Command | isMaster |
| Wrapper | db.isMaster() |
| Description | The command displays information about current member’s role in the replica set, including whether it is a primary (master), secondary or arbiter. |
| Example | In MongoDB shell, let us issue the command:db.isMaster() |
| Reference | http://docs.mongodb.org/manual/reference/command/isMaster/ http://docs.mongodb.org/manual/reference/method/db.isMaster/ |
isMaster
| Command | replSetMaintenance |
| Parameters | { replSetMaintenance: <true|false> } |
| Description | The command enables or disables the maintenance mode for a secondary member of a replica set. It should be run in context of admin database. |
| Example | Let us reconnect MongoDB shell to one of the secondary instances bin/mongo –host secondary1 and issue the command: db.adminCommand( { replSetMaintenance: true } ) |
| Reference | http://docs.mongodb.org/manual/reference/command/replSetMaintenance/ |
replSetMaintenance
| Command | replSetSyncFrom |
| Parameters | { replSetSyncFrom: <host> } |
| Wrapper | rs.syncFrom(host) |
| Description | This command sets the member that this replica set member will sync from (overriding the default sync target selection logic). |
| Example | Let us reconnect MongoDB shell to one of the secondary instances bin/mongo –host secondary1 and issue the command: rs.syncFrom( “secondary2:27017” ) |
| Reference | http://docs.mongodb.org/manual/reference/command/replSetSyncFrom/ http://docs.mongodb.org/manual/reference/method/rs.syncFrom/ |
replSetSyncFrom
| Command | replSetReconfig |
| Parameters | {
replSetReconfig: <configuration>,
force: <true|false>
} |
| Wrapper | rs.reconfig(configuration, force) |
| Description | The command modifies the configuration of an existing replica set. It may be used to add and remove members from the set and/or to change the configuration of existing members. Please notice that this function may disconnect the shell briefly and force a reconnection as the replica set renegotiates which member will be primary. As a result, the shell may display an error even if this command succeeds. |
| Example | In MongoDB shell, let us issue the command:rs.reconfig( rs.conf() ) |
| Reference | http://docs.mongodb.org/manual/reference/command/replSetReconfig/ http://docs.mongodb.org/manual/reference/method/rs.reconfig/ |
replSetReconfig
| Command | replSetStepDown |
| Parameters | {
replSetStepDown: <seconds> ,
force: <true|false>
} |
| Wrapper | rs.stepDown(seconds) |
| Description | The command forces the current replica set member to step down as primary and then attempts to avoid election as primary for the designated number of seconds. The command raises an error if the current member is not the primary. |
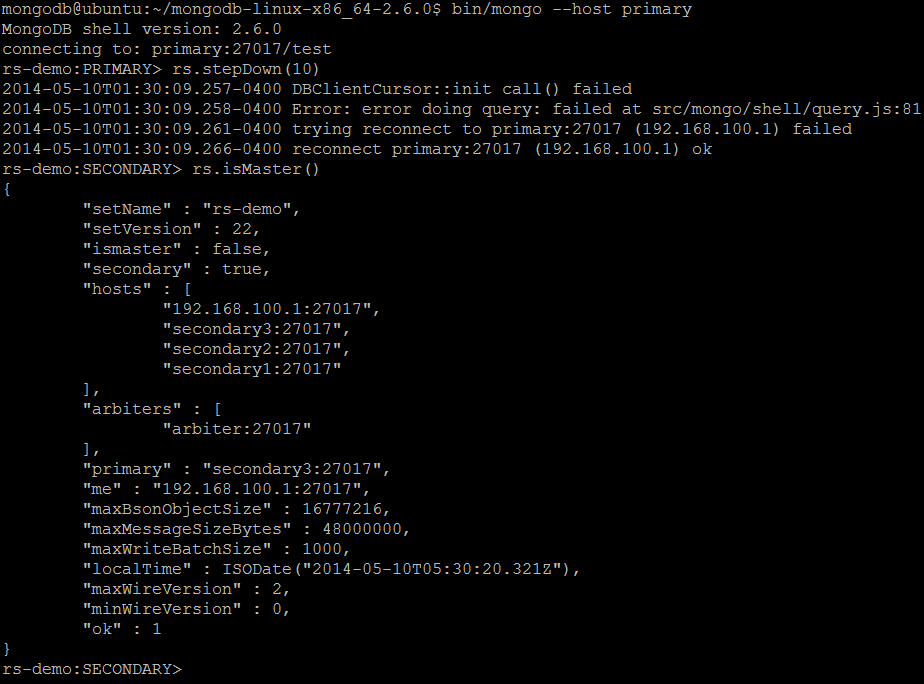
| Example | In MongoDB shell, let us issue the command:rs.stepDown( 10 ) The consecutive call of rs.isMaster() command confirms that current member has been stepped down as a primary and became a secondary node. |
| Reference | http://docs.mongodb.org/manual/reference/command/replSetStepDown/ http://docs.mongodb.org/manual/reference/method/rs.stepDown/ |
replSetStepDown
| Command | rs.slaveOk() |
| Description | The command allows the current connection to run read operations on secondary members of the replica set. |
| Example | See please Configuring Replication section. |
| Reference | http://docs.mongodb.org/manual/reference/method/rs.slaveOk/ |
rs.slaveOk()
5. What´s next
In this section we have covered replication – a very important aspect of data management. We have seen how easy it is to configure replication in MongoDB using replica sets feature and how it relates to sharding. In the next part of the tutorial we are going to cover the Map/Reduce programming model which MongoDB supports out of the box.

