Redis Replication
This article is part of our Academy Course titled Redis a NoSQL key-value store.
This is a crash course on Redis. You will learn how to install Redis and start up the server. Additionally, you will mess around with the Redis command line. More advanced topics follow, such as replication, sharding and clustering, while the integration of Redis with Spring Data is also explained. Check it out here!
Table Of Contents
1. Introduction
Replication is a very important feature of any data-oriented solution: either sophisticated relation database or simple key/value store. Replication allows having many copies of your data to be distributed across many nodes (servers), data centers and/or geographical regions.
Replication is a foundation of reliable, horizontally scalable and fault-tolerant systems: once one data node (server) fails, another one is ready to serve the queries or requests having the (mostly) up-to-date data as the failed node had. Not to mention the ability to effectively split write and read operations across master nodes and slaves (read-only replicas). Some interesting software system patterns are based on such decisions, for example CQRS (Command Query Responsibility Segregation) and replicated caching solutions.
There are basically two main classes of replication:
Master – Master(orActive – Active) andMaster – Slave(orActive – Passive).
Though Master – Master is the best option to have for automatic failover, it’s very complicated and only few data solutions have it. At the moment of writing, Redis 2.8.4 supports only Master – Slave replication.
2. Replication in Redis
The material of this section is based on excellent Redis documentation [1]. As we mentioned before, Redis supports Master – Slave replication that allows slaves to be exact copies of the master.
Some facts about Redis replication:
- Redis uses asynchronous replication
- Redis master can have multiple slaves
- Redis slaves can accept connections from other slaves (cascading replication)
- Redis replication is non-blocking on the master side: master will continue to handle queries when one or more slaves perform the initial synchronization
- Redis replication could be configured to be non-blocking on the slave side: while the slave is performing the initial synchronization, it can handle queries using the old version of the dataset (please see Advanced Replication Configuration,
slave-serve-stale-datasetting)
There are a couple of recommended use cases when Redis replication could be very handy. Firstly, it could be used in order to have multiple slaves for read-only queries or simply for data redundancy. Secondly, it is also possible to use replication to avoid master writing the full dataset to disk: slaves could be configured to do so periodically.
Also, very important recent enhancement in Redis 2.8: master and slave are usually able to continue the replication process without requiring a full resynchronization after the replication link went down. What it practically means, if network partition happens between master and slave, the slave can catch up with master later on by fetching the missed change sets, not a whole data set.
3. Configuring Basic Replication in Redis
Slave (or replica) configuration is very simple and in basic form requires only single parameter slaveof to be set in redis.conf file: the master IP address and port. Worth to mention, Redis slaves by default are run in read-only mode. This behavior is managed by the slave-read-only option in the configuration file redis.conf and can be changed while slave is running using CONFIG SET command (please refer to a part 2 of this tutorial: Redis Commands – Using Redis Command Line). Read-only slaves will reject all write commands.
In turn, non-read-only slaves will accept write commands. Please notice that the data written to a slave in such a way is ephemeral and will disappear when the slave and the master resynchronize or slave is restarted.
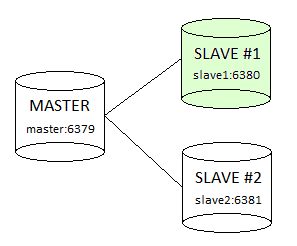
To see in practice how easy Redis replication configuration is we will configure a master and two slaves (replicas). One slave (replica) will have the default read-only mode (marked with green color on the picture below) and another one will be configured to support writes so we can see in action what’s happening.

For master and slaves we will use the configuration template redis.conf from Redis distribution (please see part 1 of this tutorial, Redis Installation – How to install Redis).
- For the
master, just copyredis.conftoredis-master.conf:cp redis.conf redis-master.conf
And start Redis server with this configuration:
redis-server redis-master.conf
- For slave (replica) 1, just copy
redis.conftoredis-slave1.conf:cp redis.conf redis-slave1.conf
And add following configuration setting to
redis-slave1.conf(we assume that hostname of Redis master ismaster):slaveof master 6379
Then start Redis server with this configuration overriding the default port to
6380:redis-server redis-slave1.conf --port 6380
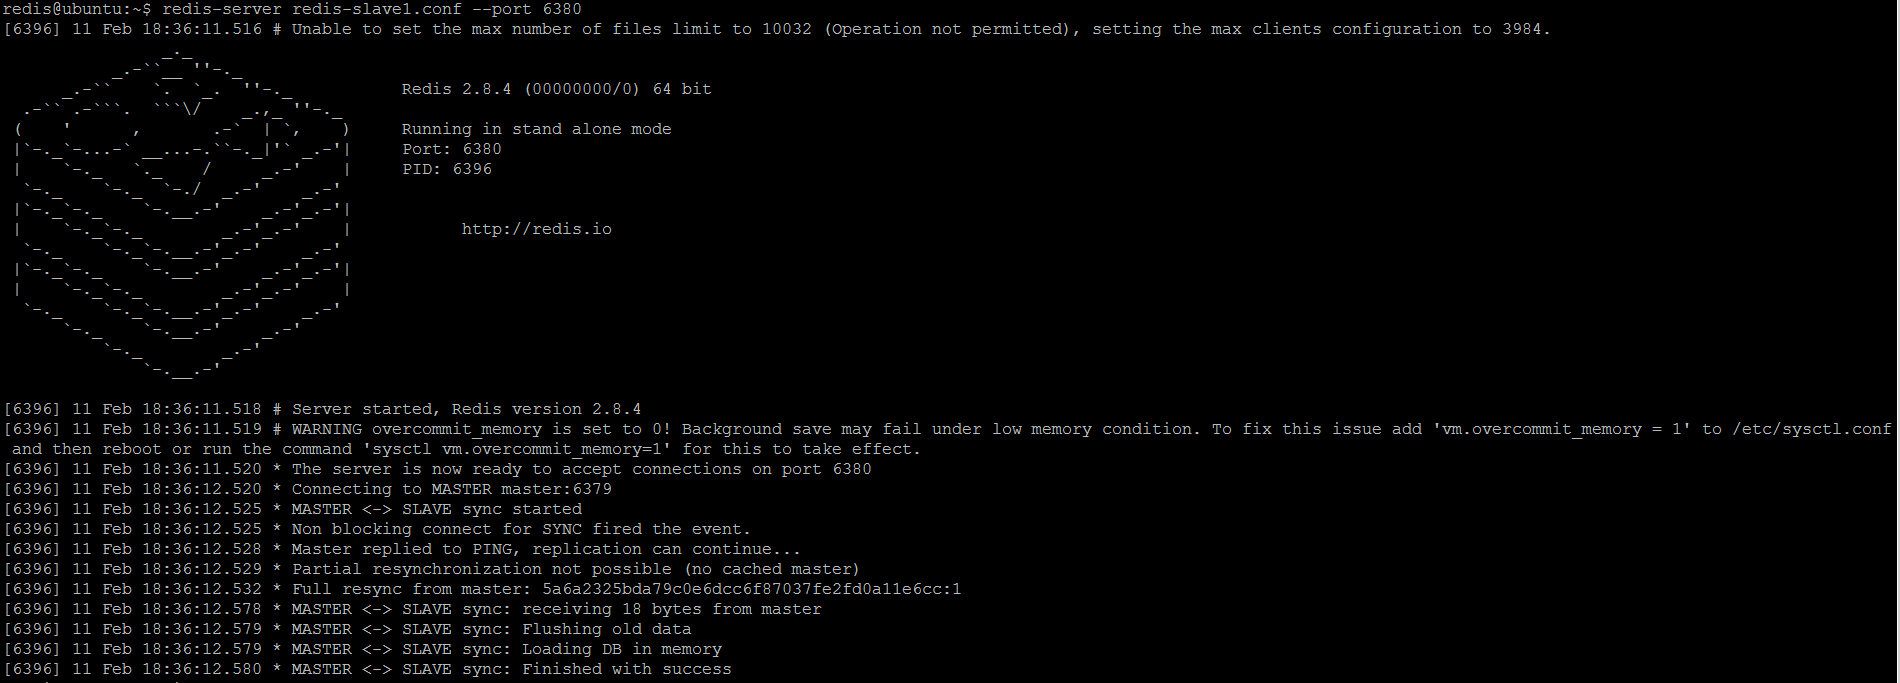
Upon start, the slave (replica) immediately synchronizes with master (as picture below shows).

Figure 3. Redis slave (replica) 1 is started (by default in read-only mode) and immediately synchronizes with master - For slave (replica) 2, just copy
redis.conftoredis-slave2.conf:cp redis.conf redis-slave2.conf
And add following configuration setting to
redis-slave2.conf(we assume that hostname of Redis master ismaster):slaveof master 6379
The change
slave-read-onlyfrom yes (default) to no, effectively allowing writes.slave-read-only no
And finally start Redis server with this configuration overriding the default port to
6381:redis-server redis-slave2.conf --port 6381
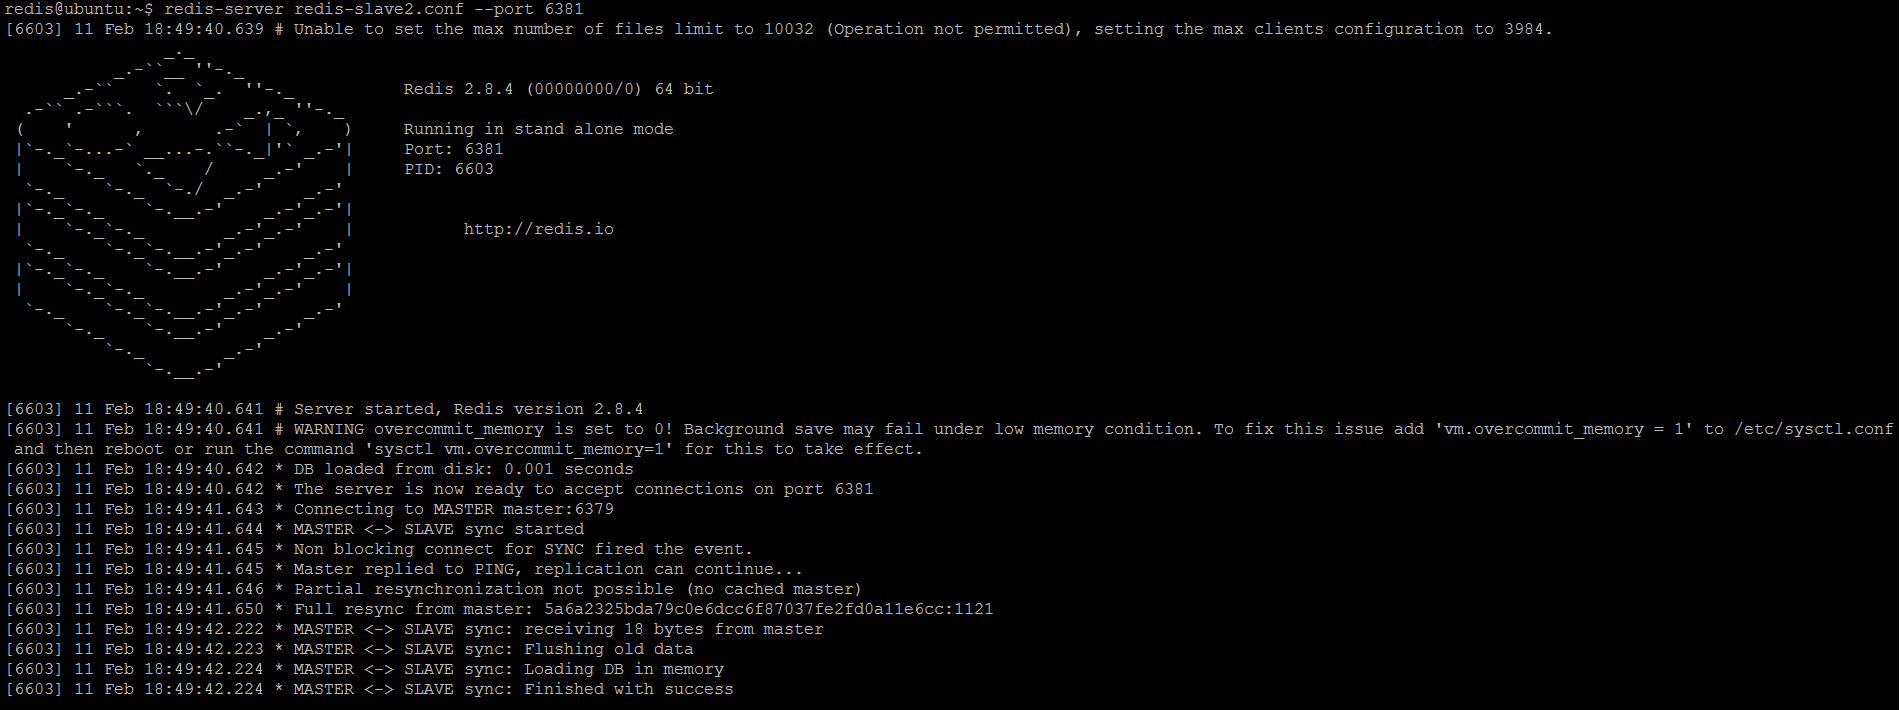
Upon start, the slave (replica) immediately synchronizes with master (as picture below shows).

Figure 4. Redis slave (replica) 2 is started (read-write mode) and immediately synchronizes with master
At this point, we have a topology with one Redis master and two Redis slaves (replicas) connected to it.
4. Verifying That Replication Works
There are a couple of simple techniques which may confirm that Redis replication works as expected. The simplest one is to SET some key on a master and then issue GET command for this key on each slave to see it’s replicated.

mykey on the master node

mykey on both slave nodes and verify changes from master are replicated
Trying to issue any write command on the slave 1 leads to error as it’s configured in read-only mode (as following picture demonstrates).

SET command on read-only slave (slave1) returns an error
Consequently, issuing any write command on the slave 2 is legitimate but all such ephemeral data is gone once slave resynchronizes with master.

SET command on read-write slave (slave2) is accepted
5. Configuring Replication at Runtime
In case you have already running multiple independent Redis servers, it’s possible to configure master-slave replication without restarting single of them, thanks to Redis runtime configuration capabilities. To demonstrate this in the field, we will run a regular Redis instance on port 6390 and then make it a slave of another Redis instance (master). So let’s the standalone instance:
redis-server --port 6390

6390
And now, let’s connect to this instance using redis-cli and using SLAVEOF command ([2]) we will make this instance a slave (replica) of running master instance.

The instance immediately synchronizes with master by using full synchronization (as picture below shows).

It is also possible at the same time to change slave’s default read-only mode to read-write using CONFIG SET command ([3]).

At any time, the current configuration settings could be queried using CONFIG GET command. The following example retrieves the slave-read-only setting to ensure its value was changed to “yes”.

6. Advanced Replication Configuration
There are quite a lot of settings which are very useful in real-words scenarios that are beyond our basic examples. In this section will go through most of them so to point out how you could make your replication more robust.
Redis master can be configured to accept write commands only if at least N slaves are currently connected to it (but it is not possible to ensure that slaves actually received a given write, only to limit the window of exposure for lost writes in case not enough slaves are available) with specified number of seconds.
Configuration settings support a minimum number of slaves (min-slaves-to-write) that have a lag not greater than a maximum number of seconds (slaves-max-lag). If those conditions haven’t been met, the master will reply with an error and the write will not be accepted.
| Setting | min-slaves-to-write <number of slaves> |
| Description | Sets the <number of slaves> which should be connected in order for write command to proceed. The <number of slaves> slaves need to be in “online” state. Setting the value to 0 disables this feature. |
| Defaults | By default min-slaves-to-write is set to 0 (feature disabled) |
| Example | min-slaves-to-write 3 |
Table 1
| Setting | min-slaves-max-lag <number of seconds> |
| Description | Sets the lag in seconds that must be less or equal to the specified value. It is calculated from the last ping received from the slave (that is usually sent every second). Setting the value to 0 disables the feature. |
| Defaults | By default min-slaves-max-lag is set to 10 |
| Example | min-slaves-max-lag 10 |
Table 2
If the master is password-protected (using the requirepass configuration directive) it is possible to tell the slave to authenticate before starting the replication synchronization process, otherwise the master will refuse the slave request.
| Setting | masterauth |
| Description | Configures password to use for authentication with master |
| Defaults | Commented out (no authentication ) |
| Example | masterauth mysectetpassword |
Table 3
When a slave loses its connection with the master, or when the replication is still in progress, the slave can act in two different ways:
- if
slave-serve-stale-datais set to ‘yes‘ (the default) the slave will still reply to client requests, possibly with out of date data, or the data set may just be empty if this is the first synchronization - if
slave-serve-stale-datais set to ‘no‘ the slave will reply with an error “SYNC with master in progress” to all the kind of commands but toINFO([4]) andSLAVEOF([2])
| Setting | slave-serve-stale-data yes | no |
| Description | Configures the behavior when a slave loses its connection with the master |
| Defaults | By default slave-serve-stale-data is set to yes |
| Example | slave-serve-stale-data yes |
Table 4
Slaves send PINGs to server in a predefined interval. It’s allowed to change this interval with the repl_ping_slave_period option.
| Setting | repl-ping-slave-period <number of seconds> |
| Description | Configures how often slaves send PINGs to server |
| Defaults | By default repl-ping-slave-period is set to 10 |
| Example | repl-ping-slave-period 10 |
Table 5
It is possible to configure the replication timeout for master and slaves (timeout from the point of view of slaves, when slaves make the decision that master is not available, and timeout from the point of view of masters, when master makes the decision that slaves are not available):
- bulk transfer I/O during SYNC, from the point of view of slave
- master timeout from the point of view of slaves
- slaves timeout from the point of view of master
| Setting | repl-timeout <number of seconds> |
| Description | Configures the replication timeout. It is important to make sure that this value is greater than the value specified for repl-ping-slave-period or a timeout will be detected every time there is low traffic between the master and the slave. |
| Defaults | By default repl-timeout is set to 60 |
| Example | repl-timeout 60 |
Table 6
For replication purposes, Redis supports some low-level TCP protocol tuning by using repl-disable-tcp-nodelay option. If it is set to “yes“, Redis server will use a smaller number of TCP packets and less bandwidth to send data to slaves. But this can add a delay for the data to appear on the slave side (up to 40 milliseconds with Linux kernels using a default configuration). Activating this setting could be considered useful in very high traffic condition or when the master and slaves are many hops away. By default, it is set to “no“, which means that delay for data to appear on the slave side will be reduced but more bandwidth will be used for replication.
| Setting | repl-disable-tcp-nodelay yes | no |
| Description | Disables / enables TCP_NODELAY on the slave socket after SYNC |
| Defaults | By default repl-disable-tcp-nodelay is set to “no” (optimized for low latency) |
| Example | repl-disable-tcp-nodelay no |
Table 7
There are two configuration parameters which help master to manage slave disconnections and partial replication: replication backlog size and backlog buffer time-to-live. The backlog is a buffer that accumulates slave data when slaves are disconnected for some time, so that when a slave wants to reconnect again, often a full resynchronization is not needed, but a partial resynchronization is enough (just passing the portion of data the slave missed while disconnected). The biggest the replication backlog, the longer the time the slave can be disconnected and later will be able to perform a partial resynchronization. The backlog is only allocated once there is at least one slave connected.
| Setting | repl-backlog-size |
| Description | Sets the replication backlog size |
| Defaults | By default repl-backlog-size |
| Example | repl-backlog-size 1mb |
Table 8
After a master has no longer connected slaves for some time, the backlog will be freed. The repl-backlog-ttl option configures the amount of seconds that needs to elapse, starting from the time the last slave disconnected, for the backlog buffer to be freed.
| Setting | repl-backlog-ttl <number of seconds> |
| Description | Sets backlog buffer time-to-live before freeing it. A value of 0 means to never release the backlog. |
| Defaults | By default repl-backlog-ttl is set to “3600” |
| Example | repl-backlog-ttl 3600 |
Table 9
Lastly, very interesting setting to assign a priority to the slave (replica) which is used by Redis Sentinel ([5]) in order to select a slave to promote into a master if the master is no longer working correctly. A slave with a low priority number is considered better for promotion, so for instance if there are three slaves with priority 10, 100, 25 Redis Sentinel ([5]) will pick the one with priority 10 (that is the lowest). However a special priority of 0 marks the slave as not able to perform the role of master, so a slave with priority of 0 will never be selected by Redis Sentinel ([5]) for promotion.
| Setting | slave-priority <number> |
| Description | The slave priority is an integer number published by Redis in the INFO output. |
| Defaults | By default slave-priority is set 100 |
| Example | slave-priority 100 |
Table 10
Redis Sentinel ([5]) will be discussed later in the tutorial.
| [1] http://redis.io/topics/replication |
| [2] http://redis.io/commands/slaveof |
| [3] http://redis.io/commands/config-set |
| [4] http://redis.io/commands/info |
| [5] http://redis.io/topics/sentinel |


