As we are very much aware of the Spring Framework and JMS. In this article, we will get introduced to an enterprise integration framework known as Spring Integration. Spring Integration is an open source enterprise integration framework that enhances the capability of what Spring could have done alone. Built on Spring’s IoC, Spring Integration abstracts message sources and destinations, integrates the messages, routes and manipulates them, while integrating various components of the application environment.
The Message object that is used by Spring Integration to communicate, consists of the payload and header data. Payload contains the actual data, while header contains other metadata like id, timestamp, etc. Below diagrams illustrates the different components involved in a Spring Integration communication
So let’s create a sample Spring Integration application:
With a custom java interface as inbound gateway
- Create a new Maven project.
- Add the dependencies into the pom.xml file:010203040506070809101112131415161718192021222324252627282930313233343536
<properties><spring.version>4.0.0.RELEASE</spring.version><jms.version>1.1-rev-1</jms.version><activemq.version>3.1</activemq.version><spring.integration.version>2.2.5.RELEASE</spring.integration.version><junit.version>4.11</junit.version><spring.test.version>3.2.3.RELEASE</spring.test.version></properties><!-- Spring Integration --><dependency><groupId>org.springframework.integration</groupId><artifactId>spring-integration-core</artifactId><version>${spring.integration.version}</version></dependency><dependency><groupId>org.springframework.integration</groupId><artifactId>spring-integration-jms</artifactId><version>${spring.integration.version}</version></dependency><!-- Include Spring test --><dependency><groupId>org.springframework</groupId><artifactId>spring-test</artifactId><version>${spring.test.version}</version><scope>test</scope></dependency><!-- Include JUnit --><dependency><groupId>junit</groupId><artifactId>junit</artifactId><version>${junit.version}</version><scope>test</scope></dependency> - Create the Student entity class, Student.java, as:01020304050607080910111213
package com.jcombat.entity;public class Student {String name;public Student(String name) {this.name = name;}public String getName() {return name;}} - Now let’s configure the spring integration components in a context file (name it as Test-context.xml):010203040506070809101112131415161718192021222324252627282930313233
<?xmlversion="1.0"encoding="UTF-8"?>xmlns:xsi="http://www.w3.org/2001/XMLSchema-instance"xmlns:context="http://www.springframework.org/schema/context"xmlns:jms="http://www.springframework.org/schema/jms"xmlns:p="http://www.springframework.org/schema/p"xsi:schemaLocation="http://www.springframework.org/schema/beanshttp://www.springframework.org/schema/integration http://www.springframework.org/schema/integration/spring-integration.xsdhttp://www.springframework.org/schema/integration/jms http://www.springframework.org/schema/integration/jms/spring-integration-jms.xsd<!-- Enable annotations --><context:annotation-config/><!-- Component scan to find all Spring components --><context:component-scanbase-package="org.jcombat.integration"/><beanid="simpleMessageReceiver"class="com.jcombat.integration.DemoMessageReceiver"/><!-- Define a request channel to communicate --><int:channelid="request"/><int:outbound-channel-adapterchannel="request"ref="simpleMessageReceiver"method="processMessage"/><int:gatewayid="demoGateway"service-interface="com.jcombat.integration.DemoGatewayInterface"default-request-channel="request"></int:gateway></beans>Message channels are something that encapsulate the actual data and decouple message producer from the consumer.
Gateway is basically an entry/exit point for the messaging system. So if you have a messaging server in place, like ActiveMQ or TIBCO, the DefaultMessageListener acts as the inbound gateway, being the entry point to our messaging system.
Service Activator is used to invoke a local service when the message arrives to the configured channel, in such a manner that the service doesn’t know it’s being invoked from a messaging system.
An Adapter receives messages from an external messaging system (JMS, SFTP, etc.) and “adapts” it to the messaging system (as a Spring Integration Message<T>). The inbound JMS adapter takes in the incoming external messages and “adapts” it to the Spring Integration Message<T> type. And vice-versa: it takes a Spring Integration Message<T> and “adapts” it to the formats required by an external system.
So, once a message comes in, via an Inbound Adapter, it flows from one component to another via Channels. Ultimately, it might be appropriate to write that message out somewhere. We can write the message using an Outbound Adapter.
- Now let’s create the gateway interface we have specified in the context, as:1234567
package com.jcombat.integration;import com.jcombat.entity.Student;public interface DemoGatewayInterface {public void process(Student student);} - Create a receiver class, which will finally receive the incoming message from the channel after being routed by the adapter.010203040506070809101112
package com.jcombat.integration;import org.springframework.integration.Message;import com.jcombat.entity.Student;public class DemoMessageReceiver {public void processMessage(Message<Student> message) {Student student = message.getPayload();System.out.println("Message Received - Student Name - " + student.getName());}} - This is it. Finally we need a client to make a call to the gateway interface method. Let’s do that using Spring Test Framework as:0102030405060708091011121314151617181920212223
package com.jcombat.integration;import org.junit.runner.RunWith;import org.springframework.beans.factory.annotation.Autowired;import org.springframework.test.context.ContextConfiguration;import org.springframework.test.context.junit4.SpringJUnit4ClassRunner;import com.jcombat.entity.Student;import com.jcombat.integration.DemoGatewayInterface;@RunWith(SpringJUnit4ClassRunner.class)@ContextConfigurationpublic class Test {@Autowiredprivate DemoGatewayInterface request;@org.junit.Testpublic void testIntegration() {Student emp = new Student("Abhishek");request.process(emp);}} - Add your application to the server and start the server.
- Navigate to the Test.java file we created in point 7 above and run it as JUnit test. Below is what we see logged in the IDE console:

- Create a new Maven project.
- Make sure the ActiveMQ server is up and running.
- The first and foremost thing is to make the entries into the pom.xml file. So it is the same as we have for the previous scenario.
- Let’s write the context file (jmsContext.xml) and configure the Spring Integration components as:01020304050607080910111213141516171819202122232425262728293031323334353637383940414243444546474849
<?xmlversion="1.0"encoding="UTF-8"?>xmlns:xsi="http://www.w3.org/2001/XMLSchema-instance"xmlns:context="http://www.springframework.org/schema/context"xmlns:jms="http://www.springframework.org/schema/jms"xmlns:p="http://www.springframework.org/schema/p"xsi:schemaLocation="http://www.springframework.org/schema/beanshttp://www.springframework.org/schema/integration http://www.springframework.org/schema/integration/spring-integration.xsdhttp://www.springframework.org/schema/integration/jms http://www.springframework.org/schema/integration/jms/spring-integration-jms.xsd<beanid="connectionFactory"class="org.apache.activemq.spring.ActiveMQConnectionFactory"><propertyname="brokerURL"value="tcp://localhost:61616"/></bean><beanid="messageListenerContainer"class="org.springframework.jms.listener.DefaultMessageListenerContainer"><propertyname="connectionFactory"ref="connectionFactory"/><propertyname="destinationName"value="testQueue"/><propertyname="maxConcurrentConsumers"value="1"/><propertyname="concurrentConsumers"value="1"/><propertyname="receiveTimeout"value="5000"/><propertyname="recoveryInterval"value="60000"/><propertyname="autoStartup"value="true"/></bean><!-- Define a channel to communicate out to a JMS Destination --><int:channelid="inbound"/><int:channelid="outbound"/><beanid="simpleMessageListener"class="com.jcombat.listener.SimpleMessageListener"/><int-jms:message-driven-channel-adapterid="jmsIn"container="messageListenerContainer"channel="inbound"acknowledge="auto"/><int:service-activatorinput-channel="inbound"output-channel="outbound"ref="simpleMessageListener"method="onMessage"/><int-jms:outbound-channel-adapterid="jmsOut"channel="outbound"connection-factory="connectionFactory"destination-name="sampleQueue"/></beans> - Let’s load up the context on server start. To do that, make an appropriate entry into the web.xml file as:010203040506070809101112131415
xsi:schemaLocation="http://java.sun.com/xml/ns/javaeeversion="3.0"><context-param><param-name>contextConfigLocation</param-name><param-value>/WEB-INF/jmsContext.xml</param-value></context-param><listener><listener-class>org.springframework.web.context.ContextLoaderListener</listener-class></listener></web-app> - Create the listener class, which will be finally receiving the message, as:123456789
package com.jcombat.listener;public class SimpleMessageListener {public String onMessage(String message) {System.out.println(message);return message;}} - Time to run our application. So this should work as:
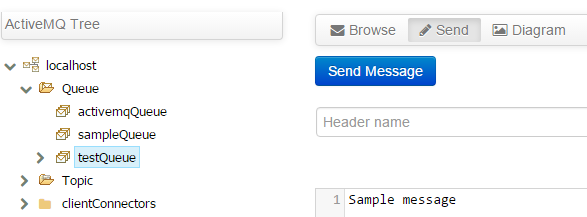
- Send a custom message to the testQueue:

- The listener gets invoked, and it’s onMessage method gets executed, logging the incoming message to the IDE console as:

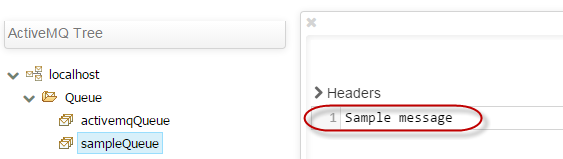
- The message is passed on the outbound channel and via outbound adapter to the destination sampleQueue, as can be seen below:

- Send a custom message to the testQueue:
With Spring DefaultMessageListener as inbound gateway

Download the Source Code
You can download the source code here.
| Reference: | Introduction to Spring Integration Framework from our JCG partner Abhimanyu Prasad at the jCombat blog. |

Hi,
I am not able to figure out the org.springframework.integration.Message import. Did I miss anything?
Thanks,
Sri
Hi Sri,
It’s because of the improper artifact versions that you were using in your application. This post has been updated. Kindly re-check the pom.xml entries. It now has the pom artifact versions as well. Also, you can now download the source code.
Hope that helps!
Thanks for the post,
Can you upload code source , c’ant find it in dropbox
Regards,