10 Practical Docker Tips for Day to Day Docker usage
I’ve had the opportunity to setup a complete new docker based microservice architecture at my current job, so since everyone is sharing their docker tips and trick, I thought I’d do the same thing. So here are a list of tips, tricks or whatever you might call it, that you might find useful in your day to day dealing with Docker.
1. Multiple dockers at the same host.
If you want you can run multiple docker containers on the same host. This is especially useful if you want to set up different TLS settings, network settings, log settings or storage drivers for a specific container. For instance we currently run a standard set up of two docker daemons. One runs Consul which provides DNS resolution and serves as the cluster store for the other docker container.
For example:
# start a docker daemon and bind to a specific port
docker daemon -H tcp://$IP:5000 --storage-opt dm.fs=xfs \
            -p "/var/run/docker1.pid" \
            -g "/var/lib/docker1" \
            --exec-root="/var/run/docker1

# and start another daemon
docker daemon -H tcp://$IP:5001 --storage-opt dm.fs=xfs \
        -s devicemapper \
        --storage-opt dm.thinpooldev=/dev/mapper/docker--vg-docker--pool \
        -p "/var/run/docker2.pid" \
        -g "/var/lib/docker2" --exec-root="/var/run/docker2"
        --cluster-store=consul://$IP:8500 \
        --cluster-advertise=$IP:2376
2. Docker exec of course
This is probably one of the tips that everyone mentions. When you’re using docker not just for your staging, production or testing environments, but also on your local machine to run database, servers, keystores etc. it is very convenient to be able to run commands directly within the context of a running container.
We do a lot with cassandra, and checking whether the tables contain correct data, or if you just want to execute a quick CQL query docker exec works great:
$ docker ps --format "table {{.ID}}\t {{.Names}}\t {{.Status}}"
CONTAINER ID        NAMES               STATUS
682f47f97fce         cassandra           Up 2 minutes
4c45aea49180         consul              Up 2 minutes

$ docker exec -ti 682f47f97fce cqlsh --color
Connected to Test Cluster at 127.0.0.1:9042.
[cqlsh 5.0.1 | Cassandra 2.2.3 | CQL spec 3.3.1 | Native protocol v4]
Use HELP for help.
cqlsh>
Or just access nodetool or any other tool available in the image:
$ docker exec -ti 682f47f97fce nodetool status
Datacenter: datacenter1
=======================
Status=Up/Down
|/ State=Normal/Leaving/Joining/Moving
--  Address         Load       Tokens       Owns    Host ID                               Rack
UN  192.168.99.100  443.34 KB  256          ?       8f9f4a9c-5c4d-4453-b64b-7e01676361ff  rack1

Note: Non-system keyspaces don't have the same replication settings, effective ownership information is meaningless
And this can of course be applied to any (client) tool bundled with an image. I personally find this much easier than installing all the client libraries locally and having to keep the versions up to date.
3. docker inspect and jq
This isn’t so much a docker tip, as it is a jq tip. If you haven’t heard of jq, it is a great tool for parsing JSON from the command line. This also makes it a great tool to see what is happening in a container instead of having to use the –format specifier which I can never remember how to use exactly:
# Get network information:
$ docker inspect 4c45aea49180 | jq '.[].NetworkSettings.Networks'
{
  "bridge": {
    "EndpointID": "ba1b6efba16de99f260e0fa8892fd4685dbe2f79cba37ac0114195e9fad66075",
    "Gateway": "172.17.0.1",
    "IPAddress": "172.17.0.2",
    "IPPrefixLen": 16,
    "IPv6Gateway": "",
    "GlobalIPv6Address": "",
    "GlobalIPv6PrefixLen": 0,
    "MacAddress": "02:42:ac:11:00:02"
  }
}

# Get the arguments with which the container was started
$ docker inspect 4c45aea49180 | jq '.[].Args'
[
  "-server",
  "-advertise",
  "192.168.99.100",
  "-bootstrap-expect",
  "1"
]

# Get all the mounted volumes
11:22 $ docker inspect 4c45aea49180 | jq '.[].Mounts'
[
  {
    "Name": "a8125ffdf6c4be1db4464345ba36b0417a18aaa3a025267596e292249ca4391f",
    "Source": "/mnt/sda1/var/lib/docker/volumes/a8125ffdf6c4be1db4464345ba36b0417a18aaa3a025267596e292249ca4391f/_data",
    "Destination": "/data",
    "Driver": "local",
    "Mode": "",
    "RW": true
  }
]
And of course also works great for querying other kinds of (docker-esque) APIs that produce JSON (e.g Marathon, Mesos, Consul etc.). JQ provides a very extensive API for accessing and processing JSON. More information can be found here: https://stedolan.github.io/jq/
4. Extending an existing container and pushing it to a local registry.
On the central docker hub there are a great number of images available that will serve for many different use cases. What we noticed though, is that often we had to make some very small changes to the images. For instance for better health checks from consul, to better behave in our cluster setup or to add additional configuration that wasn’t easy to do through system variables or command line parameters. What we usually do if we run into this, is just create our own docker image and push it to our local registry.
For instance, we wanted to have JQ available on our consul image to make health checking our services easier:
FROM progrium/consul

USER root

ADD bin/jq /bin/jq
ADD scripts/health-check.sh /bin/health-check.sh
With our health check scripts and JQ we do the health checks from our own consul image. We also have a local registry running so after image creation we just tag the resulting image and push it to our local registry:
$ docker build .
...
$ docker tag a3157e9edc18 <local-registry>/consul-local:some-tag
$ docker push <local-registry>/consul-local:some-tag
Now it is available to our developers, and can also be used in our different testing environments (we use a separate registry for production purposes).
5. Accessing dockers on remote hosts
The docker CLI is a very cool tool. One of the great features is that you can use it to easily access multiple docker daemons even if they are on different hosts. All you have to do is set the DOCKER_HOST environment variable to point to the listening address of the docker daemon, and, if the port is of course reachable, you can directly control docker on a remote host. This is pretty much the same principle that is used by docker-machine when you run a docker daemon and set up the environment through docker-machine env:
$ docker-machine env demo
export DOCKER_TLS_VERIFY="1"
export DOCKER_HOST="tcp://192.168.99.100:2376"
export DOCKER_CERT_PATH="/Users/jos/.docker/machine/machines/demo"
export DOCKER_MACHINE_NAME="demo"
But you don’t have to limit yourself to just docker daemons started through the docker-machine, if you’ve got a controlled and well secured network where your daemons are running, you can just as easily control all the from a single machine (or stepping stone).
6. The ease of mounting host directories
When you’re working with containers, you sometimes need to get some data inside the container (e.g. shared configuration). You can copy it in, or ssh it in, but most often it is easiest to just add a host directory to the container that is mounted inside the container. You can easily do this in the following manner:
$ mkdir /Users/jos/temp/samplevolume/
$ ls /Users/jos/temp/samplevolume/
$ docker run -v /Users/jos/temp/samplevolume/:/samplevolume  -it --rm busybox
$ docker run -v /Users/jos/temp/samplevolume/:/samplevolume  -it --rm busybox
/ # ls samplevolume/
/ # touch samplevolume/hello
/ # ls samplevolume/
hello
/ # exit
$ ls /Users/jos/temp/samplevolume/
hello
As you can see the directory we specified is mounted inside the container, and any files we put there are visible on both the host and inside the container. We can also use inspect to see what is mounted where:
$ docker inspect 76465cee5d49 | jq '.[].Mounts'
[
  {
    "Source": "/Users/jos/temp/samplevolume",
    "Destination": "/samplevolume",
    "Mode": "",
    "RW": true
  }
]
There are a number of additional features which are very nicely explained on the docker site: https://docs.docker.com/engine/userguide/dockervolumes/
7. Add DNS resolving to your containers
I’ve already mentioned that we use consul for our containers. Consul is a distributed KV store which also provides service discovery and health checks. For service discovery Consul provides either a REST API or plain old DNS. The great part is that you can specify the DNS server for your containers when you run a specific image. So when you’ve got Consul running (or any other DNS server) you can add it to your docker daemon like this:
docker run -d --dns $IP_CONSUL --dns-search service.consul <rest of confguration>
Now we can resolve the ip address of any container registered with Consul by name. For instance in our environment we’ve got a cassandra cluster. Each cassandra instance registers itself with the name ‘cassandra’ to our Consul cluster. The cool thing is that we can now just resolve the address of cassandra based on host name (without having to use docker links).
$ docker exec -ti 00c22e9e7c4e bash
daemon@00c22e9e7c4e:/opt/docker$ ping cassandra
PING cassandra.service.consul (192.168.99.100): 56 data bytes
64 bytes from 192.168.99.100: icmp_seq=0 ttl=64 time=0.053 ms
64 bytes from 192.168.99.100: icmp_seq=1 ttl=64 time=0.077 ms
^C--- cassandra.service.consul ping statistics ---
2 packets transmitted, 2 packets received, 0% packet loss
round-trip min/avg/max/stddev = 0.053/0.065/0.077/0.000 ms
daemon@00c22e9e7c4e:/opt/docker$
8. Docker-ui is a great way to view and get insight into your containers
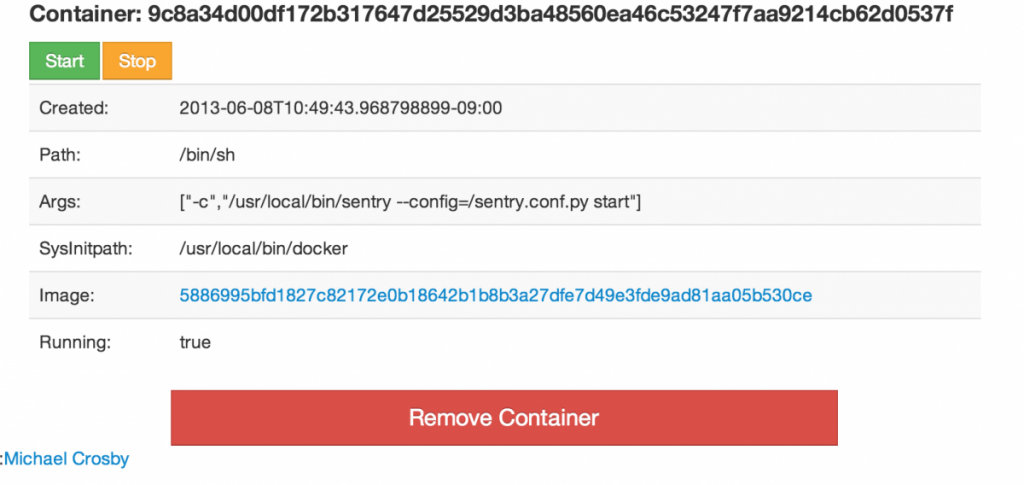
Managing docker using the Docker CLI isn’t that hard and provides great insides in what is happening. Often though you don’t need the full power of the Docker CLI but just want a quick overview of which containers are running and see what is happening. For this a great project is Docker ui (https://github.com/crosbymichael/dockerui):
With this tool, you can see the most important aspects of the containers and images of a specific docker daemon.
9. Container not starting up? overwrite the entry point and just run it from bash
Sometimes a container just doesn’t do what you want it to do. You’ve recreated the docker image a couple of times but somehow the application you run on startup doesn’t behave as you expect and the logging shows nothing useful. The easiest way to debug this is to just overwrite the entry point of the container and see what is going on inside the container. Are the file permissions right, did you copy the right files into the image or any of the other 1000 things that could go wrong.
Luckily docker has a simple solution for this. You can start a container with an entrypoint of your choosing:
$ docker run -ti --entrypoint=bash cassandra
root@896757f0bfd4:/# ls
bin   dev		    etc   lib	 media	opt   root  sbin  sys  usr
boot  docker-entrypoint.sh  home  lib64  mnt	proc  run   srv   tmp  var
root@896757f0bfd4:/#
10. Listening to events within a container
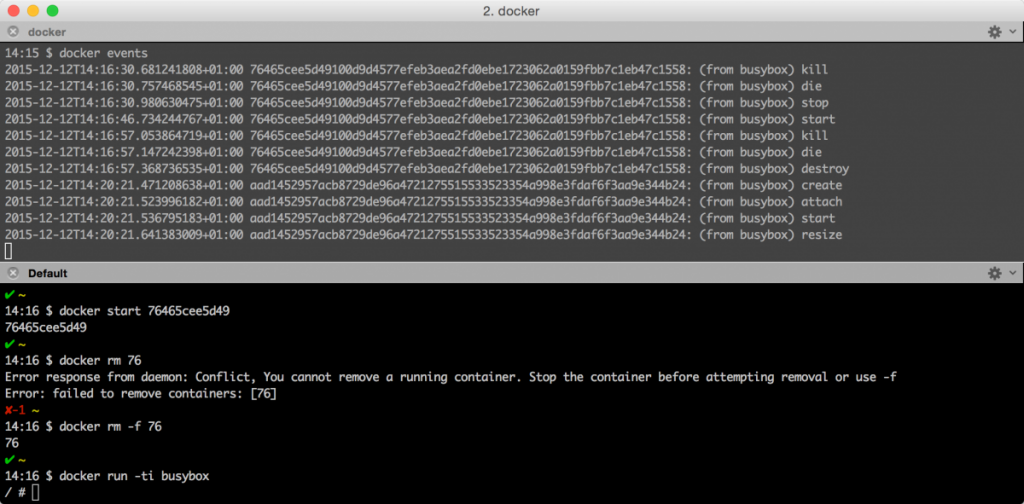
When you’re writing your own scripts or just want to learn what is happening with your running images you can use the docker event command. Writing scripts for this is very easy.
That’s it for now and we haven’t each touched upon docker compose and swarm yet, or the Docker 1.9 network overlay features! Docker is a fantastic tool, with a great set of additional tools surrounding it. In the future I’ll show some more stuff we’ve done with Docker so far.
| Reference: | 10 Practical Docker Tips for Day to Day Docker usage from our JCG partner Jos Dirksen at the Smart Java blog. |


