How to setup JNDI Database Connection pool in Tomcat – Spring Tutorial Example
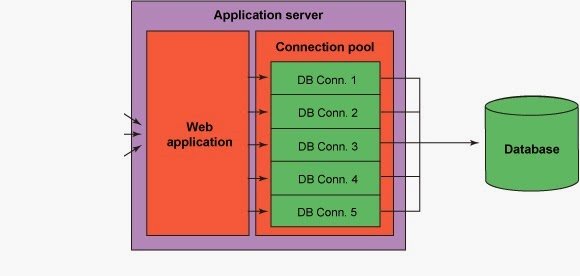
Setting the JNDI Database Connection pool in Spring and Tomcat is pretty easy. Tomcat server documentation gives enough information on how to setup connection pool in Tomcat 5, 6 or 7. Here we will use Tomcat 7 along with spring framework for creating a connection pool in Tomcat server and accessing them in Spring using JNDI code. In our last article, we have seen how to setup database connection pool in Spring for core Java application which doesn’t run on a web server or application server and doesn’t have managed J2EE container. but if you are developing a web application than its better to use server managed connection pool and access them using JNDI. Spring configuration will be generic and just based on JNDI name of Datasource so it will work on any J2EE Server e.g. Glassfish, WebLogic, JBoss or WebSphere until JNDI name is same.
Btw, Tomcat is my favorite web server and I use it a lot on development as it comes integrated with IDE like Eclipse and Netbeans. I am using it for all test and development purpose, and many companies even run Tomcat in Production for hosting Java web application.
It’s simple, fast and very robust, though beware with java.lang.OutOfMemoryError: PermGen space in tomcat, which can cause a memory leak in Java application. It usually happens due to ThreadLocal variables and JDBC drivers but you can surely avoid that by knowing more
How to use JNDI database connection pool in Tomcat and Spring
There three steps to configure and run JNDI Datasource Connection pool for any Java Web application:
1) Configure data source in Server and create JNDI name.
2) Configure web.xml
3) Configure Spring bean with JNDI Datasource
4) Include JDBC driver library on Server lib e.g. tomcat/lib
In order to create JNDI DataSource on J2EE web server you need to follow server documentation. On Tomcat 6 you can simply put following piece of XML in context.xml to create Tomcat managed database connection pool:
<<?xml version="1.0" encoding="UTF-8"?>
<Context antiJARLocking="true" path="/springDataSourceDemo">
<Resource name="jdbc/springeDataSource"
         auth="Container"
         type="javax.sql.DataSource"
         driverClassName="oracle.jdbc.driver.OracleDriver"
         url="jdbc:oracle:thin:@localhost:1521:SPRING_TEST"
         username="root"
         password="root"
         removeAbandoned="true"
         removeAbandonedTimeout="90"
         logAbandoned="true"
         maxActive="20"
         maxIdle="10"
         maxWait="-1"/>
</Context>
Resource element will create JNDI data source which can be referenced using JNDI name”jdbc/springeDataSource“.
Tomcat internally use DBCP and Commons pool library for managing database connection pool. You can check tomcat/lib directory for jar file tomcat-dbcp.jar which is responsible for creating database connection pool inside tomcat server.
1. web.xml configuration to access JNDI Database connection pool
In order to access any server resource from your web application, you need to specify the JNDI resources in web.xml.
You can use the following XML to declare JNDI Datasource in
 <resource-ref>
        <description>Oracle Spring JNDI Datasource</description>
        <res-ref-name>jdbc/springDataSource</res-ref-name>
        <res-type>javax.sql.DataSource</res-type>
        <res-auth>Container</res-auth>
</resource-ref>
Now your web application will see JNDI Datasource created in tomcat with name jdbc/springDataSource.
2. Spring configuration for accessing JNDI Datasource:
This spring configuration is generic enough which can be used to access any JNDI data source deployed on any J2EE or Java EE Server. It’s not tied up with Tomcat. The org.springframework.jndi.JndiObjectFactoryBean is used to lookup JNDI Datasource and bind with javax.sql.DataSource.
<bean id="springDataSource" class="org.springframework.jndi.JndiObjectFactoryBean">
  <property name="jndiName" value="java:comp/env/jdbc/springDataSource"/>
  <property name="lookupOnStartup" value="true"/>
  <property name="proxyInterface" value="javax.sql.DataSource"/>
</bean>
I have used XML way to declare a spring bean here, but, If you are using Spring 3.0 or higher than you can also use Java Configuration and @Bean annotation to declare data source in a Spring application.
3. JDBC Driver File in Tomcat Lib
Now the final step is to make sure tomcat lib has JDBC driver jar file. I usually put JAR file inside lib directory of tomcat but you can put it anywhere it makes sense and modifies tomcat classpath to include driver JAR into classpath.
Now rest of code which uses this data source should remain same. You can get Spring DAO source from the previous article How to setup Database Connection pool in Spring framework.
P.S. – If you want to learn how to develop RESTful Web Service using Spring MVC in depth, I suggest you join the REST with Spring certification class by Eugen Paraschiv. One of the best course to learn REST with Spring MVC.
| Published on Java Code Geeks with permission by Javin Paul, partner at our JCG program. See the original article here: How to setup JNDI Database Connection pool in Tomcat – Spring Tutorial Example Opinions expressed by Java Code Geeks contributors are their own. |


