Spring Framework with Maven Tutorial
In this post, we shall demonstrate how to use Maven dependencies for Spring framework for very specific use-cases. The latest versions of all the libraries we use can be found on the Maven Central.
1. Introduction
Understanding how Maven dependencies work and how they are managed, is important in a project for an effective build cycle and the clear concepts about what versions match between various libraries we use in our project. This is due to the reason that we often repeat the set of dependencies in multiple projects. When we don’t understand why we’re using a specific library version, we are ought to do mistakes. Let’s understand the relationship between different Spring Framework dependencies.
2. Project Setup
We will be using one of the many Maven archetypes to create a sample project for our example. To create the project execute the following command in a directory that you will use as workspace:
Creating Sample Project
mvn archetype:generate -DgroupId=com.javacodegeeks.example -DartifactId=JCG-SpringMaven-Example -DarchetypeArtifactId=maven-archetype-quickstart -DinteractiveMode=false
If you are running maven for the first time, it will take a few seconds to accomplish the generate command because maven has to download all the required plugins and artifacts in order to make the generation task.
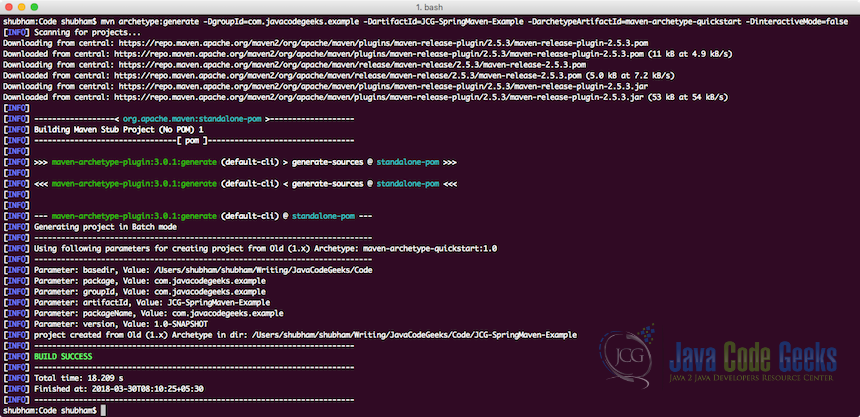
Notice that now, you will have a new directory with the same name as the artifactId inside the chosen directory. Now, feel free to open the project in your favourite IDE. Also, this project is only required to demonstrate various dependency tree made when we add appropriate Spring dependencies.
Finally, instead of using an IDE to make this project, we used a simple maven command. This helps us to make project setup and initialisation free from any specific IDE you may use.
3. Spring Dependencies with Maven
Due to a highly modular nature of Spring Framework, adding one dependency doesn’t create a requirement for another dependency. For instance, the Spring Context dependency doesn’t need any Spring MVC dependency or Spring Data libraries. Due to this, we will cover each of the dependencies in their own, separate sections.
To add the Spring Context support, here is the dependency which is needed:
Spring Context
<properties>
  <org.springframework.version>5.0.4.RELEASE</org.springframework.version>
</properties>
<dependency>
  <groupId>org.springframework</groupId>
  <artifactId>spring-context</artifactId>
  <version>${org.springframework.version}</version>
  <scope>runtime</scope>
</dependency>
Note that we have used the latest available Spring version which was released at the time this post was published. Again, the latest versions of all the libraries we use can be found on the Maven Central.
To understand all the dependencies which are added to the project when we add a specific dependency, we can run a simple Maven command which allows us to see a complete Dependency Tree for the project. Here is the Maven command which we can use to achieve the same:
Check Dependency Tree
mvn dependency:tree
When we run this command, it will show us the following Dependency Tree:
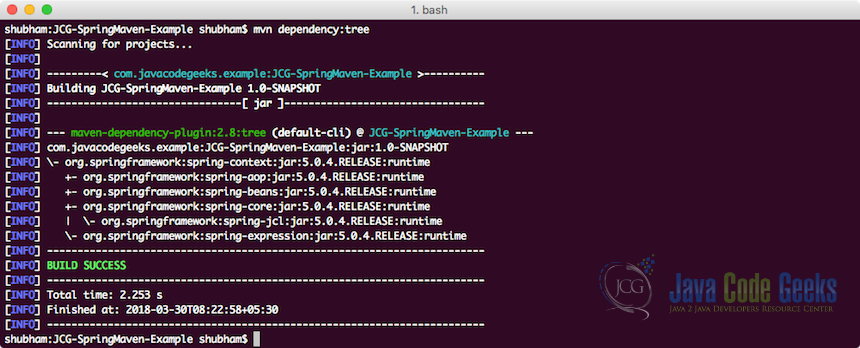
The spring-context library bring the actual Spring Injection Container into the project and needs few more JARs like spring-aop, spring-beans, spring-core, spring-expression and spring-jcl. When we ran the command above, before presenting to us the Dependency Tree, maven first downloaded the JARs again to confirm if something has changed.
Note that if one of the dependency needed another dependency to run, it was also downloaded and was shown as a sub-branch of the tree in the dependency tree above. The method of sub-branched representation of an indirect dependency clears out when some dependency brings another dependency into the dependency pool of the build system.
Finally, spring-context dependency we added here is runtime scope. This is because this JAR is only needed at runtime to provide Spring related classes only and not used in the project directly, at least not used for simple projects.
4. Spring Persistence Maven Dependencies
Now, let’s look at the core dependencies which are needed for Spring Persistence implementations:
Spring Persistence
<dependency>
  <groupId>org.springframework</groupId>
    <artifactId>spring-orm</artifactId>
  <version>${org.springframework.version}</version>
</dependency>
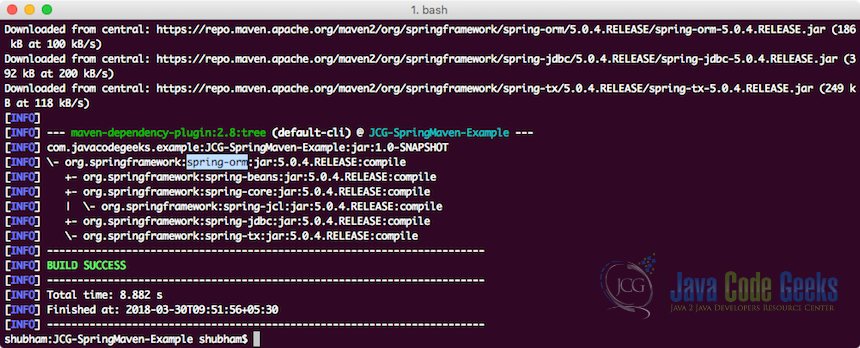
When we look at the dependency tree for this library, we will observe that JDBC and Transaction support is also included in this dependency:
5. Spring MVC Maven Dependencies
Spring MVC Maven dependency is the main dependency you will use when you start to work on Web projects with Spring. Here is the maven dependency to setup Spring MVC in your project:
Spring MVC
<dependency>
  <groupId>org.springframework</groupId>
    <artifactId>spring-web</artifactId>
  <version>${org.springframework.version}</version>
</dependency>
<dependency>
  <groupId>org.springframework</groupId>
    <artifactId>spring-webmvc</artifactId>
  <version>${org.springframework.version}</version>
</dependency>
This is one of the most used dependencies in Spring Framework Maven dependency family. Let’s look at the dependency tree for the spring-web and spring-webmvc library now:
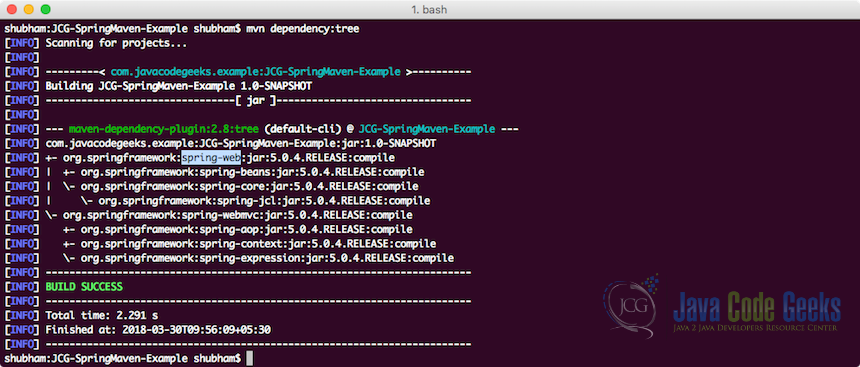
The spring-web library contains most common web utilities for a Servlet Environment. The second library, spring-webmvc brings the MVC support for the Servlet Environment.
6. Providing testing support with Maven
Testing is always an integral part of a project. In Spring, we have a dependency for the libraries that we can test our application as well. Its dependencies are defined as:
Spring Testing
<dependency>
  <groupId>org.springframework</groupId>
    <artifactId>spring-test</artifactId>
  <version>${org.springframework.version}</version>
</dependency>
Let’s look what all libraries contain with its dependency tree:
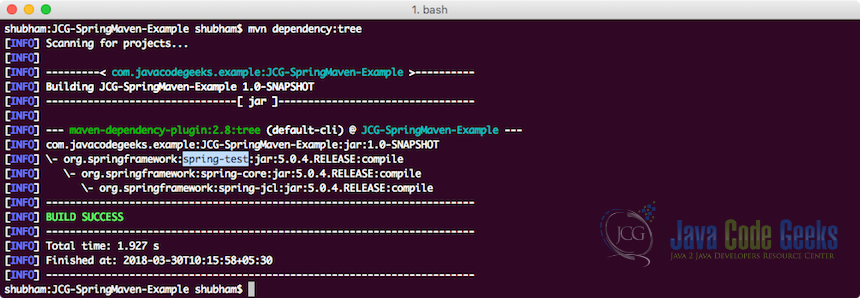
Even this is all the test dependency we need right now, we will look at two most commonly used test libraries used in Spring Framework here, JUnit and Mockito.
7. Spring Security Maven Dependencies
Maven dependencies related to Spring Security support are discussed in detail in the Spring Security with Maven lesson.
8. Using JUnit with Maven
To add JUnit dependency in your Spring based project, just add a simple dependency with test scope:
JUnit
<dependency>
  <groupId>junit</groupId>
  <artifactId>junit</artifactId>
  <version>4.12</version>
  <scope>test</scope>
</dependency>
Let’s look what all libraries contain with its dependency tree:

JUnit brings along the Hamcrest library with it too. To use Hamcrest matchers in JUnit, we use the assertThat statement followed by one or several matchers. To read about the available matchers in Hamcrest, read Hamcrest matchers tutorial.
9. Using Mockito with Maven
Mockito is one of the most widely used Java Testing Dependency which can be used to mock objects and their behaviour as well:
Mockito
<dependency>
  <groupId>org.mockito</groupId>
  <artifactId>mockito-all</artifactId>
  <version>1.10.19</version>
  <scope>test</scope>
</dependency>
Let’s look what all libraries contain with its dependency tree:
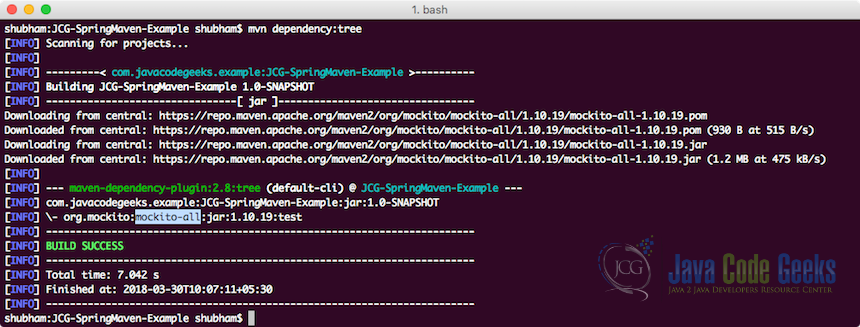
10. Project: Hello World
Just as a simple demonstration for Spring MVC, we will show how a simple controller can be made with Spring MVC 5. For this, we used the dependencies we mentioned in Spring MVC section along with some Servlet Container dependencies. Here are a list of all the dependencies we used in the project:
pom.xml
<dependency>
<dependency>
  <groupId>org.springframework</groupId>
  <artifactId>spring-web</artifactId>
  <version>${org.springframework.version}</version>
</dependency>
<dependency>
  <groupId>org.springframework</groupId>
  <artifactId>spring-webmvc</artifactId>
  <version>${org.springframework.version}</version>
</dependency>

<dependency>
  <groupId>javax.servlet</groupId>
  <artifactId>servlet-api</artifactId>
  <version>2.5</version>
  <scope>provided</scope>
</dependency>
<dependency>
  <groupId>javax.servlet.jsp</groupId>
  <artifactId>jsp-api</artifactId>
  <version>2.1</version>
  <scope>provided</scope>
</dependency>
<dependency>
  <groupId>javax.servlet</groupId>
  <artifactId>jstl</artifactId>
  <version>1.2</version>
</dependency>
To configure a front Controller in the project, we will sub-class the AbstractAnnotationConfigDispatcherServletInitializer class:
AppConfig.java
package com.javacodegeeks.example.config;

import org.springframework.web.servlet.support.AbstractAnnotationConfigDispatcherServletInitializer;

public class AppConfig extends AbstractAnnotationConfigDispatcherServletInitializer {

    protected Class<?>[] getRootConfigClasses() {
        return new Class[] { RootConfig.class };
    }

    protected Class<?>[] getServletConfigClasses() {
        return new Class[] { WebMvcConfig.class };
    }

    protected String[] getServletMappings() {
        return new String[] { "/" };
    }
}
Now we need to make a Root configuration class which will be emptry as we aren’t configuring any beans in the project for now:
RootConfig.java
package com.javacodegeeks.example.config;

import org.springframework.context.annotation.ComponentScan;
import org.springframework.context.annotation.Configuration;

@Configuration
@ComponentScan(basePackages = { "com.javacodegeeks.example.*" })
public class RootConfig {
}
To make this project as a MVC project, we need to make a WebMvcConfigurer class which also marks itself with @EnableWebMvc annotation. This enables the MVC nature of the project:
WebMvcConfig.java
package com.javacodegeeks.example.config;

import org.springframework.context.annotation.ComponentScan;
import org.springframework.context.annotation.Configuration;
import org.springframework.web.servlet.config.annotation.EnableWebMvc;
import org.springframework.web.servlet.config.annotation.WebMvcConfigurer;

@Configuration
@EnableWebMvc
@ComponentScan(basePackages = { "com.javacodegeeks.example.*" })
public class WebMvcConfig implements WebMvcConfigurer {
}
Once we’re ready with the configuration of the project, we can now add a Controller as a final step. To demonstrate, we will make a simple GET API which just returns a String as “Hello World”:
HomeController.java
package com.javacodegeeks.example.controller;

import org.springframework.stereotype.Controller;
import org.springframework.web.bind.annotation.GetMapping;
import org.springframework.web.bind.annotation.ResponseBody;

@Controller
public class HomeController {

    @GetMapping("/hello")
    @ResponseBody
    public String helloWorld() {
        return "Hello World";
    }
}
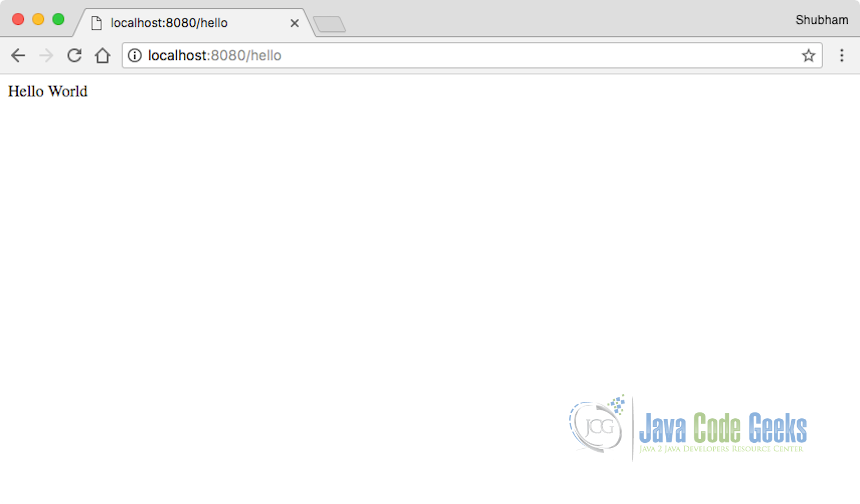
When we run this project, we’ll see a simple message in our browser. Open the URL we configured, which is:
URL
localhost:8080/hello
We will see the following output:
For a detailed explanation of why the configuration classes were needed, read Spring MVC Tutorial.
11. Conclusion
In this post, we talked about various Maven Dependencies related to Spring Framework which makes things crystal clear about the modularity of each dependency and how they’re independent of each other. This lesson is an excellent starting point to understand the required dependencies. We studied several parts of the Spring Framework dependencies and dependencies for JUNit and Mockito as well, even though they aren’t part of the Spring Framework itself but are often used with Spring-based projects to provide extensive Testing support for various layers of Spring Framework.
Finally, we learned how we can show a dependency tree of a project by using a simple maven command and observe which dependencies of a project depends on what other dependencies.
To learn more, read our Java Spring Tutorials.
12. Download the Source Code
This lesson explained how we can use Maven Dependencies for Spring Framework and present sepcific use-cases by keeping the dependencies separate and modular.
You can download the full source code of this example here: Spring Framework with Maven Tutorial
Last updated on Apr. 29th, 2021


¿And a web.xml?
With Spring Boot, we do not need to put a web.xml in place.