Animated Effects through JavaFX Callouts
In this article you will learn how to use JavaFX’s animation APIs to create callouts. You can see a demo of these callouts in action on my Youtube channel at https://www.youtube.com/watch?v=XTHbB0LRdT4.
What Is a Callout?
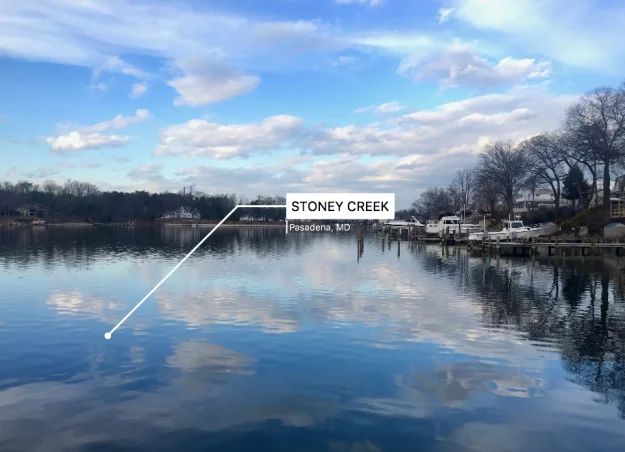
I’m sure you’ve seen commercials or sci-fi movies using callouts appearing over the top of an image to indicate objects in a scene. In this article, you will learn how to use JavaFX’s Animation APIs to create an animated callout effect. Using such effects, you can place text into a scene, and connect the text to an item of interest through a line or an arrow.
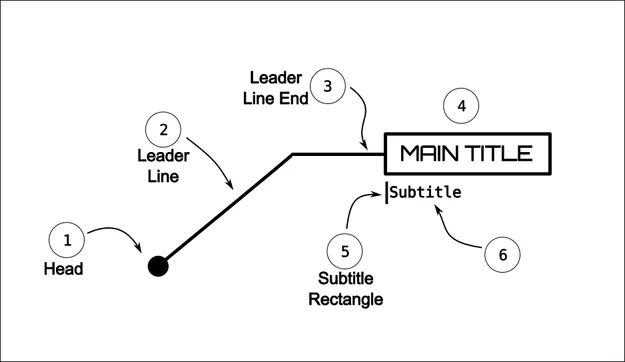
Figure 1 shows the pieces that combine to make up a callout in the context of this article.
Figure 1. The different pieces of a typical callout
Following are the definitions of the various pieces shown in Figure 1:
- Head – A point (circle) indicating an item in the image
- Leader line – A line drawn from the head to another point usually to form a diagonal
- Leader line end – The end part of the leader line segment (horizontal line)
- Main Title – The main title text. The main text begins to scroll at the leader line’s end point
- Subtitle Rectangle – A little animated rectangle coming from the bottom of the Main Title
- Subtitle – The sub title text. The subtitle text will underneath the main title text
Not all callouts are the same. Most though, will have the majority of these elements.
While a callout typically points things out in books or magazines in a static way, it is much much better in a video if we can animate the callout. A nice, animated effect is to begin by drawing a point (head), then tracing a line (leader line), then scrolling a main title, and finally scrolling a subtitle. As the animation finishes being displayed, it can pause for a moment (just enough to allow the viewer to read the title texts) before reversing the whole process as a way to exit the scene.
Animating a Callout
Now that you know what makes up a callout, we can jump into some JavaFX code to animate each of the pieces (1-6) shown in Figure 1.
Since each piece of the callout is animated in a sequence, you’ll begin by creating a javafx.animation.SequentialTransition instance. A SequentialTransition holds zero to many Animation objects. Here’s how to create one:
SequentialTransition calloutAnimation = new SequentialTransition();
As the name implies, the animations will occur in a sequence. Additional things you’ll want to set on the calloutAnimation are the cycle count and the auto reverse properties. For example:
1 2 3 | // Allow animation to go in reverse calloutAnimation.setCycleCount(2); calloutAnimation.setAutoReverse(true); |
The above settings enable the animation to reverse the sequence after the reader has had time to view and absorb the callout. To add animations you invoke the .getChildren().add() method on the sequential transition animation object. Following is code to add the head animation to the sequential transition animation object. The method buildHeadAnim() returns a javafx.animation.Animation instance.
1 2 3 4 | // Animation of head Circle head = new Circle(600, 550, 5); // center x, y, radius head.setFill(Color.WHITE); calloutAnimation.getChildren().add(buildHeadAnim(head)); |
Head Animation
You can use any shape such as a rectangle or a circle when creating an animation for the head. In the example coming next, the head is a JavaFX Circle shape. The animation begins with a zero radius, and scales to a larger radius. The method shown creates and returns a javafx.animation.Timeline object.
01 02 03 04 05 06 07 08 09 10 11 | protected Animation buildHeadAnim(Node head) { Circle headCircle = (Circle) head; return new Timeline( new KeyFrame(Duration.millis(1), new KeyValue(headCircle.visibleProperty(), true), new KeyValue(headCircle.radiusProperty(), 0) ), // start value new KeyFrame(Duration.millis(300), new KeyValue(headCircle.radiusProperty(), 5.0d)) // end value );} |
The timeline consists of an initial keyframe that sets the head circle’s visible property to true, and its radius property to zero. Next, the end key frame is defined with key values to interpolate the radius property from zero to 5.0 for 300 milliseconds.
Leader Line Animation
When animating the leader line, the line will appear as if it is being traced or drawn with a pencil. In the code below, the end point coordinates are interpolated (linear). A line is drawn from the head’s center (600, 550) to the lineToPoint coordinate (400, 300). I hard coded the values to keep the code more concise. The actual key values for the endX/endY are parameterized as getLeaderLineToPoint().getX() and getLeaderLineToPoint().getY() respectively.
01 02 03 04 05 06 07 08 09 10 | protected Animation buildBeginLeaderLineAnim(Line leaderLine) { return new Timeline( new KeyFrame(Duration.millis(1), new KeyValue(leaderLine.visibleProperty(), true)),// show new KeyFrame(Duration.millis(300), new KeyValue(leaderLine.endXProperty(), 400), new KeyValue(firstLeaderLine.endYProperty(), 300) ) );} |
Leader Line End Animation
Since the code to animate the end part of the leader line you’ll notice it is very similar to previous animation so, I will omit the code. To see the full listing please visit: https://github.com/carldea/callouts/tree/master/src/com/carlfx/callouts.
Main Title Text Animation
The main title text animation consists of an HBox containing a Text node that will appear to scroll left or right depending on the direction of the leader line’s end point. For example, if the leader line end point’s direction is pointing toward the right, then the main title text will appear to scroll to the right.
Below is the buildMainTitleAnim() method responsible for animating the main title text. Being that this method is the most complex part of the callout animation I wanted to share some tips and tricks that I encountered along the way.
01 02 03 04 05 06 07 08 09 10 11 12 13 14 15 16 17 18 19 20 21 22 23 24 25 26 27 28 29 30 31 32 33 34 35 36 37 38 39 40 41 42 43 44 45 46 | protected Animation buildMainTitleAnim(HBox mainTitleBackground) { // main title box // Calculate main title width and height upfront Rectangle2D mainTitleBounds = getBoundsUpfront(mainTitleBackground); double mainTitleWidth = mainTitleBounds.getWidth(); double mainTitleHeight = mainTitleBounds.getHeight(); // Position mainTitleText background beside the end part of the leader line. Point2D endPointLLine = calcEndPointOfLeaderLine(); double x = endPointLLine.getX(); double y = endPointLLine.getY(); // Viewport to make main title appear to scroll Rectangle mainTitleViewPort = new Rectangle(); mainTitleViewPort.setWidth(0); mainTitleViewPort.setHeight(mainTitleHeight); mainTitleBackground.setClip(mainTitleViewPort); mainTitleBackground.setLayoutX(x); mainTitleBackground.setLayoutY(y - (mainTitleHeight/2)); // Animate main title from end point to the left. if (LEFT == getEndLeaderLineDirection()) { // animate layout x and width return new Timeline( new KeyFrame(Duration.millis(1), new KeyValue(mainTitleBackground.visibleProperty(), true), new KeyValue(mainTitleBackground.layoutXProperty(), x) ), // show new KeyFrame(Duration.millis(200), new KeyValue(mainTitleBackground.layoutXProperty(), x - mainTitleWidth), new KeyValue(mainTitleViewPort.widthProperty(), mainTitleWidth) ) ); } // Animate main title from end point to the right return new Timeline( new KeyFrame(Duration.millis(1), new KeyValue(mainTitleBackground.visibleProperty(), true)), // show new KeyFrame(Duration.millis(200), new KeyValue(mainTitleViewPort.widthProperty(), mainTitleWidth) ) );} |
Finding the Main Title (Bounds) Upfront
Your code will need to know upfront the size of the bounding region when positioning the main title text. Following is a method that takes an HBox containing a Text node, then calculates the HBox’s width and height without the box having to be shown on the main scene graph.
1 2 3 4 5 6 7 8 9 | protected Rectangle2D getBoundsUpfront(Region node) { // Calculate main title width and height Group titleRoot = new Group(); new Scene(titleRoot); titleRoot.getChildren().add(node); titleRoot.applyCss(); titleRoot.layout(); return new Rectangle2D(0, 0, node.getWidth(), node.getHeight());} |
You can see in this example how the applyCss() and layout() methods from the javafx.scene.Node class are responsible for figuring out the width and height after CSS styling has been applied. Above you’ll notice a Scene is temporarily created.
Subtitle Animation
For brevity, I’ve omitted the subtitle animations. I trust you will look at the full code listing that I referred to earlier on Github. The subtitle animations all follow the same pattern as the title animations in terms of the initial start of the animations and interpolating to end key values.
Playing Callout Animation
Assuming your nodes that make up a callout are added to a JavaFX Pane layout node, you need to stop the sequential animation calloutAnimation. Then you’ll need to initialize all nodes to not be shown (visible property set to false). Lastly you’ll need to invoke the play() method.
01 02 03 04 05 06 07 08 09 10 | getChildren().addAll(head, firstLeaderLine, secondLeaderLine, mainTitle, subTitleRect, subTitle); calloutAnimation.stop(); getChildren().forEach(node -> node.setVisible(false)); calloutAnimation.play(); |
Conclusion
By using JavaFX’s animation API and simple shapes it was pretty easy to create animated callouts. In this article you learned how to use a SequentialTransition object responsible for invoking smaller animations (Timeline) sequentially.
Building each step of the callout each Timeline animation would use keyframes that interpolated over key values based on a shape’s properties such as a circle’s radius. After, learning about how to animate the leader line you also learned a neat trick that helped determine the main title text size via the applyCss() and layout() methods. Because of styling and font sizing it is difficult to know a UI component’s size until it is rendered onto the main scene graph.
Now that you know how to implement an animated callout I trust you will make applications more engaging. Happy coding!
| Published on Java Code Geeks with permission by Carl Dea, partner at our JCG program. See the original article here: Animated Effects through JavaFX Callouts Opinions expressed by Java Code Geeks contributors are their own. |


