Chain Of Responsibility Design Pattern In Java
In this tutorial, we’ll learn how to implement the Chain Of Responsibility Pattern in Java.
The Chain Of Responsibility design pattern involves having a chain of objects that are together responsible for handling a request. When a client sends a request, the first handler will try to process it. If it can process it, then the request processing ends here. However, if the handler cannot handle the user request, it will then go to the next handler in the chain. This process will continue until either one of the handlers in the chain successfully processes the request or the chain ends. If the entire chain is not able to handle the request, it means that the request remains unsatisfied.
Why Use Chain Of Responsibility?
The Chain Of Responsibility is a pretty important design pattern in our software industry. It offers several benefits:
- It promotes loose coupling between the user and the system as the user doesn’t need to care about which object will process its request
- Java exception handling mechanism also makes use of this pattern. If no suitable catch block is found, the request is delegated to the caller method to handle until we find an appropriate handler
- This pattern also finds its applications in filtering user requests by letting the request pass through a chain of filters
UML Representation:
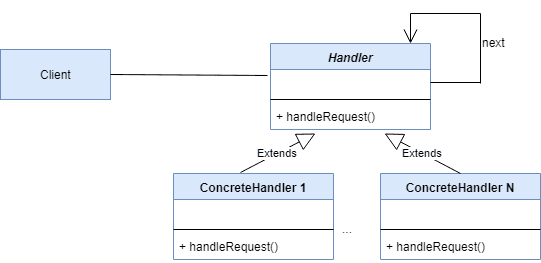
The UML representation of the Chain Of Responsibility pattern looks similar to:

Here, we have the following types of objects:
- Client: the code making user requests
- Handler: an abstract superclass or an interface defining the request handler method
- ConcreteHandler: the implementation classes for the Handler
The handler objects are connected from one to the next in the chain. Also, each concrete handler handles the request in its own unique way.
Defining the Abstract Handler:
Let’s implement a request filtering logic using the Chain Of Responsibility.
Firstly, we’ll define an abstract RequestFilter class:
01 02 03 04 05 06 07 08 09 10 11 12 | public abstract class RequestFilter { private RequestFilter next; public RequestFilter(RequestFilter next) { this.next = next; } public boolean doFilter(HttpServletRequest request); public void getNext() { return this.next; }} |
Defining the Concrete Handlers:
Now, let’s define the very first filter class in the chain, which will block request from suspicious IP addresses:
01 02 03 04 05 06 07 08 09 10 11 12 13 14 15 16 17 18 19 | public class SuspiciousRequestFilter extends RequestFilter { public SuspiciousRequestFilter(RequestFilter next) { super(next); } public boolean doFilter(HttpServletRequest request) { if(hasMaliciousIntent(request.getRemoteAddr()) { //blocks the request return false; } else if(next == null) { //filter chain ended return false; } return this.getNext().doFilter(request); } public boolean hasMaliciousIntent(String ipAddress) { ... }} |
Similarly, let’s define the second filter of our chain, which will block unauthorized requests:
01 02 03 04 05 06 07 08 09 10 11 12 13 14 15 16 17 18 19 | public class UnauthorizedRequestFilter extends RequestFilter { public UnauthorizedRequestFilter(RequestFilter next) { super(next); } public boolean doFilter(HttpServletRequest request) { if(isUserUnauthorized(request)) { //blocks the request return false; } else if(next == null) { //filter chain ended return false; } return this.getNext().doFilter(request); } public boolean isUserUnauthorized(HttpServletRequest request) { ... }} |
And the very last filter which will identify and block users with exceeded login attempts:
01 02 03 04 05 06 07 08 09 10 11 12 13 14 15 16 17 18 19 | public class ExceededLoginAttemptsRequestFilter extends RequestFilter { public ExceededLoginAttemptsRequestFilter(RequestFilter next) { super(next); } public boolean doFilter(HttpServletRequest request) { if(hasExceededLoginAttempts(request)) { //blocks the request return false; } else if(next == null) { //filter chain ended return false; } return this.getNext().doFilter(request); } public boolean hasExceededLoginAttempts(HttpServletRequest request) { ... }} |

Invoking the Chain:
Finally, it’s time to knit them together in a chain:
1 2 3 4 5 6 7 8 9 | HttpServletRequest httpServletRequest = ... //the last filter in our chainRequestFilter exceededAttemptsFilter = new ExceededLoginAttemptsRequestFilter(null); RequestFilter unauthorizedFilter = new UnauthorizedRequestFilter(exceededAttemptsFilter);RequestFilter suspiciousActivityFilter = new SuspiciousRequestFilter(unauthorizedFilter); suspiciousActivityFilter.doFilter(httpServletRequest); |
Here, each user request will follow the below chain of filtration:
As soon as one of these filter criteria gets matched, the matched filter will filter out that user request. This also means that the remaining chain will be skipped.
Conclusion:
In this tutorial, we learned how and when to use the Chain Of Responsibility design pattern.
Published on Java Code Geeks with permission by Shubhra Srivastava, partner at our JCG program. See the original article here: Chain Of Responsibility Design Pattern In Java Opinions expressed by Java Code Geeks contributors are their own. |


