Friends don’t let friends write user auth. Tired of managing your own users? Try Okta’s API and Java SDKs today. Authenticate, manage, and secure users in any application within minutes.
This tutorial will explore two ways to configure authentication and authorization in Spring Boot using Spring Security. One method is to create a WebSecurityConfigurerAdapter and use the fluent API to override the default settings on the HttpSecurity object. Another is to use the @PreAuthorize annotation on controller methods, known as method-level security or expression-based security. The latter will be the main focus of this tutorial. However, I will present some HttpSecurity code and ideas by way of contrast.
The first authentication method is HttpSecurity, which is global and is by default applied to all requests. Finer-grained control is possible, however, using pattern matching for endpoints, and the fluent API exposed by the HttpSecurity is quite powerful. This is where configuration options such as OAuth 2.0, Form Login, and HTTP Basic are exposed. It is a great place to set global authentication policies.
Method-level security is implemented by placing the @PreAuthorize annotation on controller methods (actually one of a set of annotations available, but the most commonly used). This annotation contains a Spring Expression Language (SpEL) snippet that is assessed to determine if the request should be authenticated. If access is not granted, the method is not executed and an HTTP Unauthorized is returned. In practice, using the @PreAuthorize annotation on a controller method is very similar to using HttpSecurity pattern matchers on a specific endpoint. There are some differences, however.
Differentiate Between Spring Security’s @PreAuthorize and HttpSecurity
The first difference is subtle, but worth mentioning. HttpSecurity method rejects the request earlier, in a web request filter, before controller mapping has occurred. In contrast, the @PreAuthorize assessment happens later, directly before the execution of the controller method. This means that configuration in HttpSecurity is appied before @PreAuthorize.
Second, HttpSecurity is tied to URL endpoints while @PreAuthorize is tied to controller methods and is actually located within the code adjacent to the controller definitions. Having all of your security in one place and defined by web endpoints has a certain neatness to it, especially in smaller projects, or for more global settings; however, as projects get larger, it may make more sense to keep the authorization policies near the code being protected, which is what the annotation-based method allows.
Another advantage that @PreAuthorize presents over HttpSecurity is the use of SpEL. Spring Expression Language allows you to make authorization decisions based on complex expressions that can access built-in authentication objects (such as authentication and principal), dependency-injected method parameters, and query parameters. In this tutorial you will mostly look at two expressions: hasAuthority() and hasRole(). The Spring docs are again a great place to dig deeper.
Before we dive into the project, I want to also mention that Spring also provides a @PostAuthorize annotation. Not surprisingly, this is a method-level authorization annotation that is assessed after the method executes. Why would we want to do that? It allows the method to perform its own authorization checks based on whatever controller logic it likes before the annotation is assessed. The downside is that because the controller method is executed before the annotation is assessed, this could result is inefficiency, depending on the implementation.
Dependencies
The dependencies for this tutorial are pretty simple. You need: 1) Java 8+ installed, and 2) an Okta developer account.
If you do not have Java installed, go to AdoptOpenJDK. On *nix systems, you can also use SDKMAN.
If you do not already have a free Okta developer account, go to our website and sign up.
Start a Sample Project Using Spring Initializr
To get the project started, you can use the Spring Initializr. However, while it’s worth taking a gander at the page, you don’t even have to bother going there to create the project. You can use the REST API and curl.
Open a terminal and cd to wherever you want the project file .zip to end up. Run the command below, which will download the zipped Spring Boot project.
curl https://start.spring.io/starter.zip \ -d dependencies=web,security \ -d type=gradle-project \ -d bootVersion=2.1.5.RELEASE \ -d groupId=com.okta.preauthorize \ -d artifactId=application \ -o PreAuthorizeProject.zipunzip PreAuthorizeProject.zip |
There isn’t much to the project to begin with except the build.gradle file and the DemoApplication.java class file. However, the whole project structure is there already set up for you.
The build.gradle file also has the two Spring dependencies you need for this example:
dependencies { implementation 'org.springframework.boot:spring-boot-starter-security' implementation 'org.springframework.boot:spring-boot-starter-web'} |
Add a WebController
The sample app in its current state doesn’t do much. You need to add a controller to define some endpoints and responses.
Add a new file src/main/java/com/okta/preauthorize/application/WebController.java:
package com.okta.preauthorize.application; import org.springframework.stereotype.Controller; import org.springframework.web.bind.annotation.RequestMapping; import org.springframework.web.bind.annotation.ResponseBody; @Controller public class WebController { @RequestMapping("/") @ResponseBody public String home() { return "Welcome home!"; } @RequestMapping("/restricted") @ResponseBody public String restricted() { return "You found the secret lair!"; }} |
This controller defines two endpoints: / and /restricted. You will be adding method-level security to the /restricted endpoint in a bit. Right now, however, no security has been configured.
Go ahead and run the application. From the root project directory, run:
./gradlew bootRun |
Once Spring Boot has finished launching, navigate to http://localhost:8080.
You’ll notice a login form appears. Whoa! Where did that come from?!
The form is automatically generated by Spring Boot. Take a look at the Spring class WebSecurityConfigurerAdapter and the method configure(HttpSecurity http). This is where the default authentication settings are configured.
/** * Override this method to configure the {@link HttpSecurity}. Typically subclasses * should not invoke this method by calling super as it may override their * configuration. The default configuration is: * * <pre> * http.authorizeRequests().anyRequest().authenticated().and().formLogin().and().httpBasic(); * </pre><p> *<br>* @param http the {@link HttpSecurity} to modify<br>* @throws Exception if an error occurs<br>*/<br>protected void configure(HttpSecurity http) throws Exception {<br>...<br>http<br>.authorizeRequests()<br>.anyRequest().authenticated()<br>.and()<br>.formLogin().and()<br>.httpBasic();<br>}</p><p>By default, all requests require authentication. Form-based authentication and HTTP Basic auth are enabled for all requests.</p><p>If you want to log in, look for a line in your console output like the following that tells you the generated password:</p><pre class="gutter: false;brush:bash">Using generated security password: 9c299bb9-f561-4c12-9810-c9a2bc1dca08</pre><p>The username is simply “user.” This password is re-generated each time Spring Boot is run.</p><h2 class="wp-block-heading" id="authentication-versus-authorization">Authentication Versus Authorization</h2><p>Before we go any further, I want to just quickly make sure two terms are clear: authentication and authorization. Authentication answers the question: who is making the request? Authorization answers the question: what are they allowed to do?</p><p>Authentication happens first, generally, unless there are specific permissions set for anonymous users (this is an implicit authentication in some ways). Authorization is based on the value of the authenticated user. The authenticated entity can be a human user or an automated service, or a service acting on behalf of a human user.</p><p>Two common authorization schemes are based on groups and roles. These two terms are often conflated and used interchangeably in less reputable places on the web, but there is an official difference. Groups define sets of users and assigns permissions to those sets of users. Users can be members of multiple groups. Roles define sets of permissions (allowed actions or resources) that can be assigned to users. In practice groups tends to be a more static, less flexible way of controller access while roles is often finely grained and can be dynamic even within a session, assigning roles for specific task and revoking them when they are no longer needed. Anybody that’s used Amazon AWS has seen this in action, often to bewildering effect.</p><h2 class="wp-block-heading" id="enable-method-level-security-for-spring-preauthorize">Enable Method-level Security for Spring @PreAuthorize</h2><p>What you want to do now is configure Spring Boot to allow requests on the home endpoint while restricting requests to the <code style="font-size:13px" class="highlighter-rouge">/restricted</code> endpoint.</p><p>You might initially think you could add <code style="font-size:13px" class="highlighter-rouge">@PreAuthorize("permitAll()")</code> to the home endpoint and this would allow all requests. However, if you try it, you’ll discover that it does nothing. That’s because the default <code style="font-size:13px" class="highlighter-rouge">HttpBuilder</code> implementation is still active, and because it’s assessed during the web request filter chain, it takes precedence. <strong>You also have to explicitly enable the method-level security annotations, otherwise, they’re ignored.</strong></p><p>Add the following <code style="font-size:13px" class="highlighter-rouge">SecurityConfig</code> class, that will achieve both of the above goals.</p><p><code style="font-size:13px" class="highlighter-rouge">src/main/java/com/okta/preauthorize/application/SecurityConfig.java</code></p><pre class="gutter: false;brush:java">package com.okta.preauthorize.application; import org.springframework.context.annotation.Configuration; import org.springframework.security.config.annotation.method.configuration.EnableGlobalMethodSecurity; import org.springframework.security.config.annotation.web.builders.HttpSecurity; import org.springframework.security.config.annotation.web.configuration.WebSecurityConfigurerAdapter; @Configuration @EnableGlobalMethodSecurity(prePostEnabled = true) public class SecurityConfig extends WebSecurityConfigurerAdapter { protected void configure(final HttpSecurity http) throws Exception {} }</pre><p>The <code style="font-size:13px" class="highlighter-rouge">@EnableGlobalMethodSecurity(prePostEnabled = true)</code> annotation is what enables the <code style="font-size:13px" class="highlighter-rouge">@PreAuthorize</code> annotation. This can be added to any class with the <code style="font-size:13px" class="highlighter-rouge">@Configuration</code> annotation. I won’t go into any depth about them here, but you can also enable <code style="font-size:13px" class="highlighter-rouge">@Secured</code>, an older Spring Security annotation, and JSR-250 annotations.</p><p>The <code style="font-size:13px" class="highlighter-rouge">configure(final HttpSecurity http)</code> method overrides the default <code style="font-size:13px" class="highlighter-rouge">HttpBuilder</code> configuration. Because it’s empty, it leaves the application without authorization or authentication.</p><p>Run the app again using <code style="font-size:13px" class="highlighter-rouge">./gradlew bootRun</code>, and you’ll discover that both endpoints are now wide open.</p><h2 class="wp-block-heading" id="implement-a-global-security-policy">Implement A Global Security Policy</h2><p>Apps generally have to choose which global security policy they are going to structure their security around: “default to allowed” or “default to authenticated”. Is the app by-default open? Or by-default restricted? I generally default to restricted and explicitly allow any public endpoints. This scheme makes sense for the types of proprietary web applications that I work on that tend not to be public or have a relatively small public face. However, if you are working on something that is largely public with a discrete access-controlled backed, like a website with an admin panel, a more permissive scheme might make sense. You’ll look at both here.</p><div style="display:inline-block; margin: 15px 0;"><div id="adngin-JavaCodeGeeks_incontent_video-0" style="display:inline-block;"></div></div><p></p><p>Since the app is already wide-open, I’ll show you how to restrict a specific method first. After that, you’ll look at a couple of ways to implement more globally restrictive access policies.</p><p>In the <code style="font-size:13px" class="highlighter-rouge">WebController</code> class, add the <code style="font-size:13px" class="highlighter-rouge">@PreAuthorize</code> annotation to the <code style="font-size:13px" class="highlighter-rouge">/restricted</code> endpoint, like this:</p><pre class="gutter: false;brush:java">@PreAuthorize("isAuthenticated()") @RequestMapping("/restricted") @ResponseBody public String restricted() { return "You found the secret lair!"; }</pre><p>Run the app (<code style="font-size:13px" class="highlighter-rouge">./gradlew bootRun</code>).</p><p>This time you will be able to navigate to the home page but going to the <code style="font-size:13px" class="highlighter-rouge">/restricted</code> endpoint gives you an (admittedly ugly) whitelabel error page.</p><div class="wp-block-image"><figure class="aligncenter"><img data-lazyloaded="1" src="data:image/svg+xml;base64,PHN2ZyB4bWxucz0iaHR0cDovL3d3dy53My5vcmcvMjAwMC9zdmciIHdpZHRoPSI2NzAiIGhlaWdodD0iMjMzIiB2aWV3Qm94PSIwIDAgNjcwIDIzMyI+PHJlY3Qgd2lkdGg9IjEwMCUiIGhlaWdodD0iMTAwJSIgZmlsbD0idHJhbnNwYXJlbnQiLz48L3N2Zz4=" fetchpriority="high" decoding="async" width="670" height="233" data-src="https://www.javacodegeeks.com/wp-content/uploads/2019/09/whitelabel.png.webp" alt="" class="wp-image-98455" data-srcset="https://www.javacodegeeks.com/wp-content/uploads/2019/09/whitelabel.png.webp 670w, https://www.javacodegeeks.com/wp-content/uploads/2019/09/whitelabel-300x104.png.webp 300w" data-sizes="(max-width: 670px) 100vw, 670px"><noscript><img fetchpriority="high" decoding="async" width="670" height="233" src="https://www.javacodegeeks.com/wp-content/uploads/2019/09/whitelabel.png.webp" alt="" class="wp-image-98455" srcset="https://www.javacodegeeks.com/wp-content/uploads/2019/09/whitelabel.png.webp 670w, https://www.javacodegeeks.com/wp-content/uploads/2019/09/whitelabel-300x104.png.webp 300w" sizes="(max-width: 670px) 100vw, 670px" /></noscript></figure></div><p>In a production app, you’d need to override this to return a better, custom error page or otherwise handle the error (if you want to create a custom error page, take a look at <a href="https://docs.spring.io/spring-boot/docs/2.1.x/reference/html/boot-features-developing-web-applications.html#boot-features-error-handling-custom-error-pages">the Spring docs on the subject</a>). But you can see that the app is returning a <strong>403 / Unauthorized</strong>, which is what you want.</p><p>Great. Now, instead, change your <code style="font-size:13px" class="highlighter-rouge">WebController</code> class to match the following:</p><pre class="gutter: false;brush:java">@Controller@PreAuthorize("isAuthenticated()") public class WebController { @PreAuthorize("permitAll()") @RequestMapping("/") @ResponseBody public String home() { return "Welcome home!"; } @RequestMapping("/restricted") @ResponseBody public String restricted() { return "You found the secret lair!"; } }</pre><p>Here you’ve used the <code style="font-size:13px" class="highlighter-rouge">@PreAuthorize</code> annotation to restrict the entire controller class to authenticated users and to explicitly allow all requests (regardless of authentication status) to the home endpoint.</p><p>I know we’ve been calling it “method-level” security, but, in fact, these <code style="font-size:13px" class="highlighter-rouge">@PreAuthorize</code> annotation can also be added to controller classes to set a default for the entire class. This is also where the <code style="font-size:13px" class="highlighter-rouge">@PreAuthorize("permitAll()")</code> comes in handy because it can override the class-level annotation.</p><p>If you run the app (<code style="font-size:13px" class="highlighter-rouge">./gradlew bootRun</code>) and try the endpoints, you’ll find that the home endpoint is open but the <code style="font-size:13px" class="highlighter-rouge">/restricted</code> endpoint is closed.</p><p>Note that if you added a second, separate web controller, all of its methods would still by-default be open and not require authentication.</p><p>A third option (my favorite on most small to medium-sized apps) is to use <code style="font-size:13px" class="highlighter-rouge">HttpBuilder</code> to require authentication for all requests by default and to explicitly allow any public endpoints. This allows you to use <code style="font-size:13px" class="highlighter-rouge">@PreAuthorize</code> to refine access control for specific methods based on users or roles or groups but makes it clear that all paths <strong>unless explicitly allowed</strong> will have some basic security applied. It also means that public paths are defined in a central place. Again this works for a certain type of project, but may not be the best structure for all projects.</p><p>To implement this, change the <code style="font-size:13px" class="highlighter-rouge">WebController</code> class to this (removing all the <code style="font-size:13px" class="highlighter-rouge">@PreAuthorize</code> annotations):</p><pre class="gutter: false;brush:java">@Controller public class WebController { @RequestMapping("/") @ResponseBody public String home() { return "Welcome home!"; } @RequestMapping("/restricted") @ResponseBody public String restricted() { return "You found the secret lair!"; } }</pre><p>And change the <code style="font-size:13px" class="highlighter-rouge">WebSecurity</code> class to this:</p><pre class="gutter: false;brush:java">Configuration @EnableGlobalMethodSecurity(prePostEnabled = true) public class SecurityConfig extends WebSecurityConfigurerAdapter { protected void configure(final HttpSecurity http) throws Exception { http.antMatcher("/**") .authorizeRequests() .antMatchers("/").permitAll() .anyRequest().authenticated() .and().formLogin(); } }</pre><p>What you’ve done is use <code style="font-size:13px" class="highlighter-rouge">SecurityConfig</code> class to explicitly permit all requests on the home endpoint while requiring authentication on all other endpoints. This sets a blanket minimum authentication requirement for your app. You also re-enabled form-based authentication.</p><p>Try it!</p><p>Run the app using: <code style="font-size:13px" class="highlighter-rouge">./gradlew bootRun</code>.</p><p>Navigate to the home endpoint, which is open: <code style="font-size:13px" class="highlighter-rouge">http://localhost:8080</code>.</p><p>And the restricted endpoint, which requires authentication: <code style="font-size:13px" class="highlighter-rouge">http://localhost:8080/restricted</code>.</p><p>When Spring’s login form appears, don’t forget you can use the default credentials. User is “user”, and the password is found in the console output (look for <code style="font-size:13px" class="highlighter-rouge">Using generated security password:</code>).</p><h2 class="wp-block-heading" id="advance-to-oauth-20-login">Advance to OAuth 2.0 Login</h2><p>Form-based authentication feels pretty creaky and old these days. More and more, users expect to be able to log in using third-party sites, and due to increased security threats, there’s less motivation to manage user credentials on your own server. Okta is a software-as-service identity and access management company that provides a whole host of services. In this section, you’re going to use them to quickly implement a login form using OAuth 2.0 and OIDC (OpenID Connect).</p><p>Very, very briefly: OAuth 2.0 is an industry-standard authorization protocol and OIDC is another open standard on top of OAuth that adds an identity layer (authentication). Together they provide a structured way for programs to manage authentication and authorization and to communicate across networks and the internet. Neither OAuth nor OIDC, however, provide an implementation. They are just specs or protocols. That’s where Okta comes in. Okta has an implementation of the OAuth 2.0 and OIDC specs that allows for programs to use their services to quickly provide login, registration, and single sign-on (or social login) services. In this tutorial, you’re just going to be implementing a login function, but at the end of the tutorial, you can find links to other resources to show you how to implement social login and registration.</p><p>First, sign up for a free Okta Developer account: <a href="https://developer.okta.com/signup/?utm_campaign=text_website_all_multiple_dev_dev_spring-preauthorize_null&utm_source=jcg&utm_medium=cpc">https://developer.okta.com/signup/</a>.</p><p>If this is the first time you’ve logged in or just registered, you may need to click the <strong>Admin</strong> button to get to the developer console.</p><p>Next, you need to configure an OIDC application.</p><p>From your Okta developer dashboard, in the top menu, click on <strong>Applications</strong>.</p><div class="wp-block-image"><figure class="aligncenter is-resized"><img data-lazyloaded="1" src="data:image/svg+xml;base64,PHN2ZyB4bWxucz0iaHR0cDovL3d3dy53My5vcmcvMjAwMC9zdmciIHdpZHRoPSI3NjgiIGhlaWdodD0iNDk0IiB2aWV3Qm94PSIwIDAgNzY4IDQ5NCI+PHJlY3Qgd2lkdGg9IjEwMCUiIGhlaWdodD0iMTAwJSIgZmlsbD0idHJhbnNwYXJlbnQiLz48L3N2Zz4=" decoding="async" data-src="https://www.javacodegeeks.com/wp-content/uploads/2019/09/add-app-1024x659.png.webp" alt="" class="wp-image-98456" width="768" height="494" data-srcset="https://www.javacodegeeks.com/wp-content/uploads/2019/09/add-app-1024x659.png.webp 1024w, https://www.javacodegeeks.com/wp-content/uploads/2019/09/add-app-300x193.png.webp 300w, https://www.javacodegeeks.com/wp-content/uploads/2019/09/add-app-768x494.png.webp 768w, https://www.javacodegeeks.com/wp-content/uploads/2019/09/add-app.png.webp 1118w" data-sizes="(max-width: 768px) 100vw, 768px"><noscript><img decoding="async" src="https://www.javacodegeeks.com/wp-content/uploads/2019/09/add-app-1024x659.png.webp" alt="" class="wp-image-98456" width="768" height="494" srcset="https://www.javacodegeeks.com/wp-content/uploads/2019/09/add-app-1024x659.png.webp 1024w, https://www.javacodegeeks.com/wp-content/uploads/2019/09/add-app-300x193.png.webp 300w, https://www.javacodegeeks.com/wp-content/uploads/2019/09/add-app-768x494.png.webp 768w, https://www.javacodegeeks.com/wp-content/uploads/2019/09/add-app.png.webp 1118w" sizes="(max-width: 768px) 100vw, 768px" /></noscript></figure></div><ul class="wp-block-list"><li>Click the green <strong>Add Application</strong> button</li><li>Click <strong>Web</strong> application type, and <strong>Next</strong></li><li>Give the app a Name. Any name.</li><li>Set <strong>Login Redirect URIs</strong> to <code style="font-size:13px" class="highlighter-rouge">http://localhost:8080/login/oauth2/code/okta</code></li><li>Click <strong>Done</strong>.</li></ul><div class="wp-block-image"><figure class="aligncenter"><img data-lazyloaded="1" src="data:image/svg+xml;base64,PHN2ZyB4bWxucz0iaHR0cDovL3d3dy53My5vcmcvMjAwMC9zdmciIHdpZHRoPSI2OTgiIGhlaWdodD0iOTgxIiB2aWV3Qm94PSIwIDAgNjk4IDk4MSI+PHJlY3Qgd2lkdGg9IjEwMCUiIGhlaWdodD0iMTAwJSIgZmlsbD0idHJhbnNwYXJlbnQiLz48L3N2Zz4=" decoding="async" width="698" height="981" data-src="https://www.javacodegeeks.com/wp-content/uploads/2019/09/new-oidc-app.png.webp" alt="" class="wp-image-98457" data-srcset="https://www.javacodegeeks.com/wp-content/uploads/2019/09/new-oidc-app.png.webp 698w, https://www.javacodegeeks.com/wp-content/uploads/2019/09/new-oidc-app-213x300.png.webp 213w" data-sizes="(max-width: 698px) 100vw, 698px"><noscript><img decoding="async" width="698" height="981" src="https://www.javacodegeeks.com/wp-content/uploads/2019/09/new-oidc-app.png.webp" alt="" class="wp-image-98457" srcset="https://www.javacodegeeks.com/wp-content/uploads/2019/09/new-oidc-app.png.webp 698w, https://www.javacodegeeks.com/wp-content/uploads/2019/09/new-oidc-app-213x300.png.webp 213w" sizes="(max-width: 698px) 100vw, 698px" /></noscript></figure></div><p>Take note of the <strong>Client ID</strong> and <strong>Client Secret</strong> at the bottom of the page. You’ll need these in the next section.</p><p>And that’s it on the Okta side.</p><p>Now you need to configure Spring Boot to use Okta as an OAuth 2.0 provider.</p><h2 class="wp-block-heading" id="configure-your-spring-boot-app-for-oauth-20">Configure Your Spring Boot App For OAuth 2.0</h2><p>Making Spring Boot work with OAuth 2.0 and Okta is remarkably easy. The first step is to add the Okta Spring Boot Starter dependency. It’s totally possible to use Okta OAuth 2.0 / OIDC without using our starter; however, the starter simplifies the configuration. It also handles extracting the groups claim from the JSON Web Token and turning it into a Spring Security authority (which will look at in a bit). Take a look at the <a href="https://github.com/okta/okta-spring-boot">Okta Spring Boot Starter GitHub page</a> for more info.</p><p>Update the dependencies section of your <code style="font-size:13px" class="highlighter-rouge">build.gradle</code> file:</p><pre class="gutter: false;brush:java">dependencies { implementation 'com.okta.spring:okta-spring-boot-starter:1.2.1' // <-- ADDED implementation 'org.springframework.boot:spring-boot-starter-security' implementation 'org.springframework.boot:spring-boot-starter-web' testImplementation 'org.springframework.boot:spring-boot-starter-test' testImplementation 'org.springframework.security:spring-security-test' }</pre><p>In the <code style="font-size:13px" class="highlighter-rouge">src/main/resources</code> directory there is an <code style="font-size:13px" class="highlighter-rouge">application.properties</code> file. Rename it to <code style="font-size:13px" class="highlighter-rouge">application.yml</code>. Add the following content:</p><pre class="gutter: false;brush:java">okta: oauth2: issuer: https://{yourOktaDomain}/oauth2/default client-id: {yourClientId} client-secret: {yourClientSecret}</pre><p>Don’t forget to update the <strong>client-id</strong>, <strong>client-secret</strong>, and <strong>issuer</strong> values to match the values from your Okta developer account and OIDC app. Your Okta issuer should look something like <code style="font-size:13px" class="highlighter-rouge">https://dev-123456.okta.com/oauth2/default</code>.</p><p>Finally, update the <code style="font-size:13px" class="highlighter-rouge">SecurityConfiguration.java</code> file:</p><pre class="gutter: false;brush:java">@Configuration @EnableGlobalMethodSecurity(prePostEnabled = true) public class SecurityConfig extends WebSecurityConfigurerAdapter { protected void configure(final HttpSecurity http) throws Exception { http.antMatcher("/**") .authorizeRequests() .antMatchers("/").permitAll() .anyRequest().authenticated() .and().oauth2Login(); // <-- THIS WAS CHANGED } }</pre><p>Notice that all you really changed here was <code style="font-size:13px" class="highlighter-rouge">formLogin()</code> to <code style="font-size:13px" class="highlighter-rouge">oauth2Login()</code>.</p><p>Run the app: <code style="font-size:13px" class="highlighter-rouge">./gradlew bootRun</code> (you may either need to sign out of the Okta developer dashboard or use an incognito window to see the login screen).</p><p>The <code style="font-size:13px" class="highlighter-rouge">/</code> endpoint is still open, but when you go to the restricted endpoint: <code style="font-size:13px" class="highlighter-rouge">http://localhost:8080/restricted</code>.</p><p>You’ll see the Okta login screen.</p><div class="wp-block-image"><figure class="aligncenter"><img data-lazyloaded="1" src="data:image/svg+xml;base64,PHN2ZyB4bWxucz0iaHR0cDovL3d3dy53My5vcmcvMjAwMC9zdmciIHdpZHRoPSI1OTQiIGhlaWdodD0iNjg3IiB2aWV3Qm94PSIwIDAgNTk0IDY4NyI+PHJlY3Qgd2lkdGg9IjEwMCUiIGhlaWdodD0iMTAwJSIgZmlsbD0idHJhbnNwYXJlbnQiLz48L3N2Zz4=" decoding="async" width="594" height="687" data-src="https://www.javacodegeeks.com/wp-content/uploads/2019/09/okta-login-2.png.webp" alt="" class="wp-image-98458" data-srcset="https://www.javacodegeeks.com/wp-content/uploads/2019/09/okta-login-2.png.webp 594w, https://www.javacodegeeks.com/wp-content/uploads/2019/09/okta-login-2-259x300.png.webp 259w" data-sizes="(max-width: 594px) 100vw, 594px"><noscript><img decoding="async" width="594" height="687" src="https://www.javacodegeeks.com/wp-content/uploads/2019/09/okta-login-2.png.webp" alt="" class="wp-image-98458" srcset="https://www.javacodegeeks.com/wp-content/uploads/2019/09/okta-login-2.png.webp 594w, https://www.javacodegeeks.com/wp-content/uploads/2019/09/okta-login-2-259x300.png.webp 259w" sizes="(max-width: 594px) 100vw, 594px" /></noscript></figure></div><p>Log in with your Okta credentials and you’re authenticated!</p><h2 class="wp-block-heading" id="inspect-the-oauth-20-user-attributes">Inspect the OAuth 2.0 User Attributes</h2><p>When developing OAuth applications, I have found it helpful to be able to inspect the information Spring Boot has about the client and the authenticated user. To this end, add a new controller named <code style="font-size:13px" class="highlighter-rouge">UserInfoController.java</code>.</p><p><code style="font-size:13px" class="highlighter-rouge">src/main/java/com/okta/preauthorize/application/UserInfoController.java</code></p><pre class="gutter: false;brush:java">package com.okta.preauthorize.application; import org.springframework.security.core.annotation.AuthenticationPrincipal; import org.springframework.security.oauth2.client.OAuth2AuthorizedClient; import org.springframework.security.oauth2.client.annotation.RegisteredOAuth2AuthorizedClient; import org.springframework.security.oauth2.core.user.OAuth2User; import org.springframework.stereotype.Controller; import org.springframework.web.bind.annotation.RequestMapping; import org.springframework.web.bind.annotation.ResponseBody; import java.util.Map; @RequestMapping("/user") @Controller public class UserInfoController { @RequestMapping("/oauthinfo") @ResponseBody public String oauthUserInfo(@RegisteredOAuth2AuthorizedClient OAuth2AuthorizedClient authorizedClient, @AuthenticationPrincipal OAuth2User oauth2User) { return "User Name: " + oauth2User.getName() + "<br/>" + "User Authorities: " + oauth2User.getAuthorities() + "<br/>" + "Client Name: " + authorizedClient.getClientRegistration().getClientName() + "<br/>" + this.prettyPrintAttributes(oauth2User.getAttributes()); } private String prettyPrintAttributes(Map<String, Object> attributes) { String acc = "User Attributes: <br/><div style='padding-left:20px'>"; for (String key : attributes.keySet()){ Object value = attributes.get(key); acc += "<div>"+key + ": " + value.toString() + "</div>"; } return acc + "</div>"; } }</pre><p>Notice that this class defines a class-wide request mapping path <code style="font-size:13px" class="highlighter-rouge">/user</code>, making the actual <code style="font-size:13px" class="highlighter-rouge">oauthUserInfo()</code> endpoint <code style="font-size:13px" class="highlighter-rouge">/user/oauthinfo</code>.</p><p>The second method, <code style="font-size:13px" class="highlighter-rouge">prettyPrintAttributes()</code>, is just some sugar to format the user attributes so that they’re more readable.</p><p>Run the app: <code style="font-size:13px" class="highlighter-rouge">./gradlew bootRun</code>.</p><p>Navigate to <code style="font-size:13px" class="highlighter-rouge">http://localhost:8080/user/oauthinfo</code>.</p><p>You’ll see something like this:</p><pre class="gutter: false;brush:bash">User Name: 00ab834zk7eJ18e8Y0h7 User Authorities: [ROLE_USER, SCOPE_email, SCOPE_openid, SCOPE_profile] Client Name: Okta User Attributes: at_hash: 1yq0lbHDupcb8AhBNShkeQ sub: 00ue9mlzk7eW24e8Y0h7 zoneinfo: America/Los_Angeles ver: 1 email_verified: true amr: ["pwd"] iss: https://dev-123456.oktapreview.com/oauth2/default preferred_username: andrew.hughes@mail.com locale: en-US given_name: Andrew aud: [0oakz4teswoV7sDZI0h7] updated_at: 1558380884 idp: 00oe9mlzh0xuqOT5z0h7 auth_time: 1558454889 name: Andrew Hughes exp: 2019-05-21T17:46:28Z family_name: Hughes iat: 2019-05-21T16:46:28Z email: andrew.hughes@mail.com jti: ID.CnwVJ_h1Dq5unqkwherWyf8ZFTETX_X4TP39ythQ-ZE</pre><p>I want to point out a few things. First, notice that the <strong>User Name</strong> is actually the Client ID of your OIDC application from Okta. That’s because, from the point of view of Spring Boot OAuth, the client app is the “user.” To find the actual user name and info, you have to look under the <strong>User Attributes</strong>. Keep in mind that the actual contents of these attributes vary between OAuth providers, so if you’re supporting Okta, GitHub, and Twitter, for example, so you will need to inspect these attributes for each OAuth provider to see what they’re returning.</p><p>The other important point is the <strong>User Authorities</strong>. Authorities, as used by Spring here, is a meta term for authorization information. They’re just strings. Their values are extracted from the OAuth/OIDC information. It’s up to the client app to use them properly. They may be roles, scopes, groups, etc… As far as OAuth/OIDC is concerned their usage is basically arbitrary.</p><p>To see how this works, in the next few sections you’ll add an <strong>Admin</strong> group in Okta, assign a user to that group, and restrict a method to the <strong>Admin</strong> group using the <code style="font-size:13px" class="highlighter-rouge">@PreAuthorize</code> annotation.</p><p><strong>ROLE_USER</strong>: You’ll notice that all authenticated users are assigned <code style="font-size:13px" class="highlighter-rouge">ROLE_USER</code> by Spring. This is the default, lowest-level role that is automatically assigned.</p><p><strong>SCOPE_</strong>: Also be aware that the OAuth scopes are mapped to Spring authorities and can be used for authorization, for example in the <code style="font-size:13px" class="highlighter-rouge">@PreAuthorize</code> and <code style="font-size:13px" class="highlighter-rouge">@PostAuthorize</code> annotations, as you’ll see in a sec.</p><h2 class="wp-block-heading" id="activate-groups-claim-on-okta">Activate Groups Claim on Okta</h2><p>Okta doesn’t by default include the groups claim in the JSON Web Token (JWT). The JWT is what Okta uses to communicate authentication and authorization information to the client app. A deeper dive into that is available in some other blog posts linked to at the end of this one.</p><p>To configure Okta to add the groups claim, go to your Okta developer dashboard.</p><p>From the top menu, go to <strong>API</strong> and select <strong>Authorization Servers</strong>.</p><p>Select the <strong>default</strong> authorization server.</p><p>Click on the <strong>Claims</strong> tab.</p><div class="wp-block-image"><figure class="aligncenter is-resized"><img data-lazyloaded="1" src="data:image/svg+xml;base64,PHN2ZyB4bWxucz0iaHR0cDovL3d3dy53My5vcmcvMjAwMC9zdmciIHdpZHRoPSI3NTIiIGhlaWdodD0iNTU2IiB2aWV3Qm94PSIwIDAgNzUyIDU1NiI+PHJlY3Qgd2lkdGg9IjEwMCUiIGhlaWdodD0iMTAwJSIgZmlsbD0idHJhbnNwYXJlbnQiLz48L3N2Zz4=" decoding="async" data-src="https://www.javacodegeeks.com/wp-content/uploads/2019/09/auth-server-claims.png.webp" alt="" class="wp-image-98459" width="752" height="556" data-srcset="https://www.javacodegeeks.com/wp-content/uploads/2019/09/auth-server-claims.png.webp 1003w, https://www.javacodegeeks.com/wp-content/uploads/2019/09/auth-server-claims-300x222.png.webp 300w, https://www.javacodegeeks.com/wp-content/uploads/2019/09/auth-server-claims-768x567.png.webp 768w" data-sizes="(max-width: 752px) 100vw, 752px"><noscript><img decoding="async" src="https://www.javacodegeeks.com/wp-content/uploads/2019/09/auth-server-claims.png.webp" alt="" class="wp-image-98459" width="752" height="556" srcset="https://www.javacodegeeks.com/wp-content/uploads/2019/09/auth-server-claims.png.webp 1003w, https://www.javacodegeeks.com/wp-content/uploads/2019/09/auth-server-claims-300x222.png.webp 300w, https://www.javacodegeeks.com/wp-content/uploads/2019/09/auth-server-claims-768x567.png.webp 768w" sizes="(max-width: 752px) 100vw, 752px" /></noscript></figure></div><p>You are going to create two claim mappings. You’re not creating two claims, per se, but instructing Okta to add the groups claim to both the Access Token and the ID Token. You need to do this because depending on the OAuth flow, the groups claim may be extracted from either. In our case, with the OIDC flow, it’s actually the ID Token that matters, but it’s best to just add them to both so as to avoid frustration in the future. The resource server flow requires the groups claim to be in the access token.</p><p>First, add a claim mapping for token type <strong>Access Token</strong>.</p><p>Click <strong>Add Claim</strong>.</p><p>Update the following values (the other default values are fine):</p><ul class="wp-block-list"><li><strong>Name:</strong> groups</li><li><strong>Include in token type</strong>: Access Token</li><li><strong>Value type:</strong> Groups</li><li><strong>Filter:</strong> Matches regex, <code style="font-size:13px" class="highlighter-rouge">.*</code></li></ul><div class="wp-block-image"><figure class="aligncenter"><img data-lazyloaded="1" src="data:image/svg+xml;base64,PHN2ZyB4bWxucz0iaHR0cDovL3d3dy53My5vcmcvMjAwMC9zdmciIHdpZHRoPSI3NjEiIGhlaWdodD0iNzA5IiB2aWV3Qm94PSIwIDAgNzYxIDcwOSI+PHJlY3Qgd2lkdGg9IjEwMCUiIGhlaWdodD0iMTAwJSIgZmlsbD0idHJhbnNwYXJlbnQiLz48L3N2Zz4=" decoding="async" width="761" height="709" data-src="https://www.javacodegeeks.com/wp-content/uploads/2019/09/edit-claim.png.webp" alt="" class="wp-image-98460" data-srcset="https://www.javacodegeeks.com/wp-content/uploads/2019/09/edit-claim.png.webp 761w, https://www.javacodegeeks.com/wp-content/uploads/2019/09/edit-claim-300x280.png.webp 300w" data-sizes="(max-width: 761px) 100vw, 761px"><noscript><img decoding="async" width="761" height="709" src="https://www.javacodegeeks.com/wp-content/uploads/2019/09/edit-claim.png.webp" alt="" class="wp-image-98460" srcset="https://www.javacodegeeks.com/wp-content/uploads/2019/09/edit-claim.png.webp 761w, https://www.javacodegeeks.com/wp-content/uploads/2019/09/edit-claim-300x280.png.webp 300w" sizes="(max-width: 761px) 100vw, 761px" /></noscript></figure></div><p>Second, add a second claim mapping for token type <strong>ID Token</strong>.</p><p>Click <strong>Add Claim</strong>.</p><p>Update the following values (just the same as above except token type):</p><ul class="wp-block-list"><li><strong>Name:</strong> groups</li><li><strong>Include in token type</strong>: ID Token</li><li><strong>Value type:</strong> Groups</li><li><strong>Filter:</strong> Matches regex, <code style="font-size:13px" class="highlighter-rouge">.*</code></li></ul><p>Great! So now Okta will map all of its groups to a <code style="font-size:13px" class="highlighter-rouge">groups</code> claim on the access token and the ID token.</p><p>What happens to this groups claim on the Spring side is not necessarily obvious nor automatic. One of the benefits of the Spring Boot starter is that it automatically extracts the groups claim from the JWT and maps it to a Spring authority. Otherwise you would need to implement your own <code style="font-size:13px" class="highlighter-rouge">GrantedAuthoritiesExtractor</code>.</p><p>FYI: the name of the groups claim can be configured using the <code style="font-size:13px" class="highlighter-rouge">okta.oauth2.groupsClaim</code> field in the <code style="font-size:13px" class="highlighter-rouge">application.yml</code> file. It defaults to <code style="font-size:13px" class="highlighter-rouge">groups</code>.</p><h2 class="wp-block-heading" id="inspect-the-user-attributes-with-groups">Inspect The User Attributes With Groups</h2><p>Run the app: <code style="font-size:13px" class="highlighter-rouge">./gradlew bootRun</code>.</p><p>Navigate to <code style="font-size:13px" class="highlighter-rouge">http://localhost:8080/user/oauthinfo</code>.</p><p>You’ll see something like this (a bunch of redundant lines omitted for clarity):</p><pre class="gutter: false;brush:bash">User Name: 00ab834zk7eJ18e8Y0h7 User Authorities: [Everyone, ROLE_USER, SCOPE_email, SCOPE_openid, SCOPE_profile]Client Name: Okta User Attributes: ... groups: ["Everyone"] ...</pre><p>Notice a new <strong>groups</strong> user attribute (the mapped groups claim). The value, <code style="font-size:13px" class="highlighter-rouge">Everyone</code>, is the default group mapped to, well, everyone. This gets mapped to the user authority <code style="font-size:13px" class="highlighter-rouge">Everyone</code>.</p><p>That’s the basic idea. It’ll get a little more exciting in the next step when you add an Admin group.</p><h2 class="wp-block-heading" id="create-an-admin-group-in-okta">Create An Admin Group in Okta</h2><p>Now you want to add an <strong>Admin</strong> group on Okta. Log into your Okta developer dashboard.</p><p>From the top menu, go to <strong>Users</strong> and select <strong>Groups</strong>.</p><p>Click <strong>Add Group</strong>.</p><p>In the popup:</p><ul class="wp-block-list"><li><strong>Name</strong> the group “Admin”.</li><li><strong>Description</strong> can be whatever you like.</li><li>Click <strong>Add Group</strong>.</li></ul><p>At this point, you’ve created the Admin group, <strong>but you haven’t actually assigned anybody to it!</strong></p><h2 class="wp-block-heading" id="use-method-level-authorization-to-restrict-an-endpoint">Use Method-level Authorization To Restrict An Endpoint</h2><p>In the <code style="font-size:13px" class="highlighter-rouge">WebController</code> class, update the <code style="font-size:13px" class="highlighter-rouge">/restricted</code> endpoint method. You’re adding the following annotation to the method:</p><pre class="gutter: false;brush:java">@PreAuthorize("hasAuthority('Admin')") </pre><p>Like so:</p><pre class="gutter: false;brush:java">@PreAuthorize("hasAuthority('Admin')") @RequestMapping("/restricted") @ResponseBody public String restricted() { return "You found the secret lair!"; }</pre><p>This tells Spring to check that the authenticated user has the <code style="font-size:13px" class="highlighter-rouge">Admin</code> authority, and if not, deny the request.</p><p>Run the app: <code style="font-size:13px" class="highlighter-rouge">./gradlew bootRun</code>.</p><p>Navigate to <code style="font-size:13px" class="highlighter-rouge">http://localhost:8080/restricted</code>.</p><p>You’ll get a <strong>403 / Unauthorized</strong> whitepage error.</p><h2 class="wp-block-heading" id="add-your-user-to-the-admin-group">Add Your User To the Admin Group</h2><p>Now you need to add your Okta user to the Admin group. From the top menu, select <strong>Users</strong> and click <strong>Groups</strong>. Click on the <strong>Admin</strong> group. Click <strong>Add Members</strong>. Search for your user in the popup and click <strong>Add</strong>.</p><h2 class="wp-block-heading" id="test-the-admin-group-membership">Test the Admin Group Membership</h2><p>Done! Let’s see what that did. Once, again, run the Spring Boot app: <code style="font-size:13px" class="highlighter-rouge">./gradlew bootRun</code>.</p><p>Navigate to <code style="font-size:13px" class="highlighter-rouge">http://localhost/user/oauthinfo</code>.</p><p>This time you’ll see the <code style="font-size:13px" class="highlighter-rouge">Admin</code> group and authority. (You may need a new browser session to see the change, or use incognito.)</p><pre class="gutter: false;brush:bash">User Name: 00ab834zk7eJ18e8Y0h7 User Authorities: [Admin, Everyone, ROLE_USER, SCOPE_email, SCOPE_openid, SCOPE_profile]Client Name: Okta User Attributes: ... groups: ["Everyone", "Admin"] ...</pre><p>And if you navigate to <code style="font-size:13px" class="highlighter-rouge">http://localhost:8080/restricted</code>, you’ll be allowed access.</p><h2 class="wp-block-heading" id="compare-spring-security-roles-and-authorities">Compare Spring Security Roles and Authorities</h2><p>One thing that confused me initially was <code style="font-size:13px" class="highlighter-rouge">hasRole()</code> versus <code style="font-size:13px" class="highlighter-rouge">hasAuthority()</code>.</p><p>Roles in Spring are authorities that have the <code style="font-size:13px" class="highlighter-rouge">ROLE_</code> prefix (like all things in Spring, the prefix is configurable). One way to think about this is that roles are intended for large sets of permissions while authorities can be used for finer-grained control. However, that’s just a possible use. The actual implementation is up to the developer. In this tutorial, you’re actually using authorities to map to authorization groups.</p><p>The important point to remember is that if you want to user <code style="font-size:13px" class="highlighter-rouge">hasRole()</code>, you need the authority name in the claim to start with <code style="font-size:13px" class="highlighter-rouge">ROLE_</code>. For example, if you added a <code style="font-size:13px" class="highlighter-rouge">ROLE_ADMIN</code> group, and added your user to it, and the group to the OIDC app, you could use <code style="font-size:13px" class="highlighter-rouge">hasRole('ADMIN')</code>.</p><h2 class="wp-block-heading" id="authorization-based-on-oauth-20-scopes-with-spring-preauthorize">Authorization Based On OAuth 2.0 Scopes with Spring PreAuthorize</h2><p>You can also use the <code style="font-size:13px" class="highlighter-rouge">@PreAuthorize</code> annotation to limit access based on OAuth scopes. From <a href="https://oauth.net/2/scope/">the OAuth 2.0 scopes documentation</a>:</p><blockquote class="wp-block-quote is-layout-flow wp-block-quote-is-layout-flow"><p> Scope is a mechanism in OAuth 2.0 to limit an application’s access to a user’s account. An application can request one or more scopes, this information is then presented to the user in the consent screen, and the access token issued to the application will be limited to the scopes granted.</p></blockquote><p>If you look at the inspected <code style="font-size:13px" class="highlighter-rouge">User Authorities</code> returned from the <code style="font-size:13px" class="highlighter-rouge">/user/oauthinfo</code> endpoint, you’ll see three authorities that begin with <code style="font-size:13px" class="highlighter-rouge">SCOPE_</code>:</p><ul class="wp-block-list"><li>SCOPE_email</li><li>SCOPE_openid</li><li>SCOPE_profile</li></ul><p>These correspond to the email, openid, and profile scopes. To restrict a method to a user that has a specific scope, you would use an annotation such as: <code style="font-size:13px" class="highlighter-rouge">@PreAuthorize("hasAuthority('SCOPE_email')")</code>.</p><p>I will also point out that you can accomplish exactly the same thing (more or less exactly) using <code style="font-size:13px" class="highlighter-rouge">HttpSecurity</code> in the <code style="font-size:13px" class="highlighter-rouge">SecurityConfig</code> class doing something like this:</p><pre class="gutter: false;brush:java">protected void configure(final HttpSecurity http) throws Exception { http.antMatcher("/**") .authorizeRequests() .antMatchers("/").permitAll() .antMatchers("/restricted").hasAuthority("SCOPE_custom") // <- LOOK AT ME! .anyRequest().authenticated() .and().oauth2Login(); }</pre><p>You can customize the scopes that the client app requests from the Okta authorization server by adding a <code style="font-size:13px" class="highlighter-rouge">scopes</code> property to the <code style="font-size:13px" class="highlighter-rouge">application.yml</code> file. For example, below, I have set the <code style="font-size:13px" class="highlighter-rouge">application.yml</code> file to request only the <code style="font-size:13px" class="highlighter-rouge">openid</code> scope, which is required for OAuth.</p><pre class="gutter: false;brush:bash">okta: oauth2: ... scopes: openid ...</pre><p>If you ran this request on the <code style="font-size:13px" class="highlighter-rouge">/user/oauthinfo</code> endpoint, you’d get something like this:</p><pre class="gutter: false;brush:bash">User Name: 00ab834zk7eJ18e8Y0h7 User Authorities: [Admin, Everyone, ROLE_USER, SCOPE_openid] Client Name: Okta ...</pre><p>Notice that only one scope has been assigned to the user authorities.</p><p>Try adding a custom scope. Change <code style="font-size:13px" class="highlighter-rouge">okta.oauth2.scopes</code> property in the <code style="font-size:13px" class="highlighter-rouge">application.yml</code> file to match:</p><pre class="gutter: false;brush:bash">okta: oauth2: ... scopes: openid email profile custom ...</pre><p>Before you run the app and try this out, you need to add the custom scope to the Okta authorization server (if you run it now you’ll get an error).</p><p>Open your Okta developer dashboard.</p><p>From the top menu, go to <strong>API</strong> and select <strong>Authorization Servers</strong>.</p><p>Select the <strong>default</strong> authorization server.</p><p>Click on the <strong>Scopes</strong> tab.</p><div class="wp-block-image"><figure class="aligncenter is-resized"><img data-lazyloaded="1" src="data:image/svg+xml;base64,PHN2ZyB4bWxucz0iaHR0cDovL3d3dy53My5vcmcvMjAwMC9zdmciIHdpZHRoPSI3NDQiIGhlaWdodD0iNDc4IiB2aWV3Qm94PSIwIDAgNzQ0IDQ3OCI+PHJlY3Qgd2lkdGg9IjEwMCUiIGhlaWdodD0iMTAwJSIgZmlsbD0idHJhbnNwYXJlbnQiLz48L3N2Zz4=" decoding="async" data-src="https://www.javacodegeeks.com/wp-content/uploads/2019/09/add-scope.png.webp" alt="" class="wp-image-98461" width="744" height="478" data-srcset="https://www.javacodegeeks.com/wp-content/uploads/2019/09/add-scope.png.webp 992w, https://www.javacodegeeks.com/wp-content/uploads/2019/09/add-scope-300x193.png.webp 300w, https://www.javacodegeeks.com/wp-content/uploads/2019/09/add-scope-768x493.png.webp 768w" data-sizes="(max-width: 744px) 100vw, 744px"><noscript><img decoding="async" src="https://www.javacodegeeks.com/wp-content/uploads/2019/09/add-scope.png.webp" alt="" class="wp-image-98461" width="744" height="478" srcset="https://www.javacodegeeks.com/wp-content/uploads/2019/09/add-scope.png.webp 992w, https://www.javacodegeeks.com/wp-content/uploads/2019/09/add-scope-300x193.png.webp 300w, https://www.javacodegeeks.com/wp-content/uploads/2019/09/add-scope-768x493.png.webp 768w" sizes="(max-width: 744px) 100vw, 744px" /></noscript></figure></div><p>Click the <strong>Add Scope</strong> button.</p><ul class="wp-block-list"><li><strong>Name</strong>: <code style="font-size:13px" class="highlighter-rouge">custom</code></li><li><strong>Description</strong>: <code style="font-size:13px" class="highlighter-rouge">Custom test scope</code></li></ul><p>Click <strong>Create</strong>.</p><p>You just added a custom scope (cunningly named <code style="font-size:13px" class="highlighter-rouge">custom</code>) to your default Okta authorization server.</p><p>One last time, run the Spring Boot app: <code style="font-size:13px" class="highlighter-rouge">./gradlew bootRun</code>.</p><p>Navigate to <code style="font-size:13px" class="highlighter-rouge">http://localhost:8080/user/oauthinfo</code>.</p><pre class="gutter: false;brush:bash">User Name: 00ab834zk7eJ18e8Y0h7 User Authorities: [Admin, Everyone, ROLE_USER, SCOPE_custom, SCOPE_email, SCOPE_openid, SCOPE_profile] Client Name: Okta ...</pre><p>Success! You should see the new <code style="font-size:13px" class="highlighter-rouge">SCOPE_custom</code> in the user authorities.</p><h2 class="wp-block-heading" id="spring-preauthorize-httpsecurity-and-security-in-spring-boot">Spring PreAuthorize, HttpSecurity, and Security in Spring Boot</h2><p>You covered a ton of ground! You got a good look at Spring method-level security using <code style="font-size:13px" class="highlighter-rouge">@PreAuthorize</code> and saw how it relates to <code style="font-size:13px" class="highlighter-rouge">HttpSecurity</code>. You used some basic SpEL (Spring Expression Language) statements to configure authorization. You reviewed the difference between authorization and authentication. You configured Spring Boot to use Okta as an OAuth 2.0 / OIDC single sign-on provider and added a groups claim to the authentication server and the client app. You even a new <strong>Admin</strong> group and saw how to use the groups claim, mapped to a Spring authority, to restrict access. Finally, you took a look at how OAuth 2.0 scopes can be used to define authorization schemes and implement them in the app.</p><p>Next stop: rocket science!</p><p>If you’d like to check out this complete project, you can <a href="https://github.com/oktadeveloper/okta-spring-preauthorize-example">find the repo on GithHub</a>.</p><p>If you’d like to learn more about Spring Boot, Spring Security, or secure user management, check out any of these great tutorials:</p><ul class="wp-block-list"><li><a href="https://developer.okta.com/blog/2017/03/21/spring-boot-oauth?utm_campaign=text_website_all_multiple_dev_dev_spring-preauthorize_null&utm_source=jcg&utm_medium=cpc">Get Started with Spring Boot, OAuth 2.0, and Okta</a></li><li><a href="https://developer.okta.com/blog/2017/11/20/add-sso-spring-boot-15-min?utm_campaign=text_website_all_multiple_dev_dev_spring-preauthorize_null&utm_source=jcg&utm_medium=cpc">Add Single Sign-On to Your Spring Boot Web App in 15 Minutes</a></li><li><a href="https://developer.okta.com/blog/2018/06/12/mfa-in-spring-boot?utm_campaign=text_website_all_multiple_dev_dev_spring-preauthorize_null&utm_source=jcg&utm_medium=cpc">Secure Your Spring Boot Application with Multi-Factor Authentication</a></li><li><a href="https://developer.okta.com/blog/2018/08/16/secure-api-spring-boot-graphql?utm_campaign=text_website_all_multiple_dev_dev_spring-preauthorize_null&utm_source=jcg&utm_medium=cpc">Build a Secure API with Spring Boot and GraphQL</a></li></ul><p>If you want to dive deeper, take a look at the <a href="https://github.com/okta/okta-spring-boot">Okta Spring Boot Starter GitHub Project</a>.</p><p>If you have any questions about this post, please add a comment below. For more awesome content, follow <a href="https://twitter.com/oktadev">@oktadev</a> on Twitter, like us <a href="https://www.facebook.com/oktadevelopers/">on Facebook</a>, or subscribe to <a href="https://www.youtube.com/c/oktadev">our YouTube channel</a>.</p><p><a href="https://developer.okta.com/blog/2019/06/20/spring-preauthorize?utm_campaign=text_website_all_multiple_dev_dev_spring-preauthorize_null&utm_source=jcg&utm_medium=cpc">“Spring Method Security with PreAuthorize”</a> was originally published on the Okta Developer blog on June 20, 2019. </p><p><span style="font-size: 20px;"><strong>Friends don’t let friends write user auth. Tired of managing your own users?</strong><a href="https://developer.okta.com/signup/?utm_campaign=text_website_all_multiple_dev_dev_spring-preauthorize_null&utm_source=jcg&utm_medium=cpc"> Try Okta’s API and Java SDKs today. Authenticate, manage, and secure users in any application within minutes.</a></span></p><style>.lepopup-progress-60 div.lepopup-progress-t1>div{background-color:#e0e0e0;}.lepopup-progress-60 div.lepopup-progress-t1>div>div{background-color:#bd4070;}.lepopup-progress-60 div.lepopup-progress-t1>div>div{color:#ffffff;}.lepopup-progress-60 div.lepopup-progress-t1>label{color:#444444;}.lepopup-form-60, .lepopup-form-60 *, .lepopup-progress-60 {font-size:15px;color:#444444;font-style:normal;text-decoration:none;text-align:left;}.lepopup-form-60 .lepopup-element div.lepopup-input div.lepopup-signature-box span i{font-family:'Arial','arial';font-size:13px;color:#555555;font-style:normal;text-decoration:none;text-align:left;}.lepopup-form-60 .lepopup-element div.lepopup-input div.lepopup-signature-box,.lepopup-form-60 .lepopup-element div.lepopup-input div.lepopup-multiselect,.lepopup-form-60 .lepopup-element div.lepopup-input input[type='text'],.lepopup-form-60 .lepopup-element div.lepopup-input input[type='email'],.lepopup-form-60 .lepopup-element div.lepopup-input input[type='password'],.lepopup-form-60 .lepopup-element div.lepopup-input select,.lepopup-form-60 .lepopup-element div.lepopup-input select option,.lepopup-form-60 .lepopup-element div.lepopup-input textarea{font-family:'Arial','arial';font-size:13px;color:#555555;font-style:normal;text-decoration:none;text-align:left;background-color:rgba(255, 255, 255, 0.7);background-image:none;border-width:1px;border-style:solid;border-color:#cccccc;border-radius:0px;box-shadow: inset 0px 0px 15px -7px #000000;}.lepopup-form-60 .lepopup-element div.lepopup-input ::placeholder{color:#555555; opacity: 0.9;} .lepopup-form-60 .lepopup-element div.lepopup-input ::-ms-input-placeholder{color:#555555; opacity: 0.9;}.lepopup-form-60 .lepopup-element div.lepopup-input div.lepopup-multiselect::-webkit-scrollbar-thumb{background-color:#cccccc;}.lepopup-form-60 .lepopup-element div.lepopup-input>i.lepopup-icon-left, .lepopup-form-60 .lepopup-element div.lepopup-input>i.lepopup-icon-right{font-size:20px;color:#444444;border-radius:0px;}.lepopup-form-60 .lepopup-element .lepopup-button,.lepopup-form-60 .lepopup-element .lepopup-button:visited{font-family:'Arial','arial';font-size:13px;color:#ffffff;font-weight:700;font-style:normal;text-decoration:none;text-align:center;background-color:#326693;background-image:none;border-width:1px;border-style:solid;border-color:#326693;border-radius:0px;box-shadow:none;}.lepopup-form-60 .lepopup-element div.lepopup-input .lepopup-imageselect+label{border-width:1px;border-style:solid;border-color:#cccccc;border-radius:0px;box-shadow:none;}.lepopup-form-60 .lepopup-element div.lepopup-input .lepopup-imageselect+label span.lepopup-imageselect-label{font-size:15px;color:#444444;font-style:normal;text-decoration:none;text-align:left;}.lepopup-form-60 .lepopup-element div.lepopup-input input[type='checkbox'].lepopup-checkbox-tgl:checked+label:after{background-color:rgba(255, 255, 255, 0.7);}.lepopup-form-60 .lepopup-element div.lepopup-input input[type='checkbox'].lepopup-checkbox-classic+label,.lepopup-form-60 .lepopup-element div.lepopup-input input[type='checkbox'].lepopup-checkbox-fa-check+label,.lepopup-form-60 .lepopup-element div.lepopup-input input[type='checkbox'].lepopup-checkbox-square+label,.lepopup-form-60 .lepopup-element div.lepopup-input input[type='checkbox'].lepopup-checkbox-tgl+label{background-color:rgba(255, 255, 255, 0.7);border-color:#cccccc;color:#555555;}.lepopup-form-60 .lepopup-element div.lepopup-input input[type='checkbox'].lepopup-checkbox-square:checked+label:after{background-color:#555555;}.lepopup-form-60 .lepopup-element div.lepopup-input input[type='checkbox'].lepopup-checkbox-tgl:checked+label,.lepopup-form-60 .lepopup-element div.lepopup-input input[type='checkbox'].lepopup-checkbox-tgl+label:after{background-color:#555555;}.lepopup-form-60 .lepopup-element div.lepopup-input input[type='radio'].lepopup-radio-classic+label,.lepopup-form-60 .lepopup-element div.lepopup-input input[type='radio'].lepopup-radio-fa-check+label,.lepopup-form-60 .lepopup-element div.lepopup-input input[type='radio'].lepopup-radio-dot+label{background-color:rgba(255, 255, 255, 0.7);border-color:#cccccc;color:#555555;}.lepopup-form-60 .lepopup-element div.lepopup-input input[type='radio'].lepopup-radio-dot:checked+label:after{background-color:#555555;}.lepopup-form-60 .lepopup-element div.lepopup-input div.lepopup-multiselect>input[type='checkbox']+label:hover{background-color:#bd4070;color:#ffffff;}.lepopup-form-60 .lepopup-element div.lepopup-input div.lepopup-multiselect>input[type='checkbox']:checked+label{background-color:#a93a65;color:#ffffff;}.lepopup-form-60 .lepopup-element input[type='checkbox'].lepopup-tile+label, .lepopup-form-60 .lepopup-element input[type='radio'].lepopup-tile+label {font-size:15px;color:#444444;font-style:normal;text-decoration:none;text-align:center;background-color:#ffffff;background-image:none;border-width:1px;border-style:solid;border-color:#cccccc;border-radius:0px;box-shadow:none;}.lepopup-form-60 .lepopup-element-error{font-size:15px;color:#ffffff;font-style:normal;text-decoration:none;text-align:left;background-color:#d9534f;background-image:none;}.lepopup-form-60 .lepopup-element-2 {background-color:rgba(226, 236, 250, 1);background-image:none;border-width:1px;border-style:solid;border-color:rgba(216, 216, 216, 1);border-radius:3px;box-shadow: 1px 1px 15px -6px #d7e1eb;}.lepopup-form-60 .lepopup-element-3 * {font-family:'Arial','arial';font-size:26px;color:#333333;font-weight:normal;font-style:normal;text-decoration:none;text-align:left;}.lepopup-form-60 .lepopup-element-3 {font-family:'Arial','arial';font-size:26px;color:#333333;font-weight:normal;font-style:normal;text-decoration:none;text-align:left;background-color:transparent;background-image:none;border-width:1px;border-style:none;border-color:transparent;border-radius:0px;box-shadow:none;padding-top:0px;padding-right:0px;padding-bottom:0px;padding-left:0px;}.lepopup-form-60 .lepopup-element-3 .lepopup-element-html-content {min-height:73px;}.lepopup-form-60 .lepopup-element-4 * {font-family:'Arial','arial';font-size:19px;color:#333333;font-weight:normal;font-style:normal;text-decoration:none;text-align:left;}.lepopup-form-60 .lepopup-element-4 {font-family:'Arial','arial';font-size:19px;color:#333333;font-weight:normal;font-style:normal;text-decoration:none;text-align:left;background-color:transparent;background-image:none;border-width:1px;border-style:none;border-color:transparent;border-radius:0px;box-shadow:none;padding-top:0px;padding-right:0px;padding-bottom:0px;padding-left:0px;}.lepopup-form-60 .lepopup-element-4 .lepopup-element-html-content {min-height:23px;}.lepopup-form-60 .lepopup-element-5 * {font-family:'Arial','arial';font-size:15px;color:#333333;font-weight:normal;font-style:normal;text-decoration:none;text-align:left;}.lepopup-form-60 .lepopup-element-5 {font-family:'Arial','arial';font-size:15px;color:#333333;font-weight:normal;font-style:normal;text-decoration:none;text-align:left;background-color:transparent;background-image:none;border-width:1px;border-style:none;border-color:transparent;border-radius:0px;box-shadow:none;padding-top:0px;padding-right:0px;padding-bottom:0px;padding-left:0px;}.lepopup-form-60 .lepopup-element-5 .lepopup-element-html-content {min-height:24px;}.lepopup-form-60 .lepopup-element-6 * {font-family:'Arial','arial';font-size:15px;color:#333333;font-weight:normal;font-style:normal;text-decoration:none;text-align:left;}.lepopup-form-60 .lepopup-element-6 {font-family:'Arial','arial';font-size:15px;color:#333333;font-weight:normal;font-style:normal;text-decoration:none;text-align:left;background-color:transparent;background-image:none;border-width:1px;border-style:none;border-color:transparent;border-radius:0px;box-shadow:none;padding-top:0px;padding-right:0px;padding-bottom:0px;padding-left:0px;}.lepopup-form-60 .lepopup-element-6 .lepopup-element-html-content {min-height:18px;}.lepopup-form-60 .lepopup-element-7 * {font-family:'Arial','arial';font-size:15px;color:#333333;font-weight:normal;font-style:normal;text-decoration:none;text-align:left;}.lepopup-form-60 .lepopup-element-7 {font-family:'Arial','arial';font-size:15px;color:#333333;font-weight:normal;font-style:normal;text-decoration:none;text-align:left;background-color:transparent;background-image:none;border-width:1px;border-style:none;border-color:transparent;border-radius:0px;box-shadow:none;padding-top:0px;padding-right:0px;padding-bottom:0px;padding-left:0px;}.lepopup-form-60 .lepopup-element-7 .lepopup-element-html-content {min-height:18px;}.lepopup-form-60 .lepopup-element-8 * {font-family:'Arial','arial';font-size:15px;color:#333333;font-weight:normal;font-style:normal;text-decoration:none;text-align:left;}.lepopup-form-60 .lepopup-element-8 {font-family:'Arial','arial';font-size:15px;color:#333333;font-weight:normal;font-style:normal;text-decoration:none;text-align:left;background-color:transparent;background-image:none;border-width:1px;border-style:none;border-color:transparent;border-radius:0px;box-shadow:none;padding-top:0px;padding-right:0px;padding-bottom:0px;padding-left:0px;}.lepopup-form-60 .lepopup-element-8 .lepopup-element-html-content {min-height:18px;}.lepopup-form-60 .lepopup-element-9 * {font-family:'Arial','arial';font-size:15px;color:#333333;font-weight:normal;font-style:normal;text-decoration:none;text-align:left;}.lepopup-form-60 .lepopup-element-9 {font-family:'Arial','arial';font-size:15px;color:#333333;font-weight:normal;font-style:normal;text-decoration:none;text-align:left;background-color:transparent;background-image:none;border-width:1px;border-style:none;border-color:transparent;border-radius:0px;box-shadow:none;padding-top:0px;padding-right:0px;padding-bottom:0px;padding-left:0px;}.lepopup-form-60 .lepopup-element-9 .lepopup-element-html-content {min-height:18px;}.lepopup-form-60 .lepopup-element-10 * {font-family:'Arial','arial';font-size:15px;color:#333333;font-weight:normal;font-style:normal;text-decoration:none;text-align:left;}.lepopup-form-60 .lepopup-element-10 {font-family:'Arial','arial';font-size:15px;color:#333333;font-weight:normal;font-style:normal;text-decoration:none;text-align:left;background-color:transparent;background-image:none;border-width:1px;border-style:none;border-color:transparent;border-radius:0px;box-shadow:none;padding-top:0px;padding-right:0px;padding-bottom:0px;padding-left:0px;}.lepopup-form-60 .lepopup-element-10 .lepopup-element-html-content {min-height:18px;}.lepopup-form-60 .lepopup-element-11 * {font-family:'Arial','arial';font-size:15px;color:#333333;font-weight:normal;font-style:normal;text-decoration:none;text-align:left;}.lepopup-form-60 .lepopup-element-11 {font-family:'Arial','arial';font-size:15px;color:#333333;font-weight:normal;font-style:normal;text-decoration:none;text-align:left;background-color:transparent;background-image:none;border-width:1px;border-style:none;border-color:transparent;border-radius:0px;box-shadow:none;padding-top:0px;padding-right:0px;padding-bottom:0px;padding-left:0px;}.lepopup-form-60 .lepopup-element-11 .lepopup-element-html-content {min-height:18px;}.lepopup-form-60 .lepopup-element-12 * {font-family:'Arial','arial';font-size:15px;color:#333333;font-weight:normal;font-style:normal;text-decoration:none;text-align:left;}.lepopup-form-60 .lepopup-element-12 {font-family:'Arial','arial';font-size:15px;color:#333333;font-weight:normal;font-style:normal;text-decoration:none;text-align:left;background-color:transparent;background-image:none;border-width:1px;border-style:none;border-color:transparent;border-radius:0px;box-shadow:none;padding-top:0px;padding-right:0px;padding-bottom:0px;padding-left:0px;}.lepopup-form-60 .lepopup-element-12 .lepopup-element-html-content {min-height:18px;}.lepopup-form-60 .lepopup-element-13 * {font-family:'Arial','arial';font-size:15px;color:#333333;font-weight:normal;font-style:normal;text-decoration:none;text-align:left;}.lepopup-form-60 .lepopup-element-13 {font-family:'Arial','arial';font-size:15px;color:#333333;font-weight:normal;font-style:normal;text-decoration:none;text-align:left;background-color:transparent;background-image:none;border-width:1px;border-style:none;border-color:transparent;border-radius:0px;box-shadow:none;padding-top:0px;padding-right:0px;padding-bottom:0px;padding-left:0px;}.lepopup-form-60 .lepopup-element-13 .lepopup-element-html-content {min-height:18px;}.lepopup-form-60 .lepopup-element-14 div.lepopup-input .lepopup-icon-left, .lepopup-form-60 .lepopup-element-14 div.lepopup-input .lepopup-icon-right {line-height:36px;}.lepopup-form-60 .lepopup-element-15 div.lepopup-input{height:auto;line-height:1;}.lepopup-form-60 .lepopup-element-16 * {font-family:'Arial','arial';font-size:14px;color:#333333;font-weight:normal;font-style:normal;text-decoration:none;text-align:left;}.lepopup-form-60 .lepopup-element-16 {font-family:'Arial','arial';font-size:14px;color:#333333;font-weight:normal;font-style:normal;text-decoration:none;text-align:left;background-color:transparent;background-image:none;border-width:1px;border-style:none;border-color:transparent;border-radius:0px;box-shadow:none;padding-top:0px;padding-right:0px;padding-bottom:0px;padding-left:0px;}.lepopup-form-60 .lepopup-element-16 .lepopup-element-html-content {min-height:5px;}.lepopup-form-60 .lepopup-element-19 * {font-family:'Arial','arial';font-size:13px;color:#333333;font-style:normal;text-decoration:none;text-align:left;}.lepopup-form-60 .lepopup-element-19 {font-family:'Arial','arial';font-size:13px;color:#333333;font-style:normal;text-decoration:none;text-align:left;background-color:transparent;background-image:none;border-width:1px;border-style:none;border-color:transparent;border-radius:0px;box-shadow:none;padding-top:0px;padding-right:0px;padding-bottom:0px;padding-left:0px;}.lepopup-form-60 .lepopup-element-19 .lepopup-element-html-content {min-height:363px;}.lepopup-form-60 .lepopup-element-0 * {font-size:15px;color:#ffffff;font-weight:normal;font-style:normal;text-decoration:none;text-align:left;}.lepopup-form-60 .lepopup-element-0 {font-size:15px;color:#ffffff;font-weight:normal;font-style:normal;text-decoration:none;text-align:left;background-color:#5cb85c;background-image:none;border-width:0px;border-style:solid;border-color:#ccc;border-radius:5px;box-shadow: 1px 1px 15px -6px #000000;padding-top:40px;padding-right:40px;padding-bottom:40px;padding-left:40px;}.lepopup-form-60 .lepopup-element-0 .lepopup-element-html-content {min-height:160px;}</style><div class="lepopup-inline" style="margin: 0 auto;"><div class="lepopup-form lepopup-form-60 lepopup-form-2BGiPEGuD5CH3stg lepopup-form-icon-inside lepopup-form-position-middle-right" data-session="0" data-id="2BGiPEGuD5CH3stg" data-form-id="60" data-slug="7lQM6oyWL5bTm5lw" data-title="Under the Post Inline" data-page="1" data-xd="off" data-width="820" data-height="430" data-position="middle-right" data-esc="off" data-enter="on" data-disable-scrollbar="off" style="display:none;width:820px;height:430px;" onclick="event.stopPropagation();"><div class="lepopup-form-inner" style="width:820px;height:430px;"><div class="lepopup-element lepopup-element-2 lepopup-element-rectangle" data-type="rectangle" data-top="0" data-left="0" data-animation-in="fadeIn" data-animation-out="fadeOut" style="animation-duration:0ms;animation-delay:0ms;z-index:501;top:0px;left:0px;width:820px;height:430px;"></div><div class="lepopup-element lepopup-element-3 lepopup-element-html" data-type="html" data-top="7" data-left="10" data-animation-in="bounceInDown" data-animation-out="fadeOut" style="animation-duration:0ms;animation-delay:0ms;z-index:502;top:7px;left:10px;width:797px;height:73px;"><div class="lepopup-element-html-content">Do you want to know how to develop your skillset to become a <span style="color: #CAB43D; text-shadow: 1px 1px #835D5D;">Java Rockstar?</span></div></div><div class="lepopup-element lepopup-element-4 lepopup-element-html" data-type="html" data-top="83" data-left="308" data-animation-in="bounceInDown" data-animation-out="fadeOut" style="animation-duration:0ms;animation-delay:0ms;z-index:503;top:83px;left:308px;width:473px;height:23px;"><div class="lepopup-element-html-content">Subscribe to our newsletter to start Rocking <span style="text-decoration: underline;">right now!</span></div></div><div class="lepopup-element lepopup-element-5 lepopup-element-html" data-type="html" data-top="107" data-left="308" data-animation-in="bounceInDown" data-animation-out="fadeOut" style="animation-duration:0ms;animation-delay:0ms;z-index:504;top:107px;left:308px;width:473px;height:24px;"><div class="lepopup-element-html-content">To get you started we give you our best selling eBooks for <span style="color:#e01404; text-shadow: 1px 1px #C99924; font-size: 15px;">FREE!</span></div></div><div class="lepopup-element lepopup-element-6 lepopup-element-html" data-type="html" data-top="136" data-left="308" data-animation-in="bounceInDown" data-animation-out="fadeOut" style="animation-duration:0ms;animation-delay:0ms;z-index:505;top:136px;left:308px;width:473px;height:18px;"><div class="lepopup-element-html-content"><span style="font-weight: bold;">1.</span> JPA Mini Book</div></div><div class="lepopup-element lepopup-element-7 lepopup-element-html" data-type="html" data-top="156" data-left="308" data-animation-in="bounceInDown" data-animation-out="fadeOut" style="animation-duration:0ms;animation-delay:0ms;z-index:506;top:156px;left:308px;width:473px;height:18px;"><div class="lepopup-element-html-content"><span style="font-weight: bold;">2.</span> JVM Troubleshooting Guide</div></div><div class="lepopup-element lepopup-element-8 lepopup-element-html" data-type="html" data-top="176" data-left="308" data-animation-in="bounceInDown" data-animation-out="fadeOut" style="animation-duration:0ms;animation-delay:0ms;z-index:507;top:176px;left:308px;width:473px;height:18px;"><div class="lepopup-element-html-content"><span style="font-weight: bold;">3.</span> JUnit Tutorial for Unit Testing</div></div><div class="lepopup-element lepopup-element-9 lepopup-element-html" data-type="html" data-top="196" data-left="308" data-animation-in="bounceInDown" data-animation-out="fadeOut" style="animation-duration:0ms;animation-delay:0ms;z-index:508;top:196px;left:308px;width:473px;height:18px;"><div class="lepopup-element-html-content"><span style="font-weight: bold;">4.</span> Java Annotations Tutorial</div></div><div class="lepopup-element lepopup-element-10 lepopup-element-html" data-type="html" data-top="216" data-left="308" data-animation-in="bounceInDown" data-animation-out="fadeOut" style="animation-duration:0ms;animation-delay:0ms;z-index:509;top:216px;left:308px;width:473px;height:18px;"><div class="lepopup-element-html-content"><span style="font-weight: bold;">5.</span> Java Interview Questions</div></div><div class="lepopup-element lepopup-element-11 lepopup-element-html" data-type="html" data-top="236" data-left="308" data-animation-in="bounceInDown" data-animation-out="fadeOut" style="animation-duration:0ms;animation-delay:0ms;z-index:510;top:236px;left:308px;width:473px;height:18px;"><div class="lepopup-element-html-content"><span style="font-weight: bold;">6.</span> Spring Interview Questions</div></div><div class="lepopup-element lepopup-element-12 lepopup-element-html" data-type="html" data-top="256" data-left="308" data-animation-in="bounceInDown" data-animation-out="fadeOut" style="animation-duration:0ms;animation-delay:0ms;z-index:511;top:256px;left:308px;width:473px;height:18px;"><div class="lepopup-element-html-content"><span style="font-weight: bold;">7.</span> Android UI Design</div></div><div class="lepopup-element lepopup-element-13 lepopup-element-html" data-type="html" data-top="282" data-left="308" data-animation-in="bounceInDown" data-animation-out="fadeOut" style="animation-duration:0ms;animation-delay:0ms;z-index:512;top:282px;left:308px;width:473px;height:18px;"><div class="lepopup-element-html-content">and many more ....</div></div><div class="lepopup-element lepopup-element-14" data-type="email" data-deps="" data-id="14" data-top="305" data-left="308" data-animation-in="fadeIn" data-animation-out="fadeOut" style="animation-duration:0ms;animation-delay:0ms;z-index:513;top:305px;left:308px;width:473px;height:36px;"><div class="lepopup-input"><input type="email" name="lepopup-14" class="lepopup-ta-left " placeholder="Enter your e-mail..." autocomplete="email" data-default="" value="" aria-label="Email Field" oninput="lepopup_input_changed(this);" onfocus="lepopup_input_error_hide(this);"></div></div><div class="lepopup-element lepopup-element-15" data-type="checkbox" data-deps="" data-id="15" data-top="344" data-left="308" data-animation-in="fadeIn" data-animation-out="fadeOut" style="animation-duration:0ms;animation-delay:0ms;z-index:514;top:344px;left:308px;width:160px;"><div class="lepopup-input lepopup-cr-layout-1 lepopup-cr-layout-left"><div class="lepopup-cr-container lepopup-cr-container-medium lepopup-cr-container-left"><div class="lepopup-cr-box"><input class="lepopup-checkbox lepopup-checkbox-classic lepopup-checkbox-medium" type="checkbox" name="lepopup-15[]" id="lepopup-checkbox-ZFuqFtyGmFZUpmy7-14-0" value="on" data-default="off" onchange="lepopup_input_changed(this);"><label for="lepopup-checkbox-ZFuqFtyGmFZUpmy7-14-0" onclick="lepopup_input_error_hide(this);"></label></div><div class="lepopup-cr-label lepopup-ta-left"><label for="lepopup-checkbox-ZFuqFtyGmFZUpmy7-14-0" onclick="lepopup_input_error_hide(this);"></label></div></div></div></div><div class="lepopup-element lepopup-element-16 lepopup-element-html" data-type="html" data-top="344" data-left="338" data-animation-in="fadeIn" data-animation-out="fadeOut" style="animation-duration:0ms;animation-delay:0ms;z-index:515;top:344px;left:338px;width:350px;height:5px;"><div class="lepopup-element-html-content">I agree to the <a href="https://www.javacodegeeks.com/about/terms-of-use" target="_blank">Terms </a> and <a href="https://www.javacodegeeks.com/about/privacy-policy" target="_blank">Privacy Policy</a></div></div><div class="lepopup-element lepopup-element-17" data-type="button" data-top="372" data-left="308" data-animation-in="bounceIn" data-animation-out="fadeOut" style="animation-duration:0ms;animation-delay:0ms;z-index:516;top:372px;left:308px;width:85px;height:37px;"><a class="lepopup-button lepopup-button-zoom-out " href="#" onclick="return lepopup_submit(this);" data-label="Sign up" data-loading="Loading..."><span>Sign up</span></a></div><div class="lepopup-element lepopup-element-19 lepopup-element-html" data-type="html" data-top="67" data-left="-15" data-animation-in="fadeIn" data-animation-out="fadeOut" style="animation-duration:0ms;animation-delay:0ms;z-index:518;top:67px;left:-15px;width:320px;height:363px;"><div class="lepopup-element-html-content"><img data-lazyloaded="1" src="data:image/svg+xml;base64,PHN2ZyB4bWxucz0iaHR0cDovL3d3dy53My5vcmcvMjAwMC9zdmciIHdpZHRoPSIzMjAiIGhlaWdodD0iMzYzIiB2aWV3Qm94PSIwIDAgMzIwIDM2MyI+PHJlY3Qgd2lkdGg9IjEwMCUiIGhlaWdodD0iMTAwJSIgZmlsbD0idHJhbnNwYXJlbnQiLz48L3N2Zz4=" decoding="async" data-src="https://www.javacodegeeks.com/wp-content/uploads/2015/01/books_promo.png.webp" alt="" width="320" height="363"><noscript><img decoding="async" src="https://www.javacodegeeks.com/wp-content/uploads/2015/01/books_promo.png.webp" alt="" width="320" height="363"/></noscript></div></div></div></div><div class="lepopup-form lepopup-form-60 lepopup-form-2BGiPEGuD5CH3stg lepopup-form-icon-inside lepopup-form-position-middle-right" data-session="0" data-id="2BGiPEGuD5CH3stg" data-form-id="60" data-slug="7lQM6oyWL5bTm5lw" data-title="Under the Post Inline" data-page="confirmation" data-xd="off" data-width="420" data-height="320" data-position="middle-right" data-esc="off" data-enter="on" data-disable-scrollbar="off" style="display:none;width:420px;height:320px;" onclick="event.stopPropagation();"><div class="lepopup-form-inner" style="width:420px;height:320px;"><div class="lepopup-element lepopup-element-0 lepopup-element-html" data-type="html" data-top="80" data-left="70" data-animation-in="bounceInDown" data-animation-out="fadeOutUp" style="animation-duration:1000ms;animation-delay:0ms;z-index:500;top:80px;left:70px;width:280px;height:160px;"><div class="lepopup-element-html-content"><h4 style="text-align: center; font-size: 18px; font-weight: bold;">Thank you!</h4><p style="text-align: center;">We will contact you soon.</p></div></div></div></div><input type="hidden" id="lepopup-logic-2BGiPEGuD5CH3stg" value="[]"></div><div class="post-bottom-meta post-bottom-tags post-tags-classic"><div class="post-bottom-meta-title"><span class="tie-icon-tags" aria-hidden="true"></span> Tags</div><span class="tagcloud"><a href="https://www.javacodegeeks.com/tag/preauthorize" rel="tag">PreAuthorize</a> <a href="https://www.javacodegeeks.com/tag/spring" rel="tag">Spring</a> <a href="https://www.javacodegeeks.com/tag/spring-security" rel="tag">Spring Security</a></span></div> |
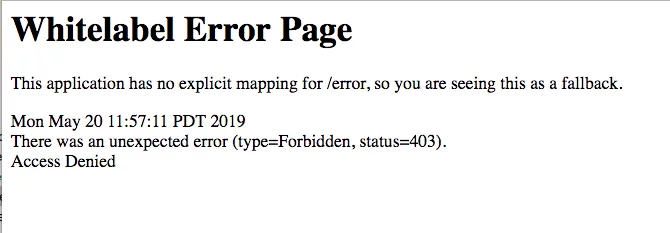
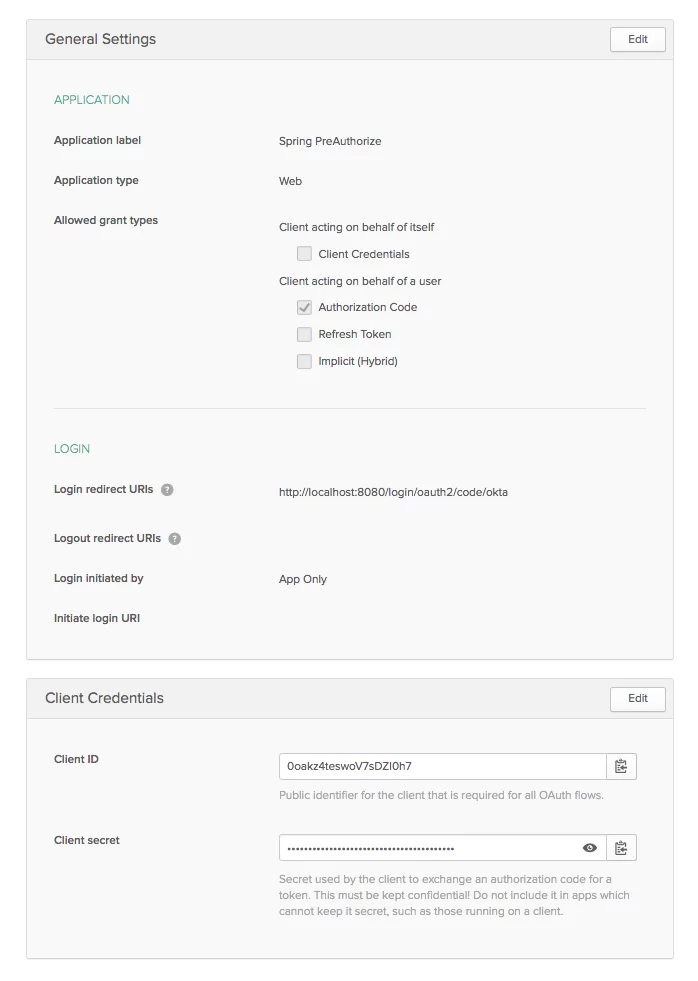
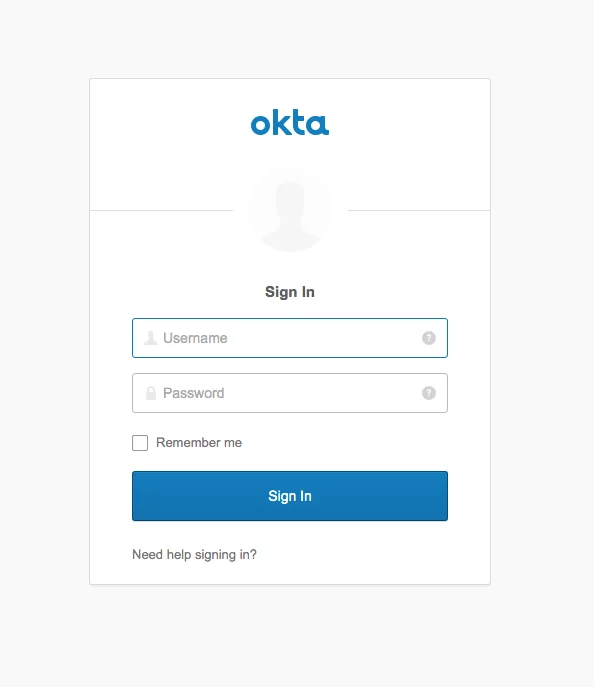
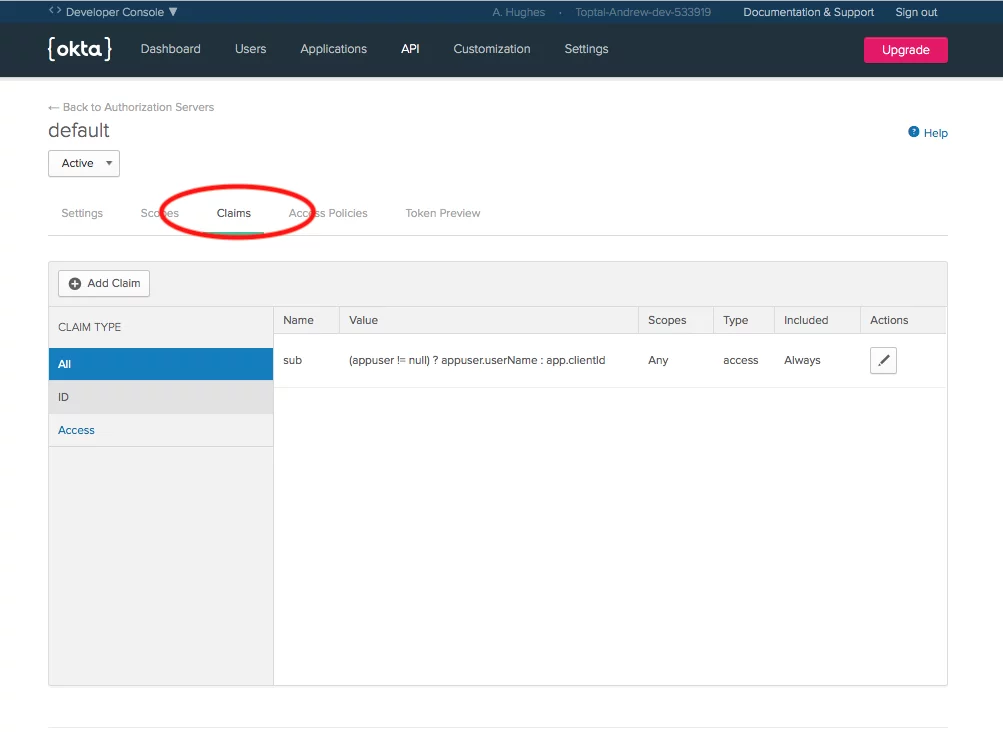
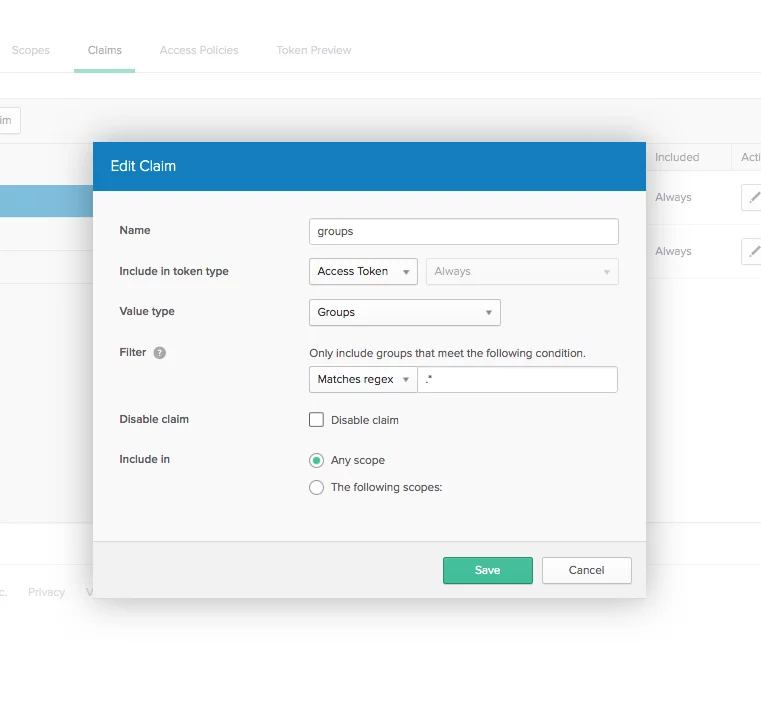
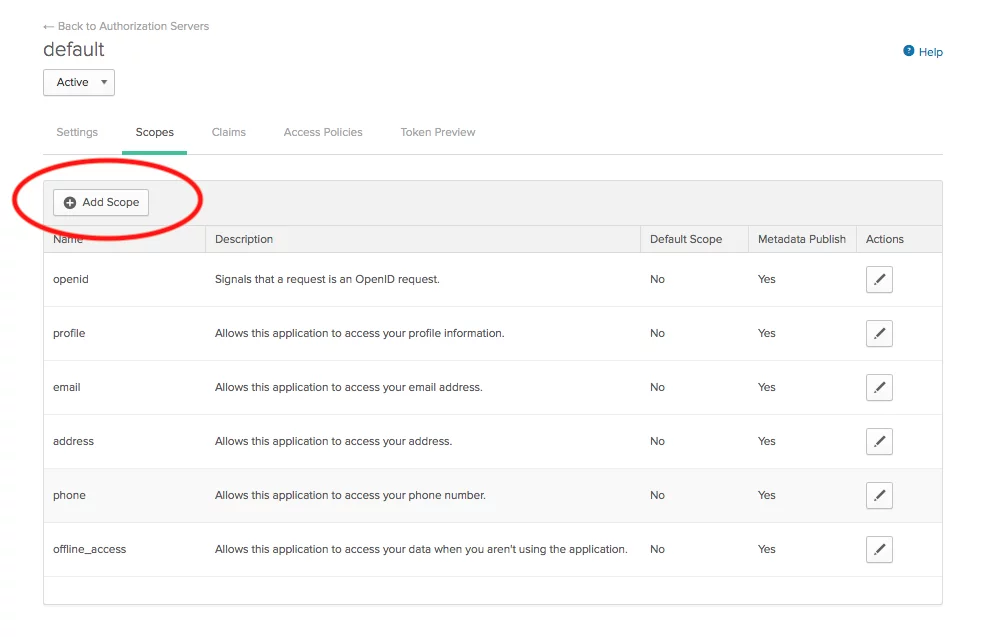