Using React Context Hook
Welcome readers, in this tutorial, we will understand how to use the Context Hook in a React-js application.
1. Introduction
React is a flexible javascript library responsible for building reusable UI components. It is an open-source component-based frontend library responsible only for the view part of an application and works in a virtual document object model. But before that let us take a look at the differences between angular and react –
| Angular | React |
| Complete framework | Library |
| Object-oriented programming | Extension to the javascript library and its internal architecture is based on jsx |
| Based on the model view controller and real document object model | Based on the virtual document object model |
1.1 Use Context hook in React-js
Hooks in React-js are the functions that are hooked into react-js state and lifecycle features from function components. The useContext(…) allows the components to access global data and re-render when that global data is changed. It helps to solve the drilling problem when we have to pass props from parents to children components. It helps to remove the complex nesting.
- Props drilling in React-js is a problem where data is passed from one component through multiple multiple interdependent components until we get to the component where the data is needed
1.2 Setting up dependencies
To play with React let us set up some of the required dependencies.
1.2.1 Setting up Node.js
To set up Node.js on windows you will need to download the installer from this link. Click on the installer (also include the NPM package manager) for your platform and run the installer to start with the Node.js setup wizard. Follow the wizard steps and click on Finish when it is done. If everything goes well you can navigate to the command prompt to verify if the installation was successful as shown in Fig. 1.
1.2.2 Setting up React-js project
Once the Nodejs setup is successful we will use the below command to install the react library and set up the project. Do note that the npx package is available with the npm 5.2 version and above.
Create project structure
$ npx create-react-app usecontext-app
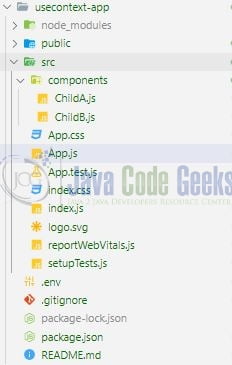
The above command will take some time to install the react library and create a new project named – usecontext-app as shown below.
2. Using React Context Hook
To set up the application, we will need to navigate to a path where our project will reside and I will be using Visual Studio Code as my preferred IDE.
2.1 Setting up the react code
To understand a practical implementation let us go through some hands-on exercises.
2.1.1 Creating components
Create a folder named components in the src folder.
2.1.1.1 Creating ChildA component
Add the following code to the ChildA.js file. We will use the useContext(..) hook to retrieve the data from the titleContext context. The context will be passed from the App.js file.
ChildA.js
import React, { useContext } from "react";
import { titleContext } from "../App";
import ChildB from "./ChildB";

const ChildA = () => {
  // retrieved from app.js
  const title = useContext(titleContext);

  return (
    <>
      <h2>{title}</h2>
      <ChildB></ChildB>
    </>
  );
};

export default ChildA;
2.1.1.2 Creating ChildB component
Add the following code to the ChildB.js file. We will use the useContext(..) hook to retrieve the data from the genreContext and nameContext context. The context will be passed from the App.js file.
ChildB.js
import React, { useContext } from "react";
import { genreContext, nameContext } from "../App";

const ChildB = () => {
  // retrieved from app.js
  const website = useContext(nameContext);
  const websiteGenre = useContext(genreContext);

  return (
    <>
      <h4>
        {website} is of {websiteGenre} category
      </h4>
    </>
  );
};

export default ChildB;
2.1.2 Creating implementation file
In the App.js component we will call the child component and export the created contexts. We will use the createContext(…) method to create a context instance and Provider on the context instance to provide the context to the child components, no matter how deep they are in the application. To set the value of the context we use the value prop available on the provider.
App.js
import { createContext } from "react";
import "./App.css";
import ChildA from "./components/ChildA";

// what is the useContext hook?
// create, provider, useContext
// allows the component to access some global data and re-render when that global data is changed.
// solves props drilling problem when we pass down props from parents to children.

// how to use it?
const titleContext = createContext();
const nameContext = createContext();
const genreContext = createContext();

function App() {
  const title = "useContext hook in reactjs";
  const name = "javacodegeeks";
  const genre = "learning";

  return (
    <div className="App">
      <titleContext.Provider value={title}>
        <nameContext.Provider value={name}>
          <genreContext.Provider value={genre}>
            <ChildA></ChildA>
          </genreContext.Provider>
        </nameContext.Provider>
      </titleContext.Provider>
    </div>
  );
}

export default App;
export { titleContext, nameContext, genreContext };
3. Run the setup
To run the application navigate to the project directory and enter the following command as shown below in the terminal.
Run command
$ npm run start
The application will be started on the default port. In case the application does not get started on the default port you can change the port number as per your requirement. I have changed the default port to 2000.
4. Demo
The application will be started in the default browser as shown below and a welcome message will be shown.
That is all for this tutorial and I hope the article served you with whatever you were looking for. Happy Learning and do not forget to share!
5. Summary
In this tutorial, we created a react application and understood the Context Hook in React-js. You can download the source code from the Downloads section.
6. Download the Project
This was a tutorial to understand the useContext() hook in a react application.
You can download the full source code of this example here: Using React Context Hook


