Java EE CDI Disposer methods example
This is a tutorial of CDI Disposer methods. In CDI, since a Producer method generates an object that can then be injected in an application, the Disposer method is used so that the object is removed when its work is completed. A Disposer method is always matched to a Producer method.
An example of the Disposer method use is when an application uses a connection to a database. Since the connection must close after the interface with the database is completed, the Disposer method is used to remove the object that represents the connection.
Here we shall show you how to make use of a Disposer method. We will create a simple service. Then we will create a Producer method to produce and inject the service in an application and a Disposer method to clean up the service, once it is ended.
Our preferred development environment is Eclipse. We are using Eclipse Juno (4.2) version, along with Maven Integration plugin version 3.1.0. You can download Eclipse from here and Maven Plugin for Eclipse from here. The installation of Maven plugin for Eclipse is out of the scope of this tutorial and will not be discussed. Tomcat 7 is the application server used.
Let’s begin,
1. Create a new Maven project
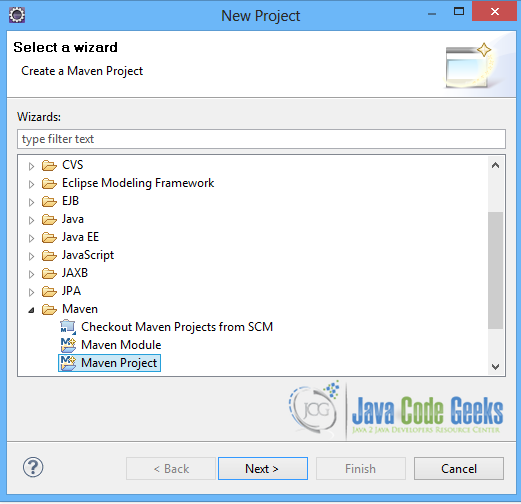
Go to File -> Project ->Maven -> Maven Project.
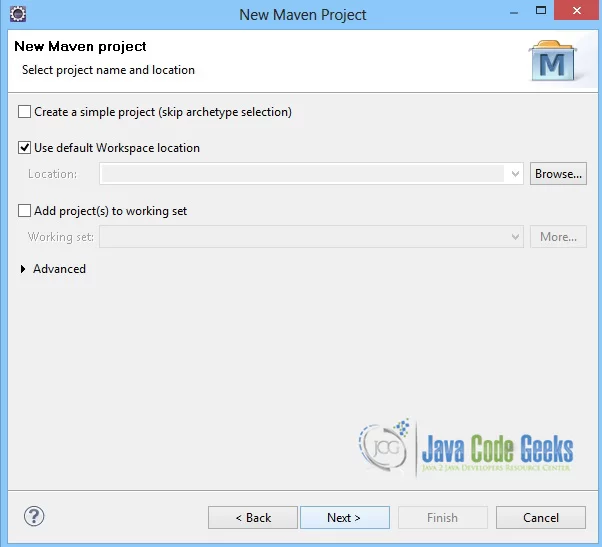
In the “Select project name and location” page of the wizard, make sure that “Create a simple project (skip archetype selection)” option is unchecked, hit “Next” to continue with default values.
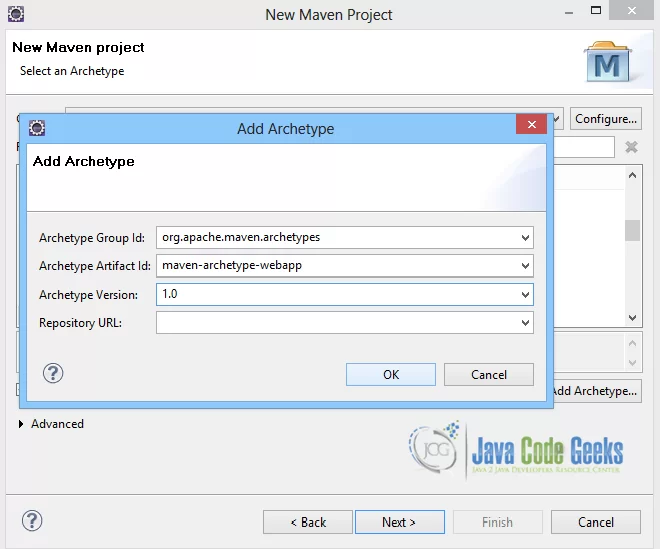
Here the maven archetype for creating a web application must be added. Click on “Add Archetype” and add the archetype. Set the “Archetype Group Id” variable to "org.apache.maven.archetypes", the “Archetype artifact Id” variable to "maven-archetype-webapp" and the “Archetype Version” to "1.0". Click on “OK” to continue.
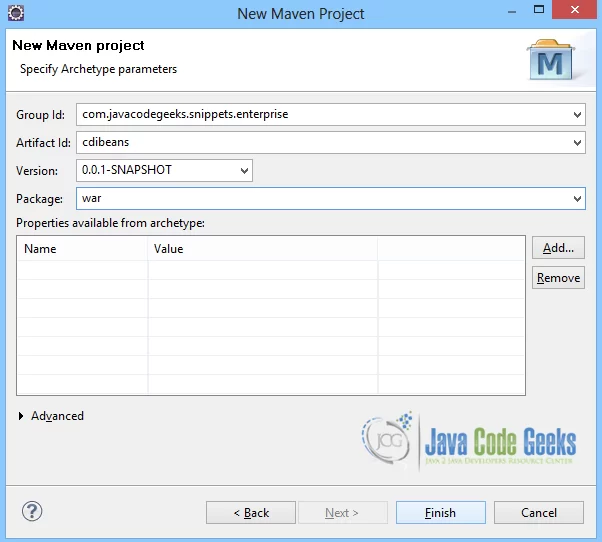
In the “Enter an artifact id” page of the wizard, you can define the name and main package of your project. Set the “Group Id” variable to "com.javacodegeeks.snippets.enterprise" and the “Artifact Id” variable to "cdibeans". The aforementioned selections compose the main project package as "com.javacodegeeks.snippets.enterprise.cdibeans" and the project name as "cdibeans". Set the “Package” variable to "war", so that a war file will be created to be deployed to tomcat server. Hit “Finish” to exit the wizard and to create your project.
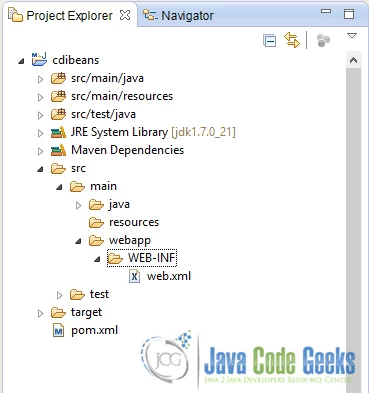
The Maven project structure is shown below:
- It consists of the following folders:
- /src/main/java folder, that contains source files for the dynamic content of the application,
- /src/test/java folder contains all source files for unit tests,
- /src/main/resources folder contains configurations files,
- /target folder contains the compiled and packaged deliverables,
- /src/main/resources/webapp/WEB-INF folder contains the deployment descriptors for the Web application ,
- the pom.xml is the project object model (POM) file. The single file that contains all project related configuration.
2. Add all the necessary dependencies
You can add the dependencies in Maven’s pom.xml file, by editing it at the “Pom.xml” page of the POM editor, as shown below:
pom.xml:
01 02 03 04 05 06 07 08 09 10 11 12 13 14 15 16 17 18 19 20 21 22 23 24 25 26 27 28 29 30 31 32 33 34 35 36 37 | <project xmlns="http://maven.apache.org/POM/4.0.0" xmlns:xsi="http://www.w3.org/2001/XMLSchema-instance" <modelVersion>4.0.0</modelVersion> <groupId>com.javacodegeeks.snippets.enterprise.cdi</groupId> <artifactId>cdibeans</artifactId> <packaging>war</packaging> <version>0.0.1-SNAPSHOT</version> <name>cdibeans Maven Webapp</name> <dependencies> <dependency> <groupId>org.jboss.weld.servlet</groupId> <artifactId>weld-servlet</artifactId> <version>1.1.10.Final</version> </dependency> <dependency> <groupId>javax.servlet</groupId> <artifactId>jstl</artifactId> <version>1.2</version> </dependency> <dependency> <groupId>javax.servlet</groupId> <artifactId>javax.servlet-api</artifactId> <version>3.0.1</version> <scope>provided</scope> </dependency> <dependency> <groupId>org.glassfish</groupId> <artifactId>javax.faces</artifactId> <version>2.1.7</version> </dependency> </dependencies> <build> <finalName>cdibeans</finalName> </build></project> |
As you can see Maven manages library dependencies declaratively. A local repository is created (by default under {user_home}/.m2 folder) and all required libraries are downloaded and placed there from public repositories. Furthermore intra – library dependencies are automatically resolved and manipulated.
3. Create a simple Service
The GreetingCard.java class is an interface with two methods.
GreetingCard.java
1 2 3 4 5 6 7 8 | package com.javacodegeeks.snippets.enterprise.cdibeans;public interface GreetingCard { public void sayHello(); public void sayGoodBye();} |
The implementation of the service is shown below:
GreetingCardImpl.java
01 02 03 04 05 06 07 08 09 10 11 12 13 14 15 16 | package com.javacodegeeks.snippets.enterprise.cdibeans.impl;import com.javacodegeeks.snippets.enterprise.cdibeans.GreetingCard;public class GreetingCardImpl implements GreetingCard { public void sayHello() { System.out.println("Hello!!!"); } public void sayGoodBye() { System.out.println("GoodBye!!!"); }} |
4. Use of the Producer and the Disposer in a Managed Bean
In the managed bean below, we are making use of the Producer and Disposer methods created above. In particular, in the GreetingCardFactory.java class, we create a method, getGreetingCard(), annotated with the @Produces annotation. The method creates an instance of the GreetingCardImpl. In the same way, the Disposer method has an annotated @Disposes parameter. The Disposer parameter receives the object produced by the producer method. The Disposer method is called automatically when the context ends. Here, since we have created a RequestScoped Producer method, the Disposer method is called at the end of the request.
GreetingCardFactory.java
01 02 03 04 05 06 07 08 09 10 11 12 13 14 15 16 17 18 19 20 21 22 23 24 25 26 27 28 29 | package com.javacodegeeks.snippets.enterprise.cdibeans;import java.io.Serializable;import javax.enterprise.context.RequestScoped;import javax.enterprise.inject.Disposes;import javax.enterprise.inject.Produces;import com.javacodegeeks.snippets.enterprise.cdibeans.impl.GreetingCardImpl;public class GreetingCardFactory implements Serializable { private static final long serialVersionUID = -44416514616012281L; @Produces @RequestScoped @Greetings public GreetingCard getGreetingCard() { GreetingCard greetingCard = new GreetingCardImpl(); greetingCard.sayHello(); return greetingCard; } public void disposeGreetingCard( @Disposes @Greetings GreetingCard greetingCard) { greetingCard.sayGoodBye(); }} |
We can use qualifiers to provide various implementations of a particular bean type. A qualifier is an annotation that we apply to a bean. A qualifier type is a Java annotation defined as @Target({METHOD, FIELD, PARAMETER, TYPE}) and @Retention(RUNTIME).
Here, we declare a @Greetings qualifier, as shown below:
Greetings.java
01 02 03 04 05 06 07 08 09 10 11 12 13 14 15 16 17 18 | package com.javacodegeeks.snippets.enterprise.cdibeans;import static java.lang.annotation.ElementType.FIELD;import static java.lang.annotation.ElementType.TYPE;import static java.lang.annotation.ElementType.METHOD;import static java.lang.annotation.ElementType.PARAMETER;import static java.lang.annotation.RetentionPolicy.RUNTIME;import java.lang.annotation.Retention;import java.lang.annotation.Target;import javax.inject.Qualifier;@Qualifier@Retention(RUNTIME)@Target({ FIELD, TYPE, METHOD, PARAMETER })public @interface Greetings {} |
5. Run the application
In order to run the application, we have created a simple servlet, as shown below:
GreetingServlet.java
01 02 03 04 05 06 07 08 09 10 11 12 13 14 15 16 17 18 19 20 21 22 23 24 25 26 27 28 29 30 31 32 33 34 35 36 37 38 39 | package com.javacodegeeks.snippets.enterprise.cdibeans.servlet;import java.io.IOException;import java.io.PrintWriter;import javax.inject.Inject;import javax.servlet.ServletException;import javax.servlet.annotation.WebServlet;import javax.servlet.http.HttpServlet;import javax.servlet.http.HttpServletRequest;import javax.servlet.http.HttpServletResponse;import com.javacodegeeks.snippets.enterprise.cdibeans.GreetingCard;import com.javacodegeeks.snippets.enterprise.cdibeans.Greetings;@WebServlet(name = "greetingServlet", urlPatterns = {"/sayHello"})public class GreetingServlet extends HttpServlet { private static final long serialVersionUID = 2280890757609124481L; @Inject @Greetings private GreetingCard greetingCard; public void init() throws ServletException { } public void doGet(HttpServletRequest request, HttpServletResponse response) throws ServletException, IOException { response.setContentType("text/html"); PrintWriter out = response.getWriter(); out.println("<h1>" + "Hello ... " + "</h1>"); System.out.println(" .... " + greetingCard.toString()); } public void destroy(){ }} |
To run the example we must build the project with Maven, and then place the war file produced in webbaps folder of tomcat. Then, we can hit on :
http://localhost/8080/cdibeans/sayHello
and the result is the one shown below:

This was a tutorial of Java EE CDI Disposer methods.
Download the source code of this tutorial: CDIDisposerMethodExample

