Android ListView – Tutorial and basic example
One of the UI component we use often is ListView, for example when we need to show items in a vertical scrolling list. One interesting aspect is this component can be deeply customized and can be adapted to our needs. In this first post i want to analyze the basic concepts behind it and how to use this component.
In order to show items inside the list, this component uses an adapter, so if we want to populate the list we have first create or use existing adapters. Android SDK has some standard adapters that are useful in many cases. If we have special needs we can create custom adapter and i will cover it in the next post. To understand how we can use this UI component we can suppose we want to show a list of planets. To make things simple and focus our attention on the ListView component we will use, by now
a very simple and basic adapter called SimpleAdapter.
So let’s create an android project with an activity called MainActivity and a layout called activity_main.xml. This layout is very simple, it just contains the listView component.
<RelativeLayout xmlns:android="http://schemas.android.com/apk/res/android"
    xmlns:tools="http://schemas.android.com/tools"
    android:layout_width="match_parent"
    android:layout_height="match_parent" >

    <ListView android:id="@+id/listView"
              android:layout_height="match_parent"
              android:layout_width="match_parent"/>

</RelativeLayout>
Our MainActivity class is:
public class MainActivity extends Activity {

    @Override
    public void onCreate(Bundle savedInstanceState) {
        super.onCreate(savedInstanceState);
        setContentView(R.layout.activity_main);
        ....
    }
...
}
So now it is the time to populate our listView. As said before we use a SimpleAdapter, a standard adapter present in SDK. Let’s suppose we want to show a list with the solar system planets. SimpleAdapter accepts a java.util.List with element’s type of java.util.Map. In our case we have then:
// The data to show
List<Map<String, String>> planetsList = new ArrayList<Map<String,String>>();

.....

   private void initList() {
    // We populate the planets

    planetsList.add(createPlanet("planet", "Mercury"));
    planetsList.add(createPlanet("planet", "Venus"));
    planetsList.add(createPlanet("planet", "Mars"));
    planetsList.add(createPlanet("planet", "Jupiter"));
    planetsList.add(createPlanet("planet", "Saturn"));
    planetsList.add(createPlanet("planet", "Uranus"));
    planetsList.add(createPlanet("planet", "Neptune"));

}

private HashMap<String, String> createPlanet(String key, String name) {
    HashMap<String, String> planet = new HashMap<String, String>();
    planet.put(key, name);

    return planet;
}
and the SimpleAdapter can be instantiated as:
// This is a simple adapter that accepts as parameter
// Context
// Data list
// The row layout that is used during the row creation
// The keys used to retrieve the data
// The View id used to show the data. The key number and the view id must match
simpleAdpt = new SimpleAdapter(this, planetsList, android.R.layout.simple_list_item_1, new String[] {"planet"}, new int[] {android.R.id.text1});
where the first parameter is the context reference (our Activity), the second the data we want so show in the list. The 3rd is the layout we want to use for each row in the list. In this case we just used a pre-built layout shipped with android SDK that you can find inside the android sdk directroy and then platforms\android-16\data\res\layout. This is a very simple layout that contains just a TextView with id text1. The 4th parameter is an array of key used to retrieve the data from the Map. Each list element of java.util.List represents a row in the ListView and each element inside the row must have a unique key that is used to retrieve the element content. In our case to make things very simple we just used planet as key. The 5th element is an array of int representing the ids of the View inside the row layout. In our case is just text1 id. Please notice that the keys array length must match the ids array length.
We have almost done. Let’s modify the onCreate method in our Activity like that:
@Override
public void onCreate(Bundle savedInstanceState) {
    super.onCreate(savedInstanceState);
    setContentView(R.layout.activity_main);

    initList();

    // We get the ListView component from the layout
    ListView lv = (ListView) findViewById(R.id.listView);

    // This is a simple adapter that accepts as parameter
    // Context
    // Data list
    // The row layout that is used during the row creation
    // The keys used to retrieve the data
    // The View id used to show the data. The key number and the view id must match
    simpleAdpt = new SimpleAdapter(this, planetsList, android.R.layout.simple_list_item_1, new String[] {"planet"}, new int[] {android.R.id.text1});

    lv.setAdapter(simpleAdpt);
}
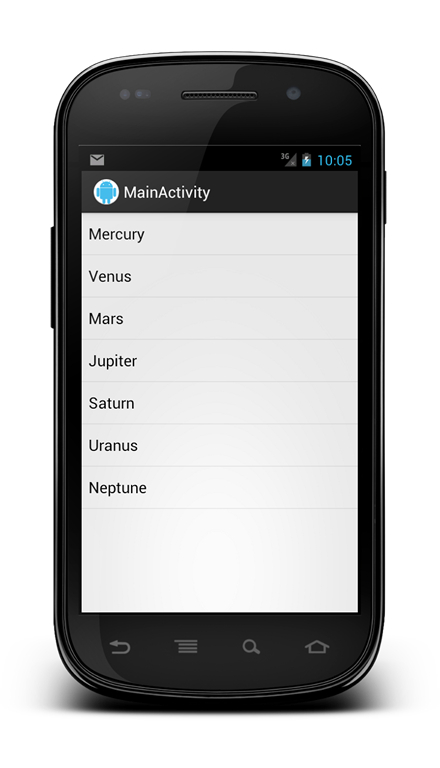
If we run our project we have:
User interaction
Once we have created our list and populated it with the items we want to interact with the user giving the chance to click one item or maybe show a context menu. To do it we have to register some listener.
If we want to listen when the user clicks on an item we simply have to implement the AdapterView.OnItemClickListener(). So we have:
// React to user clicks on item
lv.setOnItemClickListener(new AdapterView.OnItemClickListener() {

     public void onItemClick(AdapterView<?> parentAdapter, View view, int position,
                             long id) {

         // We know the View is a TextView so we can cast it
         TextView clickedView = (TextView) view;

         Toast.makeText(MainActivity.this, "Item with id ["+id+"] - Position ["+position+"] - Planet ["+clickedView.getText()+"]", Toast.LENGTH_SHORT).show();

     }
});
When the user clicks on an item we simply show the position and the id of the item clicked using a simple Toast.
What about if we want to create a context menu when a user long click on an item? Well this is very simple because we have to override the onCreateContextMenu method in the Activity class and register the class as listener. First override the method:
// We want to create a context Menu when the user long click on an item
  @Override
  public void onCreateContextMenu(ContextMenu menu, View v,
          ContextMenuInfo menuInfo) {

      super.onCreateContextMenu(menu, v, menuInfo);
      AdapterContextMenuInfo aInfo = (AdapterContextMenuInfo) menuInfo;

      // We know that each row in the adapter is a Map
      HashMap map =  (HashMap) simpleAdpt.getItem(aInfo.position);

      menu.setHeaderTitle("Options for " + map.get("planet"));
      menu.add(1, 1, 1, "Details");
      menu.add(1, 2, 2, "Delete");

  }
What do we do in this method? Well first we call super to let the SO makes its work. Then we cast the ContextMenuInfo to AdapterContextMenuInfo because we are using a ListView. The AdapterContextMenuInfo has an attribute that olds the item position clicked se we use this information to retrieve the item information. We know we are using an HashMap to represent the row so we cast the result to HashMap. It is the time we create the menu.
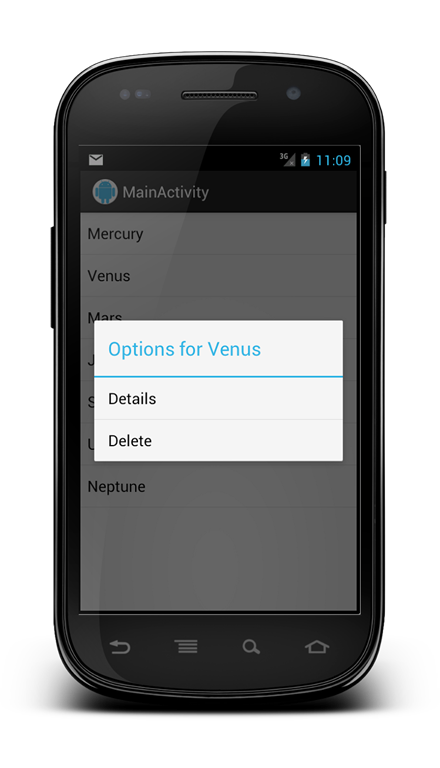
First we create the menu header using the name of the planet retrieved using the HashMap and then set two options “Details” and “Delete” with different ids but belonging to the same group we called “1”.
Before running our project we have to modify onCreate method to register our MainClass as the handler for the context menu for the ListView.
// we register for the contextmneu
registerForContextMenu(lv);
Let’s run our project and when we long click on an item we will get:

The last step is handle when user clicks on one of the options. We have to override the method onContextItemSelected like that:
// This method is called when user selects an Item in the Context menu
@Override
public boolean onContextItemSelected(MenuItem item) {
    int itemId = item.getItemId();
    // Implements our logic
    Toast.makeText(this, "Item id ["+itemId+"]", Toast.LENGTH_SHORT).show();
    return true;
}
In this case we simply show a Toast with the menu item id.


useful
Thanks for the tutorial! Well written and saved me a lot of time!
Nice, easy to follow, thanks.
may I ask for the complete source code of this example… This will be of great help to the application I am working on… Thanks!
I’ll post the code. Thank you
While calling initList() in MainActivity, it showing error. Says “The method initList() is undefined for the type MainActivity”.
Are you sure you have defined the initList method in your code? In the post there’s defined the method that you should add in your MainActivity.
I have defined initList() in a separate SimpleAdapter.java within the project. But how to refer it in MainActivity.java? By simply calling it within MainActivity is showing the above error.
You can give a look here. It is very similar. I hope it helps you
Is there any way to have the context menu pop up after a short click rather than a long one? And btw, thanks for the tutorial it was very useful!!!
Usually the short click is used to select the row in the listView so that you can move, for example, to the detail page.
You could use
setOnItemClickListener.Awesome, simple and nice.
I have created this project in Eclipse, just the first part to create and show the list.
Several errors are reported:
simpleAdpt cannot be resolved to a variable
planetsList cannot be resolved to a variable
In initList function:
planetsList cannot be resolved
I cannot get these errors fixed using Eclipse suggestions. If I allow Eclipse to create local variables for simpleAdpt and planetsList, the planetlist error in InitList does not go away.
I’m just starting Android so I have no idea what to do.
Hi cviguy – I had the same problem. I accepted this eclipse suggestion to change
simpleAdpt = new SimpleAdapter(this, planetsList, android.R.layout.simple_list_item_1, new String[] {“planet”}, new int[] {android.R.id.text1});
…to…
SimpleAdapter simpleAdpt = new SimpleAdapter(this, planetsList, android.R.layout.simple_list_item_1, new String[] {“planet”}, new int[] {android.R.id.text1});
and everything worked out all right. Also a java/android newbie, so no real idea as to what is going on, but I’m assuming something that some variable types need to be declared as a type (as with the ‘ListView lv = (ListView) … ‘ line a few lines up?
Francesco? Any insights?
Confuse !
Error: Multiple markers at this line
– AdapterView cannot be resolved to a type
– The method setOnItemClickListener(AdapterView.OnItemClickListener) in the type AdapterView is not applicable for the arguments (new
OnItemClickListener(){}).
==============================================================================
This is the error for the lv.setOnItemClickListener(new AdapterView.OnItemClickListener() {
public void onItemClick(AdapterView parentAdapter, View view, int position,
long id) {
// We know the View is a TextView so we can cast it
TextView clickedView = (TextView) view;
Toast.makeText(getApplicationContext(), “Item with id [“+id+”] – Position [“+position+”] – Planet [“+clickedView.getText()+”]”, Toast.LENGTH_SHORT).show();
}
});
Do you have any suggestion i am using eclipse.
thanks
Thank you for taking the time to layout all this code for me in such an organized way, with the right calls that work. Literally days of my life of peiceing code toghether saved. Thank you.
Very nice post regarding basic usage of ListView. Waiting for more.
Hi, i am having problem with the whole source code, can you share with me the complete mainactivity.java code?
Thanks..
Nice tutorial. If you would like to customize the listview to show both text and images, this tutorial is useful to you.
http://www.worldbestlearningcenter.com/tips/Android—customize-ListView-to-show-text-and-images.htm
onItemClick() not working shows “unfortunately app has stopped” when ever an list item is clicked!!!
Overly complicated nonsense and I’ll tell you why. I can’t tell you how many of these tutorials I have found on the internet that claim to be “basic’ but are not. THIS is a basic Array, public static void main(String[] args) { // declares an array of integers int[] anArray; // allocates memory for 10 integers anArray = new int[10]; // initialize first element anArray[0] = 100; // initialize second element anArray[1] = 200; // and so forth anArray[2] = 300; anArray[3] = 400; anArray[4] = 500; anArray[5] = 600; anArray[6] = 700; anArray[7] = 800; anArray[8] = 900; anArray[9]… Read more »