Android: Build real weather app: JSON, HTTP and Openweathermap
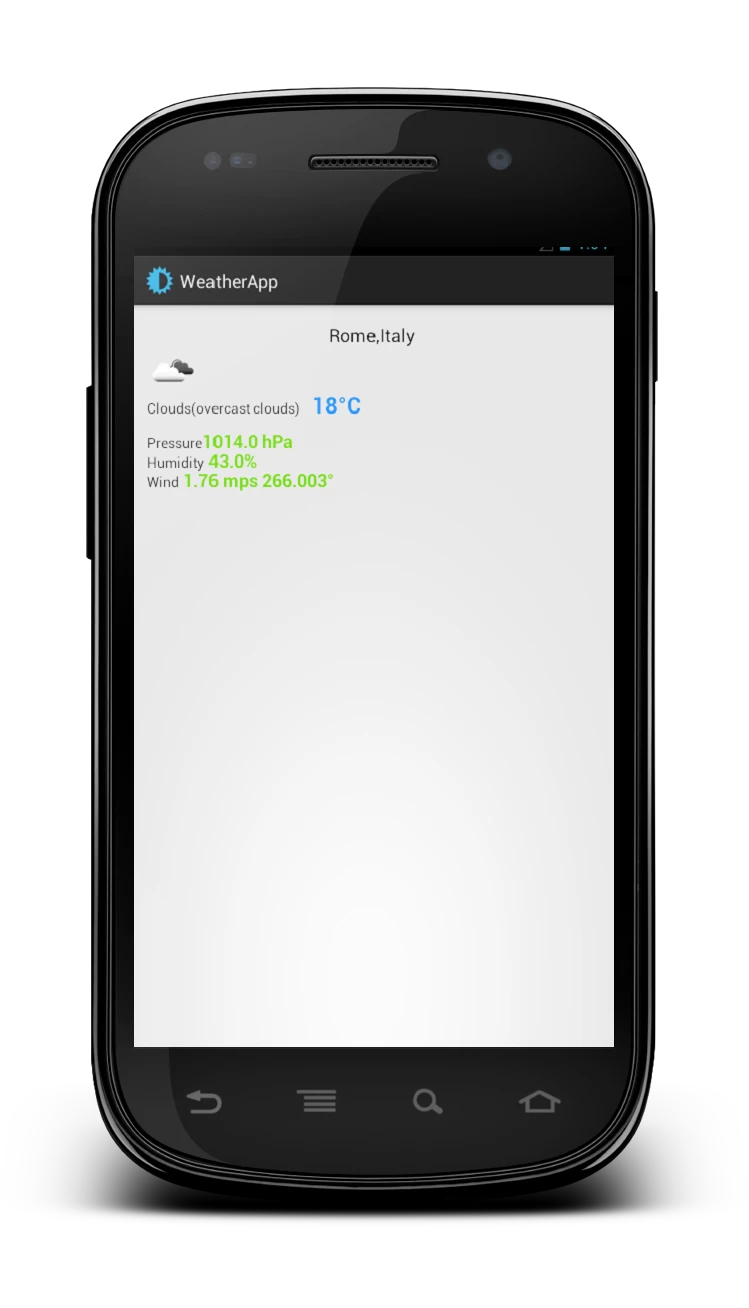
In this post I want to describe how to create a weather app that gives current weather information. This app will use JSON, HTTP connection and AsyncTask to get this information.. As weather provider I will use OpenWeatherMap a free weather service that provides some interesting API really easy to use.I will guide you through the steps necessary to build up a working app. For more information about API, you can visit the OpenWeatherMap web site. I will show to you the final result so you can have an idea about what we will do in this post.
Current weather info – HTTP Request and JSON Response
OpenWeatherMap offers several API to use to get weather information. We want to use the one that gives us the current weather info. The URL to call to get this info is:
1 | http://api.openweathermap.org/data/2.5/weather?q=city,country |
Let’s suppose we want to know the weather in Rome, IT. Using our browser we can have:
As we can see we have JSON response. Formatting the response we have
01 02 03 04 05 06 07 08 09 10 11 12 13 14 15 16 17 18 19 20 21 22 | { "coord":{"lon":12.4958,"lat":41.903}, "sys":{"country":"Italy","sunrise":1369107818,"sunset":1369160979}, "weather":[{ "id":802,"main":"Clouds","description":"scattered clouds", "icon":"03d"}], "base":"global stations", "main":{ "temp":290.38, "humidity":68, "pressure":1015, "temp_min":287.04, "temp_max":293.71}, "wind":{ "speed":1.75, "deg":290.002}, "clouds":{"all":32}, "dt":1369122932, "id":3169070, "name":"Rome", "cod":200} |
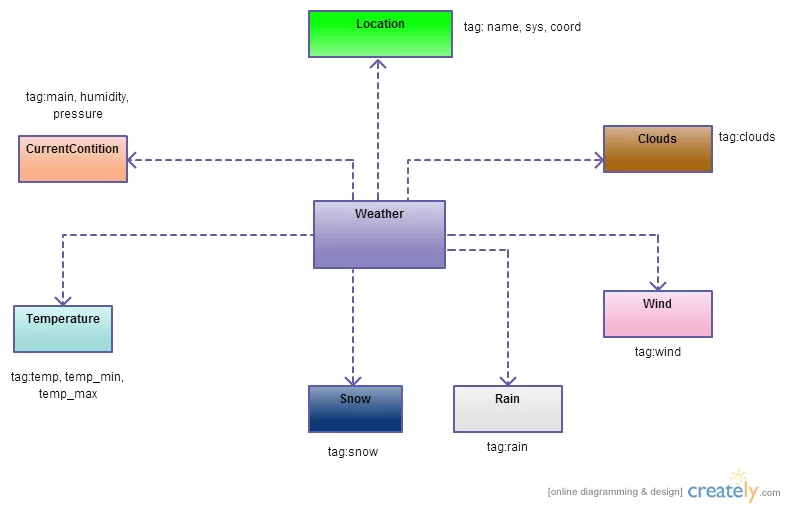
So the first thing we need to do is creating our data model so that we can parse the response and convert it into Java classes. Analyzing the response we have different “main” tags that we can use as class in Java:
- coord (object)
- sys (object)
- weather (array)
- main (object)
- wind (object)
- name: (String)
The response is quite simple and we can convert it manually. The UML class diagram for the model is shown below:
JSON Weather Parser
Once we have created our model we have to parse it. We can create a specific class that handles this task. First we have to create the “root” object that receive as input the entire string containing all the JSON response:
1 2 | // We create out JSONObject from the dataJSONObject jObj = new JSONObject(data); |
Then we start parsing each piece of the response:
01 02 03 04 05 06 07 08 09 10 11 12 13 | // We start extracting the infoLocation loc = new Location();JSONObject coordObj = getObject("coord", jObj);loc.setLatitude(getFloat("lat", coordObj));loc.setLongitude(getFloat("lon", coordObj));JSONObject sysObj = getObject("sys", jObj);loc.setCountry(getString("country", sysObj));loc.setSunrise(getInt("sunrise", sysObj));loc.setSunset(getInt("sunset", sysObj));loc.setCity(getString("name", jObj));weather.location = loc; |
In the line 4,8 we create two “sub” object (coordObj and sysObj) having as parent the jObj as it clear from the JSON response. As we can see we use some helper methods to get String,int and float values:
01 02 03 04 05 06 07 08 09 10 11 12 13 14 15 16 | private static JSONObject getObject(String tagName, JSONObject jObj) throws JSONException { JSONObject subObj = jObj.getJSONObject(tagName); return subObj;}private static String getString(String tagName, JSONObject jObj) throws JSONException { return jObj.getString(tagName);}private static float getFloat(String tagName, JSONObject jObj) throws JSONException { return (float) jObj.getDouble(tagName);}private static int getInt(String tagName, JSONObject jObj) throws JSONException { return jObj.getInt(tagName);} |
And then we finally parse the weather information. We have to remember that weather tag is an array so we have to handle it differently
01 02 03 04 05 06 07 08 09 10 11 12 13 14 15 16 17 18 19 20 21 22 23 24 25 | // We get weather info (This is an array)JSONArray jArr = jObj.getJSONArray("weather");// We use only the first valueJSONObject JSONWeather = jArr.getJSONObject(0);weather.currentCondition.setWeatherId(getInt("id", JSONWeather));weather.currentCondition.setDescr(getString("description", JSONWeather));weather.currentCondition.setCondition(getString("main", JSONWeather));weather.currentCondition.setIcon(getString("icon", JSONWeather));JSONObject mainObj = getObject("main", jObj);weather.currentCondition.setHumidity(getInt("humidity", mainObj));weather.currentCondition.setPressure(getInt("pressure", mainObj));weather.temperature.setMaxTemp(getFloat("temp_max", mainObj));weather.temperature.setMinTemp(getFloat("temp_min", mainObj));weather.temperature.setTemp(getFloat("temp", mainObj));// WindJSONObject wObj = getObject("wind", jObj);weather.wind.setSpeed(getFloat("speed", wObj));weather.wind.setDeg(getFloat("deg", wObj));// CloudsJSONObject cObj = getObject("clouds", jObj);weather.clouds.setPerc(getInt("all", cObj)); |
At the end we have our Weather class filled with the data retrieved.
HTTP Request and Response
Now we have to exchange information with the remote server using HTTP protocol. We have to send information and then read the response. We covered this topic in the previous post( Android HTTP Client: GET, POST, Download, Upload, Multipart Request) so we won’t describe it again, we simply show the code:
01 02 03 04 05 06 07 08 09 10 11 12 13 14 15 16 17 18 19 20 21 22 23 24 25 26 27 28 29 30 31 32 33 34 35 36 37 38 39 40 41 42 43 44 45 46 47 48 49 50 51 52 53 54 55 56 57 58 59 60 61 62 63 64 65 66 67 68 69 70 71 72 | public class WeatherHttpClient { public String getWeatherData(String location) { HttpURLConnection con = null ; InputStream is = null; try { con = (HttpURLConnection) ( new URL(BASE_URL + location)).openConnection(); con.setRequestMethod("GET"); con.setDoInput(true); con.setDoOutput(true); con.connect(); // Let's read the response StringBuffer buffer = new StringBuffer(); is = con.getInputStream(); BufferedReader br = new BufferedReader(new InputStreamReader(is)); String line = null; while ( (line = br.readLine()) != null ) buffer.append(line + "\r\n"); is.close(); con.disconnect(); return buffer.toString(); } catch(Throwable t) { t.printStackTrace(); } finally { try { is.close(); } catch(Throwable t) {} try { con.disconnect(); } catch(Throwable t) {} } return null; } public byte[] getImage(String code) { HttpURLConnection con = null ; InputStream is = null; try { con = (HttpURLConnection) ( new URL(IMG_URL + code)).openConnection(); con.setRequestMethod("GET"); con.setDoInput(true); con.setDoOutput(true); con.connect(); // Let's read the response is = con.getInputStream(); byte[] buffer = new byte[1024]; ByteArrayOutputStream baos = new ByteArrayOutputStream(); while ( is.read(buffer) != -1) baos.write(buffer); return baos.toByteArray(); } catch(Throwable t) { t.printStackTrace(); } finally { try { is.close(); } catch(Throwable t) {} try { con.disconnect(); } catch(Throwable t) {} } return null; }} |
Weather App
Finally, it is the time for our Activity. The layout is very simple and of course it is just a skeleton you need to improve it if you want to have a production app.
001 002 003 004 005 006 007 008 009 010 011 012 013 014 015 016 017 018 019 020 021 022 023 024 025 026 027 028 029 030 031 032 033 034 035 036 037 038 039 040 041 042 043 044 045 046 047 048 049 050 051 052 053 054 055 056 057 058 059 060 061 062 063 064 065 066 067 068 069 070 071 072 073 074 075 076 077 078 079 080 081 082 083 084 085 086 087 088 089 090 091 092 093 094 095 096 097 098 099 100 101 102 | android:layout_width="match_parent" android:layout_height="match_parent" android:paddingBottom="@dimen/activity_vertical_margin" android:paddingLeft="@dimen/activity_horizontal_margin" android:paddingRight="@dimen/activity_horizontal_margin" android:paddingTop="@dimen/activity_vertical_margin" tools:context=".MainActivity" > <TextView android:id="@+id/cityText" style="?android:attr/textAppearanceMedium" android:layout_width="wrap_content" android:layout_height="wrap_content" android:layout_centerHorizontal="true" /> <ImageView android:id="@+id/condIcon" android:layout_width="wrap_content" android:layout_height="wrap_content" android:layout_alignParentLeft="true" android:layout_below="@id/cityText" /> <TextView android:id="@+id/condDescr" android:layout_width="wrap_content" android:layout_height="wrap_content" android:layout_below="@id/condIcon" android:layout_alignLeft="@id/condIcon" /> <TextView android:id="@+id/temp" style="@style/tempStyle" android:layout_width="wrap_content" android:layout_height="wrap_content" android:layout_marginLeft="12dp" android:layout_alignBaseline="@id/condDescr" android:layout_toRightOf="@id/condDescr"/> <TextView android:id="@+id/pressLab" android:layout_width="wrap_content" android:layout_height="wrap_content" android:layout_alignParentLeft="true" android:layout_below="@id/condDescr" android:text="Pressure" android:layout_marginTop="15dp" /> <TextView android:id="@+id/press" android:layout_width="wrap_content" android:layout_height="wrap_content" android:layout_alignBaseline="@id/pressLab" android:layout_toRightOf="@id/pressLab" style="@style/valData"/> <TextView android:id="@+id/humLab" android:layout_width="wrap_content" android:layout_height="wrap_content" android:layout_alignParentLeft="true" android:layout_below="@id/pressLab" android:text="Humidity" /> <TextView android:id="@+id/hum" android:layout_width="wrap_content" android:layout_height="wrap_content" android:layout_alignBaseline="@id/humLab" android:layout_toRightOf="@id/humLab" android:layout_marginLeft="4dp" style="@style/valData"/> <TextView android:id="@+id/windLab" android:layout_width="wrap_content" android:layout_height="wrap_content" android:layout_alignParentLeft="true" android:layout_below="@id/humLab" android:text="Wind" /> <TextView android:id="@+id/windSpeed" android:layout_width="wrap_content" android:layout_height="wrap_content" android:layout_alignBaseline="@id/windLab" android:layout_toRightOf="@id/windLab" android:layout_marginLeft="4dp" style="@style/valData" /> <TextView android:id="@+id/windDeg" android:layout_width="wrap_content" android:layout_height="wrap_content" android:layout_alignBaseline="@id/windLab" android:layout_toRightOf="@id/windSpeed" android:layout_marginLeft="4dp" style="@style/valData"/></RelativeLayout> |
In onCreate method we simply get the reference to the Views inside the layout so that we can populate them later after the request is completed.
01 02 03 04 05 06 07 08 09 10 11 12 13 14 15 16 17 18 | @Overrideprotected void onCreate(Bundle savedInstanceState) { super.onCreate(savedInstanceState); setContentView(R.layout.activity_main); String city = "Rome,IT"; cityText = (TextView) findViewById(R.id.cityText); condDescr = (TextView) findViewById(R.id.condDescr); temp = (TextView) findViewById(R.id.temp); hum = (TextView) findViewById(R.id.hum); press = (TextView) findViewById(R.id.press); windSpeed = (TextView) findViewById(R.id.windSpeed); windDeg = (TextView) findViewById(R.id.windDeg); imgView = (ImageView) findViewById(R.id.condIcon); JSONWeatherTask task = new JSONWeatherTask(); task.execute(new String[]{city});} |
and we start an AsyncTask, because as we already know network operations are time consuming so we can run them in the main thread otherwise we could have an ANR problem. The JSONWeatherTask is very simply
01 02 03 04 05 06 07 08 09 10 11 12 13 14 15 16 | protected Weather doInBackground(String... params) { Weather weather = new Weather(); String data = ( (new WeatherHttpClient()).getWeatherData(params[0])); try { weather = JSONWeatherParser.getWeather(data); // Let's retrieve the icon weather.iconData = ( (new WeatherHttpClient()).getImage(weather.currentCondition.getIcon())); } catch (JSONException e) { e.printStackTrace(); } return weather; } |
At line 3 we make the HTTP request and then we parse it at line 6. At line 9 we retrieve the icon that shows the weather condition.
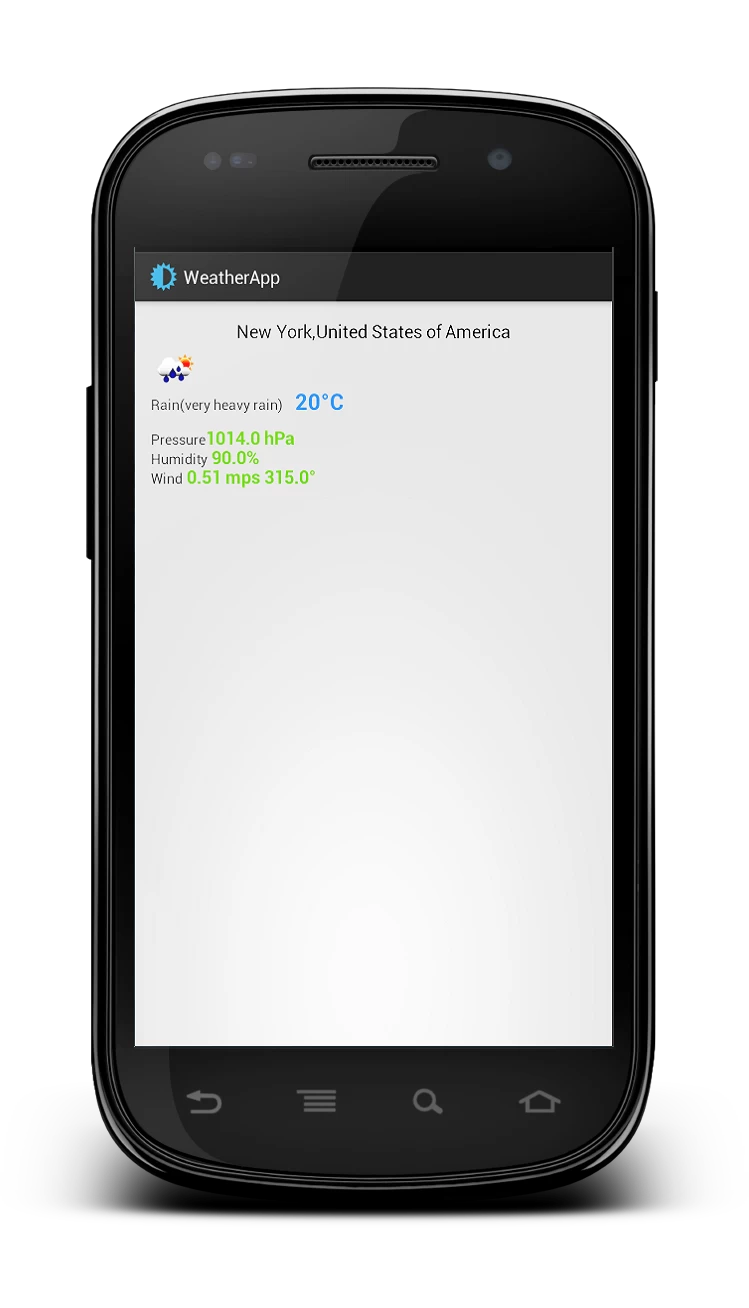
Running the code we have:
The source code available @github.


Really great tutorial :)
Thank you!
Also, I have a question: If I want to use my own icons for weather, can I do that?
You can do it remapping weather icon code. If you look at the code there’s a piece of it downloading an icon that is the weather icon. You can map this icon code to your icon.
amm…i m a beginner at this one…cud u pls upload the whole code…i couldnt get some of the parts above…
Look at the original post here: http://www.survivingwithandroid.com/2013/05/build-weather-app-json-http-android.html
You can find the link to download the code at github.
hi, m also a beginner my location object Location loc = new Location(); gives me an error i imported location classes, What am i missing.
Can you post the stacktrace so that i can have an idea on your error. Thank you.
Thanks a Lot nice tutorials helped me a lot,.. if you have any donations i will donate 10% of my salary thanks a lot i am really impressed
Im trying to have the user input the location, so I did this:
1. Added a button with id button1 in activity_main.xml
2. Changed cityText to EditText in activity_main.xml
3. Commented out the setting of String city in Main
4. Set location to be cast as EditText in order to get the cityText view
5. Added a public void open (View view) method to:
– String city = location.getText().toString();
– JSONWeatherTask task = new JSONWeatherTask();
– task.execute(new String[]{city});
but the app just crashes. Actually i put a:
System.out.printf(“buttonClicked”);
in that method but it doesn’t seem to log. Can you help?
Hi, Im beginner in android and I have to make an weather app. My problem here is the data model, I didn’t get how to do the data model.
I’ll be grateful …
Thank you. l
Thanks a ton! Great help!
i cant get the icon data?How can solve problem.
public byte[] getImage(String code) {
HttpURLConnection con = null ;
InputStream is = null;
try {
con = (HttpURLConnection) ( new URL(IMG_URL + code)).openConnection();
con.setRequestMethod(“GET”);
con.setDoInput(true);
con.setDoOutput(true);
con.connect();
// Let’s read the response
is = con.getInputStream();
byte[] buffer = new byte[1024];
ByteArrayOutputStream baos = new ByteArrayOutputStream();
while ( is.read(buffer) != -1)
baos.write(buffer);
return baos.toByteArray();
}
catch(Throwable t) {
t.printStackTrace();
}
finally {
try { is.close(); } catch(Throwable t) {}
try { con.disconnect(); } catch(Throwable t) {}
}
return null;
}
How to Convert sunset and sunrise time into minute???
public static String TimeStamp2Date(String timestampString) {
Long timestamp = Long.parseLong(timestampString) * 1000;
String date = new java.text.SimpleDateFormat(“yyyy-MM-dd HH:mm:ss”)
.format(new java.util.Date(timestamp));
return date;
}
How can I convert “sunrise”: 1428450217, “sunset”: 1428495411 to actual time.
Sorry I got this from last comment
Ho can I convert “humidity”: 100 to percent?
I was always having confusion about parsing the json string. after reading your tutorial I really understand the basics about converting json formate.
Thanks Alot