Fragment in Android: Tutorial with Example using WebView
In this post we want to explain how to use fragment in Android with a real example. In the last post we talked about Fragment in Android and how we can use it to support multiple screen. We described their lifecycle and how we can use it. In this post we want to go deeper and create an example that helps us to understand better how we can use fragments. As example we want to create a simple application that is built by two fragments:
- one that shows a list of links and
- another one that show the web page in a WebView.
We can suppose we have two different layouts one for portrait mode and one for
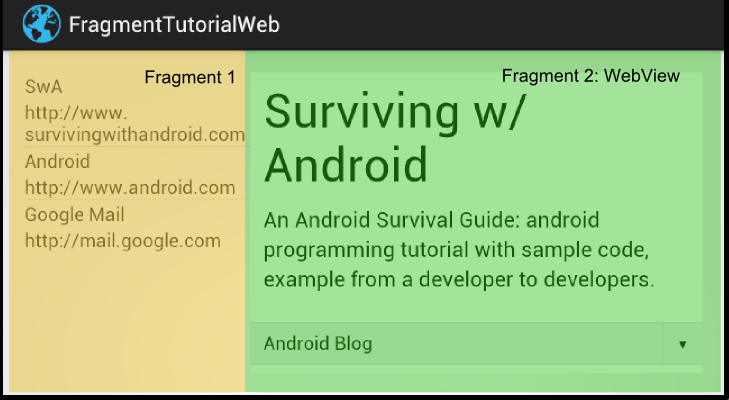
landscape. In the landscape mode we want something like the image below:
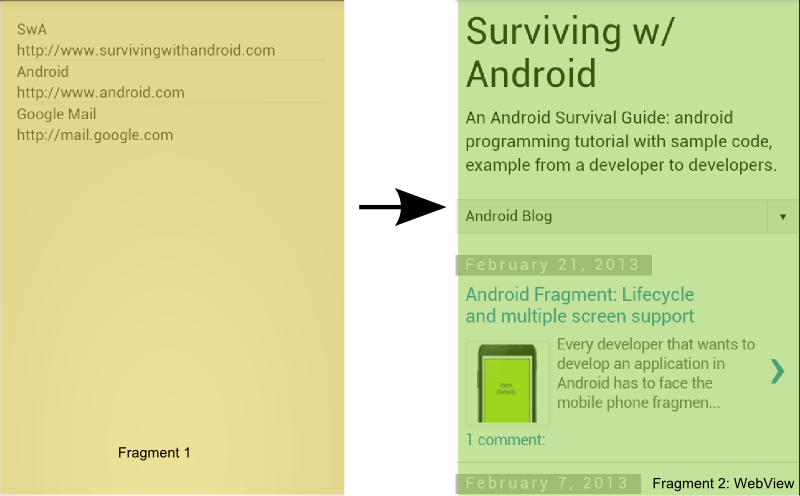
while, in the portrait mode we want something like:
CREATE LAYOUT
The first step we have to do is creating our layout. As we said we need two different layout one for portrait and one for landscape. So we have to create two xml file under res/layout (for portrait mode) and one under res/layout-land (for landscape mode). Of course we could customize more our layout including other specs but it is enough for now. These two files are called activity_layout.xml.
<RelativeLayout xmlns:android="http://schemas.android.com/apk/res/android"
    xmlns:tools="http://schemas.android.com/tools"
    android:layout_width="match_parent"
    android:layout_height="match_parent"
    android:paddingBottom="@dimen/activity_vertical_margin"
    android:paddingLeft="@dimen/activity_horizontal_margin"
    android:paddingRight="@dimen/activity_horizontal_margin"
    android:paddingTop="@dimen/activity_vertical_margin"
    tools:context=".MainActivity" >

    <fragment android:id="@+id/listFragment"
              android:layout_width="wrap_content"
              android:layout_height="wrap_content"
              class="com.survivingwithandroid.fragment.LinkListFragment"/>

</RelativeLayout>
This one is for the portrait mode and as we notice we have only one fragment containing just the link list. We will see later how to create this fragment. We need, moreover, another layout as it is clear from the pic above, the one that contains the WebView.
<?xml version="1.0" encoding="utf-8"?>

<LinearLayout xmlns:android="http://schemas.android.com/apk/res/android"

    android:layout_width="match_parent"

    android:layout_height="match_parent"

    android:orientation="vertical" >

    <WebView android:id="@+id/webPage"

             android:layout_height="wrap_content"

             android:layout_width="wrap_content"/>

</LinearLayout>
For the landscape mode we have something very similar plus the FrameLayout component in the same layout.
<LinearLayout xmlns:android="http://schemas.android.com/apk/res/android"
    xmlns:tools="http://schemas.android.com/tools"
    android:layout_width="match_parent"
    android:layout_height="match_parent"
    android:paddingBottom="@dimen/activity_vertical_margin"
    android:paddingLeft="@dimen/activity_horizontal_margin"
    android:paddingRight="@dimen/activity_horizontal_margin"
    android:paddingTop="@dimen/activity_vertical_margin"
    tools:context=".MainActivity"
    android:orientation="horizontal" >

    <fragment android:id="@+id/listFragment"
              android:layout_width="0dp"
              android:layout_height="wrap_content"
              class="com.survivingwithandroid.fragment.LinkListFragment"
              android:layout_weight="2"/>

    <FrameLayout android:id="@+id/fragPage"
                 android:layout_width="0dp"
                 android:layout_height="match_parent"
                 android:layout_weight="4"
                 />

</LinearLayout>
CREATE LINK LIST FRAGMENT
As you have already noticed both layout have a common fragment that is called LinkListFragment. We have to create it. If you didn’t read already the post explaining the lifecycle it is time you give a look. In this case we don’t have to override all the methods in the fragment lifecycle, but those important to control its behaviour. In our case we need to override:
- onCreateView
- onAttach
In this fragment we use a simple ListView to show the links and a simple adapter to customize the way how the items are shown. We don’t want to spend much time on how to create a custom adapter because it is out of this topic you can refer here to have more information. Just to remember in the onCreateView fragment method we simply inflate the layout and initialize the custom adapter. As XML layout to inflate in the fragment we have:
<?xml version="1.0" encoding="utf-8"?>
<LinearLayout xmlns:android="http://schemas.android.com/apk/res/android"
    android:layout_width="match_parent"
    android:layout_height="match_parent"
    android:orientation="vertical" >

    <ListView android:id="@+id/urls"
              android:layout_height="match_parent"
              android:layout_width="wrap_content"/>

</LinearLayout>
while in the method looks like:
@Override
public View onCreateView(LayoutInflater inflater, ViewGroup container,
        Bundle savedInstanceState) {
    Log.d("SwA", "LV onCreateView");
    View v = inflater.inflate(R.layout.linklist_layout, container, false);
    ListView lv = (ListView) v.findViewById(R.id.urls);
    la = new LinkAdapter(linkDataList, getActivity());
    lv.setAdapter(la);
    lv.setOnItemClickListener(new AdapterView.OnItemClickListener() {
        @Override
         public void onItemClick(AdapterView<?> parentAdapter, View view, int position,
                 long id) {
            LinkData data = ( (LinkAdapter) la ).getItem(position);
            ( (ChangeLinkListener)  getActivity()).onLinkChange(data.getLink());
        }

    });
    return v;
}
In this method we simply set our custom adapter and the set the listener when the user clicks on an item. We will cover this later (if you are curious see Inter fragment communication).
In the onAttach method we verify that the activity that holds the fragment implements a specific interface.
@Override
    public void onAttach(Activity activity) {
        // We verify that our activity implements the listener
        if (! (activity instanceof ChangeLinkListener) )
            throw new ClassCastException();

        super.onAttach(activity);
    }
We will clarify why we need this control later.
FRAGMENT COMMUNICATION
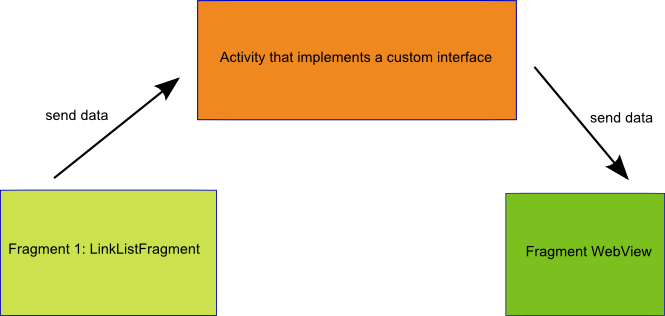
Basically in our example we have two fragments and they need to exchange information so that when user select an item in the fragment 1 (LinkListFragment) the other one (WebViewFragment) shows the web page corresponding to the link. So we need to find a way to let these fragments to exchange data.
On the other way we know that a fragment is a piece of code that can be re-used inside other activity so we don’t want to bind our fragment to a specific activity to not invalidate our work. In Java if we want to decouple two classes we can use an interface. So this interface solution fits perfectly. On the other hand we don’t want that our fragment exchange information directly because each fragment can rely only on the activity that holds it. So the simplest solution is that the activity implements an interface.
So in our case we define an interface called ChangeLinkListener that has only one method:
public interface ChangeLinkListener {

    public void onLinkChange(String link);
}
We have, more over, to verify that our activity implements this interface to be sure we can call it. The best place to verify it is in the onAttach method (see above) and at the end we need to call this method when the user selects an item in the ListView:
lv.setOnItemClickListener(new AdapterView.OnItemClickListener() {
    @Override
     public void onItemClick(AdapterView<?> parentAdapter, View view, int position,
             long id) {
        LinkData data = ( (LinkAdapter) la ).getItem(position);
        (ChangeLinkListener)  getActivity()).onLinkChange(data.getLink());
    }

});
PROGRAMMING MAIN ACTIVITY: FIND FRAGMENT
By now we talked about fragments only, but we know that fragments exists inside a “father” activity that control them. So we have to create this activity but we have to do much more.
As we said before this activity has to implements a custom interface so that it can receive data from the LinkListFragment. In this method (onLinkChange) we have somehow to control if we are in landscape mode or in portrait mode, because in the first case we need to update the WebViewFragment while in the second case we have to start another activity. How can we do it? The difference in the layout is the presence of the FrameLayout. If it is present it means we are in landscape mode otherwise in portrait mode. So the code in the onLinkChange method is:
@Override
public void onLinkChange(String link) {
    System.out.println("Listener");
    // Here we detect if there's dual fragment
    if (findViewById(R.id.fragPage) != null) {        WebViewFragment wvf = (WebViewFragment) getFragmentManager().findFragmentById(R.id.fragPage);

        if (wvf == null) {
            System.out.println("Dual fragment - 1");
            wvf = new WebViewFragment();
            wvf.init(link);
            // We are in dual fragment (Tablet and so on)
            FragmentManager fm = getFragmentManager();
            FragmentTransaction ft = fm.beginTransaction();

            //wvf.updateUrl(link);
            ft.replace(R.id.fragPage, wvf);
            ft.commit();

        }
        else {
         Log.d("SwA", "Dual Fragment update");
         wvf.updateUrl(link);
        }
    }
    else {
        System.out.println("Start Activity");
        Intent i = new Intent(this, WebViewActivity.class);
        i.putExtra("link", link);
        startActivity(i);
    }

}
Let’s analyse this method. The first part (line 5) verify that exists the FrameLayout. If it exists we use the FragmentManager to find the fragment relative to the WebViewFragment. If this fragment is null (so it is the first time we use it) we simply create it and put this fragment “inside” the FrameLayout (line 7-20). If this fragment already exists we simply update the url (line 23). If we aren’t in landscape mode, we can start a new activity passing data as an Intent (line 28-30).
WEBVIEW FRAGMENT AND WEBVIEWACTIVITY: The web page
Finally we analyze the WebViewFragment. It is really simple, it is just override some Fragment method to customize its behaviour:
public class WebViewFragment extends Fragment {

    private String currentURL;

    public void init(String url) {
        currentURL = url;
    }

    @Override
    public void onActivityCreated(Bundle savedInstanceState) {
        super.onActivityCreated(savedInstanceState);
    }

    @Override
   public View onCreateView(LayoutInflater inflater, ViewGroup container,
            Bundle savedInstanceState) {

        Log.d("SwA", "WVF onCreateView");
        View v = inflater.inflate(R.layout.web_layout, container, false);
        if (currentURL != null) {
            Log.d("SwA", "Current URL  1["+currentURL+"]");

            WebView wv = (WebView) v.findViewById(R.id.webPage);
            wv.getSettings().setJavaScriptEnabled(true);
            wv.setWebViewClient(new SwAWebClient());
            wv.loadUrl(currentURL);

        }
        return v;
    }

   public void updateUrl(String url) {
        Log.d("SwA", "Update URL ["+url+"] - View ["+getView()+"]");
        currentURL = url;

        WebView wv = (WebView) getView().findViewById(R.id.webPage);
        wv.getSettings().setJavaScriptEnabled(true);
        wv.loadUrl(url);

    }

    private class SwAWebClient extends WebViewClient {

        @Override
        public boolean shouldOverrideUrlLoading(WebView view, String url) {
            return false;
        }

    }

}
In the onCreateView method we simply inflate our layout inside the fragment and verify that the url to show is not null. If so we simply show the page (line 15-30). In the updateUrl we simply find the WebView component and update its url.
In the portrait mode we said we need to start another activity to show the webpage, so we need an activity (WebViewActivity). It is really simple and i just show the code without any other comment on it:
public class WebViewActivity extends FragmentActivity {

    @Override
    protected void onCreate(Bundle savedInstanceState) {
        super.onCreate(savedInstanceState);

        WebViewFragment wvf = new WebViewFragment();

        Intent i = this.getIntent();
        String link = i.getExtras().getString("link");

        Log.d("SwA", "URL ["+link+"]");
        wvf.init(link);
        getFragmentManager().beginTransaction().add(android.R.id.content, wvf).commit();

    }

}
Source code @ github.


