JasperReports JSF Plugin Use Cases – Simple List Report
Our application will offer with following features when showing reports to the user:
- User will be able to select the output format of the report.
- The report view will be localizable and will be output in the same locale that the user of the application has.
Initial Setup
To avoid creating all the CRUD functionally I will initialize the table that will contain the values to be shown using a SQL script for the sake of simplicity. Just a few records should be enough to the purpose of this article and thus, I will use following script to feed the book table:
insert into book(title, author, published_year, genre, price)
    values('The Futurogical Congress', 'Stanislaw Lem', '1978', 'SciFi', 2.5);
insert into book(title, author, published_year, genre, price)
    values('Brave New World', 'H. G. Wells', '1975', 'SciFi', 3.99);
insert into book(title, author, published_year, genre, price)
    values('Treasure Island', 'Robert Lewis Stevenson', '1948', 'Adventures', 4.45);
insert into book(title, author, published_year, genre, price)
    values('The Lord of the Rings', 'J. R. Tolkien', '1945', 'Fantasy', 12.23);
insert into book(title, author, published_year, genre, price)
    values('In Cold Blood', 'Truman Capote', '1966', 'Nonfiction', 9.50);
I will create a resource bundle that will hold the localised texts for the view and the report. The name of the file will be Messages.properties and I will add it to the package net.sf.jasperreports.jsf.sample.usecases under the resources root folder. File contents will be as follows:
report.format.select=Select report format

bookList.pageTitle=Browsing Books
bookList.id=Reference ID
bookList.title=Title
bookList.author=Author
bookList.genre=Genre
bookList.year=Year
bookList.price=Price
I added another file like the previous one but named Messages_es.properties and holding the Spanish translation, you can add your additional preferred languages if interested in support more than one. Previous resource file must be configured in our faces-config.xml file:
<faces-config ...>
    <application>
        <locale-config>
            <default-locale>en</default-locale>
            <supported-locale>es</supported-locale>
        </locale-config>
        <resource-bundle>
            <var>Messages</var>
            <base-name>net.sf.jasperreports.jsf.sample.usecases.Messages</base-name>
        </resource-bundle>
    </application>
</faces-config>
Since I’m using Maven I will configure a folder inside my project structure to hold the reports’ .jrxml files and configure my POM to run the JasperReports compiler against that folder. The folder name I chose is src/main/jasperreports and the POM configuration for the JasperReports Maven Plugin is as follows:
<plugin>
  <groupId>org.codehaus.mojo</groupId>
  <artifactId>jasperreports-maven-plugin</artifactId>
  <version>1.0-beta-2</version>
  <executions>
    <execution>
      <goals>
        <goal>compile-reports</goal>
      </goals>
    </execution>
  </executions>
  <configuration>
    <outputDirectory>target/jasperreports/jasper</outputDirectory>
  </configuration>
  <dependencies>
    <dependency>
      <groupId>net.sf.jasperreports</groupId>
      <artifactId>jasperreports</artifactId>
      <version>4.5.1</version>
    </dependency>
  </dependencies>
</plugin>
I will also add some extra configuration to the Maven WAR Plugin so it can collect all the .jasper files generated by the JasperReports compiler and pack them inside the application WAR file:
<plugin>
  <groupId>org.apache.maven.plugins</groupId>
  <artifactId>maven-war-plugin</artifactId>
  <version>2.2</version>
  <configuration>
    <webResources>
      <resource>
        <directory>src/main/jasperreports</directory>
        <includes>
          <include>**/*.jrxml</include>
        </includes>
        <targetPath>resources/reports/sources</targetPath>
      </resource>
      <resource>
        <directory>target/jasperreports/jasper</directory>
        <includes>
          <include>**/*.jasper</include>
        </includes>
        <targetPath>resources/reports/jasper</targetPath>
      </resource>
    </webResources>
  </configuration>
</plugin>
As you may notice, I’m packaging the JasperReports’ .jrxml files inside the web application archive. When using the plugin we can reference either as the report template resource, the plugin engine is smart enough to recognise the type of file referenced and when using a reference to a report source file the plugin will compile the report on the fly. However, the preferred approach should be always to use a .jasper file as it has better performance than the other one.
Design the Report Template
As stated in the intro to this series, the visual design tool for JasperReports I will be using is iReport, there are a lot of tutorials out there about how to use iReport so I will skip that part. However, since I want to design a locale-aware report I must pay attention to the I18n Sample provided at JasperReports’ web site.
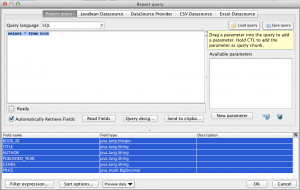
So, we start iReport and select a blank report template. Since our report will use a SQL based data source, once the visual designer has finished loading we must configure the SQL sentence that will grab the data from the database. To do that we must click on the button at the left of the zoom options in the designer view and select the “Report query” tab:

The SQL query I will use to grab the data is the most simple one we can do. After inputting that SQL sentence iReport will show us all the available fields in the lower part of the window. If it could load all the fields without any errors then click the OK button to save them to report:
select * from book;
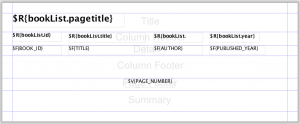
All the text that will be outputted in my final report will come from either a resource bundle or the database itself. So, as the JasperReports i18n sample points out, we should use text fields wherever we want to output some text. The report design view will look something like following picture:

The XML view of the report template file will be something like the following:
<?xml version="1.0" encoding="UTF-8"?>
<jasperReport xmlns="http://jasperreports.sourceforge.net/jasperreports"
              xmlns:xsi="http://www.w3.org/2001/XMLSchema-instance"
              xsi:schemaLocation="http://jasperreports.sourceforge.net/jasperreports http://jasperreports.sourceforge.net/xsd/jasperreport.xsd"
              name="booklist" pageWidth="595" pageHeight="842" columnWidth="555" leftMargin="20" rightMargin="20"
              topMargin="20" bottomMargin="20">
    <property name="ireport.zoom" value="1.5"/>
    <property name="ireport.x" value="0"/>
    <property name="ireport.y" value="0"/>
    <queryString>
        <![CDATA[select * from book]]>
    </queryString>
    <field name="BOOK_ID" class="java.lang.Integer"/>
    <field name="TITLE" class="java.lang.String"/>
    <field name="AUTHOR" class="java.lang.String"/>
    <field name="PUBLISHED_YEAR" class="java.lang.String"/>
    <field name="GENRE" class="java.lang.String"/>
    <field name="PRICE" class="java.math.BigDecimal"/>
    <background>
        <band splitType="Stretch"/>
    </background>
    <title>
        <band height="38" splitType="Stretch">
            <textField>
                <reportElement x="0" y="0" width="227" height="29"/>
                <textElement>
                    <font size="18" isBold="true"/>
                </textElement>
                <textFieldExpression><![CDATA[$R{bookList.pageTitle}]]></textFieldExpression>
            </textField>
        </band>
    </title>
    <columnHeader>
        <band height="27" splitType="Stretch">
            <textField>
                <reportElement x="0" y="0" width="100" height="20"/>
                <textElement>
                    <font isBold="true"/>
                </textElement>
                <textFieldExpression><![CDATA[$R{bookList.id}]]></textFieldExpression>
            </textField>
            <textField>
                <reportElement x="113" y="2" width="155" height="20"/>
                <textElement>
                    <font isBold="true"/>
                </textElement>
                <textFieldExpression><![CDATA[$R{bookList.title}]]></textFieldExpression>
            </textField>
            <textField>
                <reportElement x="285" y="2" width="100" height="20"/>
                <textElement>
                    <font isBold="true"/>
                </textElement>
                <textFieldExpression><![CDATA[$R{bookList.author}]]></textFieldExpression>
            </textField>
            <textField>
                <reportElement x="398" y="2" width="100" height="20"/>
                <textElement>
                    <font isBold="true"/>
                </textElement>
                <textFieldExpression><![CDATA[$R{bookList.year}]]></textFieldExpression>
            </textField>
        </band>
    </columnHeader>
    <detail>
        <band height="21" splitType="Stretch">
            <textField>
                <reportElement x="0" y="0" width="100" height="20"/>
                <textElement/>
                <textFieldExpression class="java.lang.Integer"><![CDATA[$F{BOOK_ID}]]></textFieldExpression>
            </textField>
            <textField>
                <reportElement x="113" y="0" width="155" height="20"/>
                <textElement/>
                <textFieldExpression><![CDATA[$F{TITLE}]]></textFieldExpression>
            </textField>
            <textField>
                <reportElement x="285" y="0" width="100" height="20"/>
                <textElement/>
                <textFieldExpression><![CDATA[$F{AUTHOR}]]></textFieldExpression>
            </textField>
            <textField>
                <reportElement x="398" y="0" width="112" height="20"/>
                <textElement/>
                <textFieldExpression><![CDATA[$F{PUBLISHED_YEAR}]]></textFieldExpression>
            </textField>
        </band>
    </detail>
    <columnFooter>
        <band height="45" splitType="Stretch"/>
    </columnFooter>
    <pageFooter>
        <band height="25" splitType="Stretch">
            <textField>
                <reportElement x="227" y="0" width="100" height="20"/>
                <textElement textAlignment="Center"/>
                <textFieldExpression class="java.lang.Integer"><![CDATA[$V{PAGE_NUMBER}]]></textFieldExpression>
            </textField>
        </band>
    </pageFooter>
    <summary>
        <band height="42" splitType="Stretch"/>
    </summary>
</jasperReport>
Save this file inside the src/main/jasperreports folder created earlier and you are ready for the next section.
Design the JSF View
Our JSF View will based in Facelets, so it will be written as a XHTML file in which we need to declare the different library namespaces that we will be using. For instructions how to setup Facelets go straight to its documentation (JSF 2.x applications support Facelets out-of-the-box without additional configuration).
The following snippet shows the contents of the Facelets’ template I will use to render the user interface for the book list. Copy it and save it in a file inside your web application content files. The file name I will use is /book/bookList.xhtml:
<?xml version="1.0" encoding="UTF-8"?>

<!DOCTYPE html PUBLIC "-//W3C//DTD XHTML 1.0 Strict//EN" "http://www.w3.org/TR/xhtml1/DTD/xhtml1-strict.dtd">
<html xmlns="http://www.w3.org/1999/xhtml"
      xmlns:f="http://java.sun.com/jsf/core"
      xmlns:h="http://java.sun.com/jsf/html"
      xmlns:jr="http://jasperreportjsf.sf.net/tld/jasperreports-jsf-1_3.tld">
<head>
    <title>Book List - JasperReports JSF Use Cases</title>
</head>
<body>
<h1><h:outputText value="#{Messages['bookList.pageTitle']}"/></h1>

<div>
    <h:form id="bookListForm">
        <jr:source id="bookSource" type="jndi" value="java:comp/env/jdbc/BookStoreDB"/>

        <h:panelGrid columns="3">
            <h:outputLabel for="reportFormat" value="#{Messages['report.format.select']}" />
            <h:selectOneMenu id="reportFormat" value="#{bookList.reportFormat}"
                             onchange="document.bookListForm.submit();">
                <f:selectItems value="#{bookList.reportFormats}" />
            </h:selectOneMenu>
            <jr:reportLink id="reportLink" format="#{bookList.reportFormat}"
                           target="blank" source="bookSource"
                           value="/resources/reports/jasper/booklist.jasper"
                           resourceBundle="#{Messages}">
                <h:outputText value="#{Messages['bookList.action.show']}"/>
            </jr:reportLink>
        </h:panelGrid>

        <h:dataTable value="#{bookList.allBooks}" var="book">
            <h:column>
                <f:facet name="header">
                    <h:outputText value="#{Messages['bookList.title']}"/>
                </f:facet>
                <h:outputText value="#{book.title}"/>
            </h:column>
            <h:column>
                <f:facet name="header">
                    <h:outputText value="#{Messages['bookList.author']}"/>
                </f:facet>
                <h:outputText value="#{book.author}"/>
            </h:column>
            <h:column>
                <f:facet name="header">
                    <h:outputText value="#{Messages['bookList.year']}"/>
                </f:facet>
                <h:outputText value="#{book.publishedYear}"/>
            </h:column>
            <h:column>
                <f:facet name="header">
                    <h:outputText value="#{Messages['bookList.genre']}"/>
                </f:facet>
                <h:outputText value="#{book.genre}"/>
            </h:column>
        </h:dataTable>
    </h:form>
</div>
</body>
</html>
The highlighted lines are where we are adding the JasperReports JSF Plugin components:
- First of all, at line 14, we are defining a Report Source Component by means of the <jr:source> tag. This component will not output any data to the rendered HTML but can be referenced by the visual components of the library as way of telling them how to obtain the data they need to render the report contents.
- From line 21 to 26 we are defining a Report Link Component by means of the <jr:reportLink> tag. This component will output a standard a HTML element pointing to a special URL generated by the plugin’s engine. When clicked on it the plugin’s engine will intercept that URL and replace some of the JSF life-cycle phases to process the report data and generate a result. Notice that the report component has an attribute resourceBundle pointing to the messages bundle we have created in the first section.
Note: The resourceBundle attribute has made available in the trunk version (at the moment of writing this lines) of JasperReports JSF Plugin, which uses the 1.3 version of the tag library. For users that are still using the 1.2 version of the tag library they can get a similar result adding a parameter to the report link:
<jr:reportLink id="reportLink" format="#{bookList.reportFormat}"
               target="blank" source="bookSource"
               value="/resources/reports/jasper/booklist.jasper">
    <f:param name="RESOURCE_BUNDLE" value="#{Messages}" />
    <h:outputText value="#{Messages['bookList.action.show']}"/>
</jr:reportLink>
Apart from the highlighted lines, I added code to render a combo box with all the export options supported by JasperReports JSF Plugin and a data table that will layout the different records for the table books.
Note: The combo box contains an onchange attribute intended to submit the form with the new value for the report export option. I must done it that way to get the report link properly working in JSF prior to version 2.x as that versions do not have any AJAX support.
The JSF view shown above needs a managed bean to work, that managed bean will be providing the values to the user interface:
public class BookListView {

    private BookManager bookManager;

    private List allBooks;

    private String reportFormat = "pdf";

    public void setBookManager(BookManager bookManager) {
        this.bookManager = bookManager;
    }

    public List getAllBooks() {
        if (allBooks == null) {
            allBooks = bookManager.getAllBooks();
        }
        return allBooks;
    }

    public String getReportFormat() {
        return reportFormat;
    }

    public void setReportFormat(String reportFormat) {
        this.reportFormat = reportFormat;
    }

    public List getReportFormats() {
        FacesContext context = FacesContext.getCurrentInstance();
        JRFacesContext jrContext = JRFacesContext.getInstance(context);
        List list = new ArrayList();
        for (String format : jrContext.getAvailableExportFormats()) {
            list.add(new SelectItem(format, format));
        }
        return list;
    }

}
The bookManager field is a reference to an interface that will provide with the logic to fetch all the books from the database:
public interface BookManager {
    public List getAllBooks();
}
As said in the introduction article to this series, I will not get into the details of additional classes or interfaces needed to implement the use case as it’s up each specific user to decide what framework will be providing the skeleton of the application.
Testing All Together
It’s time to check that everything works as it should. So, let’s package our web application, deploy it on our Tomcat server and enter the following URL into your preferred browser: http://localhost:8080/jrjsf-usecases/book/bookList.jsf.
Note: The Derby (database) and Tomcat (app server) must be running before performing the deploy operation.
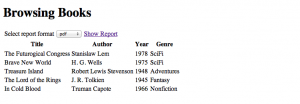
So, this is how it should look when our browser outputs the contents of the previous mentioned URL:

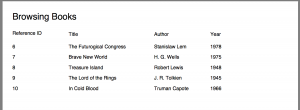
Now, click on the “Show Report” link to see the outputs of the report filled with the strings from our resource bundle and the data from the database:

That is a sample screenshot taken from the PDF view of the report. Use the combo box in the user interface to change the report export format.
Conclusion
So, all done, this is the simplest way of adding a report to our JavaServer Faces application. I started with a simple sample and I will be adding more complex features to it from time to time. Hope you enjoyed this article and come back for the future publications, the good stuff is yet to come!
Reference: JasperReports JSF Plugin Use Cases – Simple List Report from our JCG partner Alonso Dominguez at the Code Nibbles blog.


Imagens not found!