Getting Started with PrimeFaces Mobile
Introduction
If you have developed an application that utilizes PrimeFaces, or if you are planning to develop a web application for use on desktop and mobile devices, then consider PrimeFaces Mobile for your mobile implementation. This blog post will cover some basics to help you get started developing a mobile interface for an existing PrimeFaces application. However, the same procedures can be applied to an application that is being written from scratch. This article is a precursor to an article that I am currently writing for OTN, which will cover the PrimeFaces Mobile API in more detail. That article will be published later this year.
Getting in the Mobile Mindset
One of the most important pieces of a mobile project is getting into the mobile mindset. While you may have a set of components that you are comfortable using on standard web applications, these components may not provide the best experience when transferred to the smaller screen. For that reason, you need to think about how your user is going to be interacting with your application on the small screen, and provide them with the most convenient user interface as possible. Some things to consider are the amount of text that you will want your users to be typing. If they are on a small device, it may be cumbersome to type lots of text, so we will want to provide them with easy to use components, allowing them to type as little as possible, and even selecting from lists instead. We also need to consider real estate (no not the housing market). Adding a menu to the top or bottom of the screen may not be beneficial to the user if they do not have enough screen left to easily navigate an application.
These are just a couple of the issues tat are presented when developing applications for a mobile device. PrimeFaces Mobile is well suited to assist in these areas since it is built upon one of the leading mobile HTML5 based UI frameworks. PrimeFaces Mobile consists of many UI components that can enable users to be highly productive on a mobile device. If you take a look at the PrimeFaces Showcase, you can see many of these mobile components in action. This enables you to get an idea of how these components look, and how they react for the user. It is recommended to visit the PrimeFaces mobile showcase on a mobile device such as a smartphone or tablet gain the best understanding of how they’ll react.
Creating a Mobile Root
Now that you have a basic understanding of some mobile design concepts, let’s take a look at how easy it is to get started creating mobile views using PrimeFaces mobile. Before PrimeFaces 5, mobile was a separate download that needed to be included in your project. Now it is easier than ever to get going with PrimeFaces Mobile, as it is packaged as part of PrimeFaces 5. This makes it easy to build enterprise web applications on PrimeFaces for the standard browser, and then build separate views for use on mobile devices, oftentimes utilizing the same back-end business methods for each. I recommend creating a view that is dedicated as a starting point or “root” for mobile device users. I also recommend creating a separate MobileNavigationController class to handle navigation throughout the mobile views, as needed. We can utilize the mobile root view to set the hook for using the MobileNavigationController vs. the standard web application navigation.
For the purposes of this article, let’s simply call our mobile root mobileRoot.xhtml. In this case, mobleRoot.xhtml may look something like the following:
<html xmlns:f="http://xmlns.jcp.org/jsf/core"
      xmlns:h="http://xmlns.jcp.org/jsf/html"
      xmlns:p="http://primefaces.org/ui"
      xmlns:ui="http://xmlns.jcp.org/jsf/facelets"
      xmlns="http://www.w3.org/1999/xhtml">


    <f:metadata>
        <f:viewaction action="#{mobileNavigationController.doMobile()}" id="useMobile">
    </f:viewaction>
    </f:metadata>

    <h:head>
        <h:outputscript library="js" name="addtohomescreen.js">
        <h:outputstylesheet library="css" name="addtohomescreen.css">
        <script>
            addToHomescreen();
        </script>
    </h:outputstylesheet></h:outputscript></h:head>
    <h:body>

    </h:body>
</html>
In the view above, a JSF viewAction is used to initiate the MobileNavigationController doMobile() method, which sets the mobile UI into motion. From this point, the navigation can take the user to the primary movile view of the application, and it can also set any other necessary configurations. The addtohomescreen.js script (http://cubiq.org/add-to-home-screen) can be also be used to supply a nice button to recommend mobile device users to add the mobile application to their homescreen for a more rich experience. I will address some additional custom configurations for full screen web applications in a future post or the upcoming OTN article.
Creating a Simple Mobile View
Once we’ve provided our users with a clear path to access the mobile views, we need to ensure that the PrimeFaces mobile render kit is being used to display the mobile views. To flag a view for use with PrimeFaces Mobile, supply the “renderKitId” attribute in the <f:view> tag of your view, and apply PRIMEFACES_MOBILE as the value.
<f:view renderKitId="PRIMEFACES_MOBILE">
Another requirement or building a PrimeFaces Mobile view is to add the mobile namespace (xmlns:pm=”http://primefaces.org/mobile”), as it will be used for each of the PrimeFaces Mobile specific components. It is also a good idea to include the JSF passthrough (xmlns:pt=”http://xmlns.jcp.org/jsf/passthrough”) namespace, as we may wish to make use of some HTML5-specific features.
A mobile page consists of a header, content, and a footer. Each mobile page is enclosed within the <pm:page> tag. A mobile view can consist of a single page enclosed in <pm:page>, or multiple pages, each with their own identifiers. In this example, we will create two views that constitute two mobile pages, the second page is accessed via a link on the first page. It is possible to utilize Facelets templates to build an entire mobile application solution, but in this example we will create each view separately. It is also possible to develop using the “single page” application strategy that is currently quite popular…we will cover more on that in the OTN article.
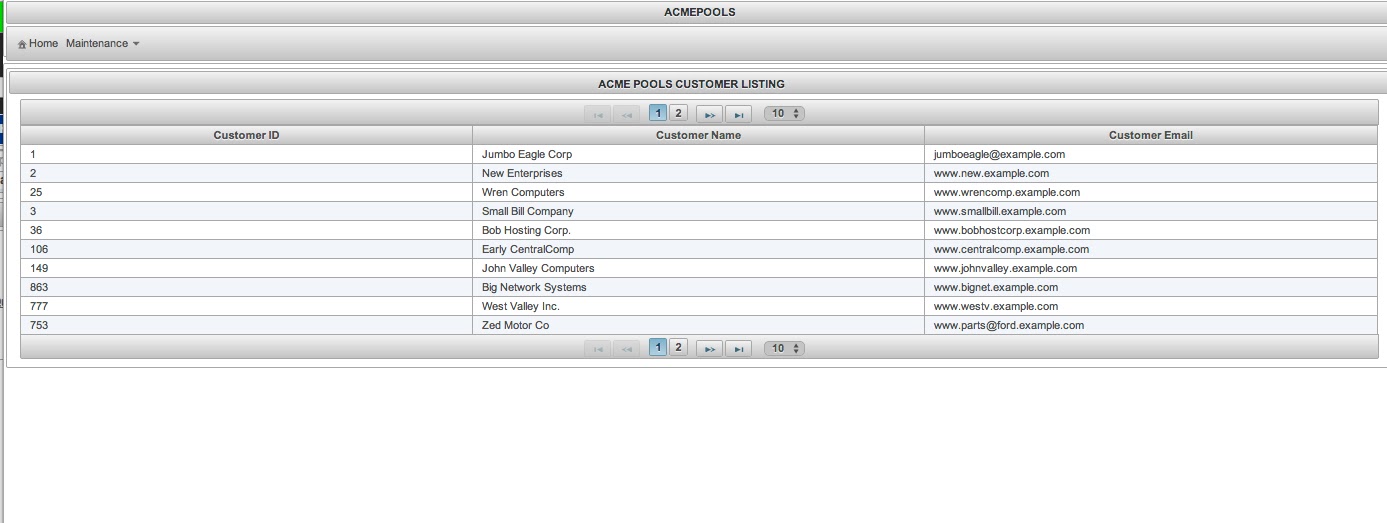
The PrimeFaces Mobile example in this post and also the upcoming OTN article builds upon the Acme Pools example that was used in my “PrimeFaces in the Enterprise” article for OTN (http://www.oracle.com/technetwork/articles/java/java-primefaces-2191907.html). In the full web version, the root view includes a listing of Acme Pool customers in a table view (Figure 1). We would like to transform this view (and the others) to work better on a mobile device, and also allow selection of each row, which will take us to more information on the selected customer.

For the purposes of this post, we will work with the initial customer view to convert it into a mobile view. The view will contain a list of customers, and if you select a particular row in the view, then more information on the selected customer will be displayed. To display a table using PrimeFaces mobile, you must make use of the DataList component, which provides a convenient “clickable” link or button for each row of data. The DataList differs from a DataTable in that there are no columns in a DataList, but rather, there is one group of related data for each row of data. The group of data should be wrapped with a clickable link, which will then provide navigation for the user to the second view displaying more details on the selected item. The following code is used to develop the mobile UI for the customer data list.
Listing 1: Mobile View (mobile/index.xhtml)
<html xmlns="http://www.w3.org/1999/xhtml"
      xmlns:h="http://xmlns.jcp.org/jsf/html"
      xmlns:p="http://primefaces.org/ui"
      xmlns:f="http://xmlns.jcp.org/jsf/core"
      xmlns:pm="http://primefaces.org/mobile"
      xmlns:pt="http://xmlns.jcp.org/jsf/passthrough">
    <f:view renderKitId="PRIMEFACES_MOBILE">
        <h:head></h:head>
        <h:body>
            <pm:page id="customerListing">
                <pm:header>
                    Acme Pools
                </pm:header>
                <pm:content>
                    <h:form id="indexForm">
                        <p:panel header="Acme Pools Customer Listing">
                            <p:dataList id="datalist"
                                 value="#{customerController.items}"
                                 var="item"
                                 paginator="true"
                                 pt:data-role="listview" pt:data-filter="true"
                                 rows="10"
                                 rowsPerPageTemplate="10,20,30,40,50"
                                        >

                                <p:commandLink
                                   action="#{customerController.loadCustomer}">
                                  <f:param name="customer" value="#{item.customerId}"/>
                                    <h:panelGroup>

                                    <h:outputText value="#{item.customerId} - #{item.name}"/>

                                    <br/>
                                    <h:outputText value="#{item.email}"/>


                                    </h:panelGroup>
                                </p:commandLink>
                            </p:dataList>
                        </p:panel>
                    </h:form>
                </pm:content>
                <pm:footer>
                    Author: Josh Juneau
                </pm:footer>
            </pm:page>

        </h:body>
    </f:view>
</html>
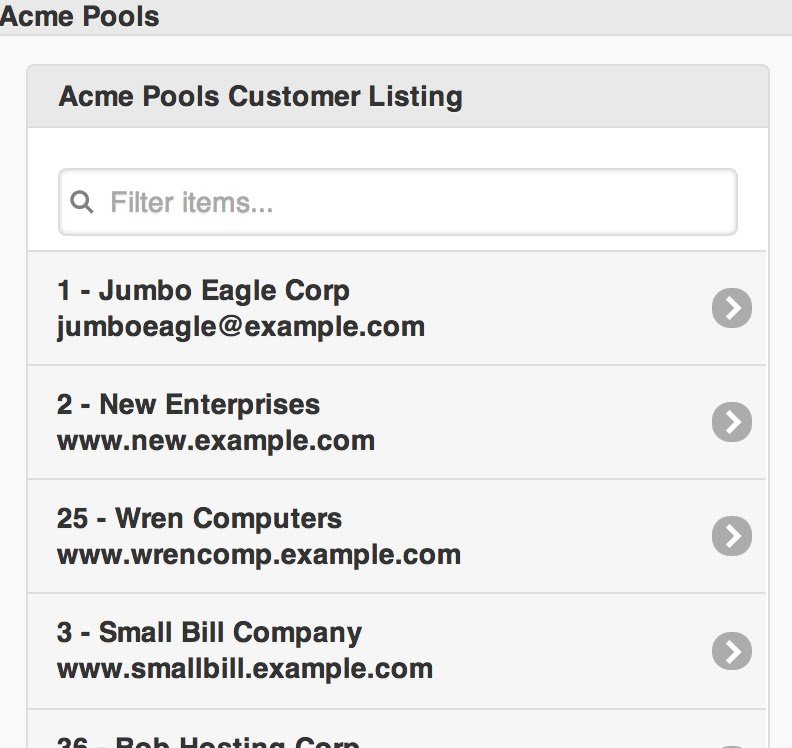
As you can see, we flag the view for PrimeFaces Mobile use via the specification in the <f:view> tag. We then create a <pm:page>, and inside of the page we have sections for <pm:header>, <pm:content>, and <pm:footer>. The main content consists of a PrimeFaces mobile DataList that displays customer data, and the data is wrapped in a p:commandLink component. When the link is clicked, the #{customerController.loadCustomer} method is invoked, passing the ID of the selected customer. Note that the DataList component uses passthrough attributes to specify the data-role and data-filter HTML5 attributes. These are used to provide the user with a more rich experience. The filter makes it easy for the user to begin typing a value into a filter textbox, and have the list shortened to contain only the records that contain the typed text. The resulting view looks like Figure 2.
The code in Listing 2 contains the implementation for loadCustomer(). The customer ID is passed to the find() method of the EJB, which then returns the selected customer data.
Listing 2: CustomerController loadCustomer()
  public String loadCustomer() {

        Map requestMap = FacesContext.getCurrentInstance().

                getExternalContext().getRequestParameterMap();

        String customer = (String) requestMap.get("customer");

        selected = ejbFacade.find(Integer.valueOf(customer));

        return "customerInfo";


    }
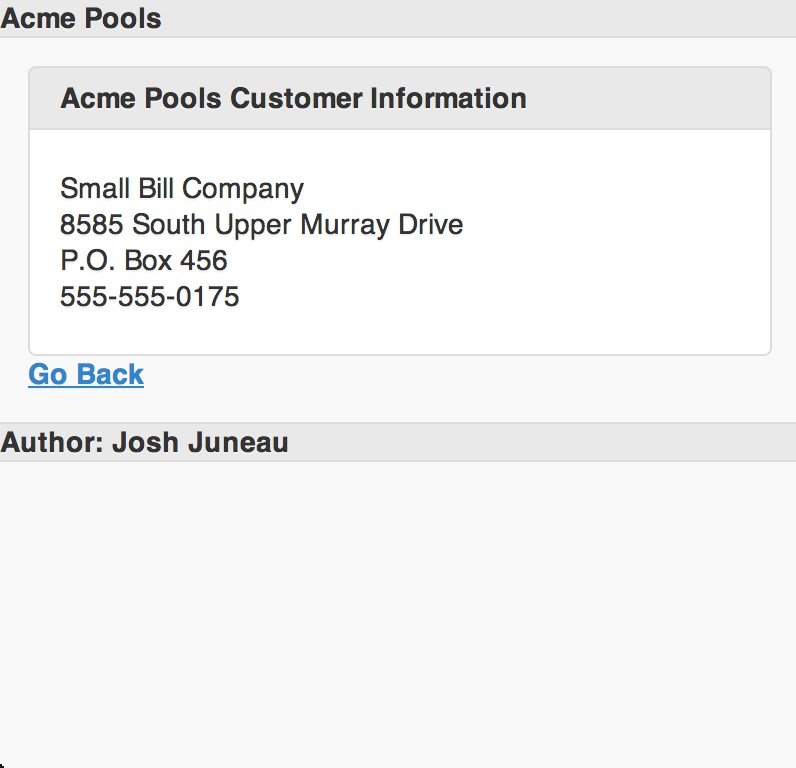
When a customer is selected in the DataList, the loadCustomer() method is invoked, and it results in the navigation to our second mobile view, customerInfo.xhtml (Figure 3). The second mobile view basically displays customer details, and provides a link to go back to the DataList of customers. The code for customerInfo looks like that in Listing 3.
Listing 3: customerInfo.xhtml View
<?xml version='1.0' encoding='UTF-8' ?>
<!DOCTYPE html PUBLIC "-//W3C//DTD XHTML 1.0 Transitional//EN" "http://www.w3.org/TR/xhtml1/DTD/xhtml1-transitional.dtd">
<html xmlns="http://www.w3.org/1999/xhtml"
      xmlns:h="http://xmlns.jcp.org/jsf/html"
      xmlns:p="http://primefaces.org/ui"
      xmlns:f="http://xmlns.jcp.org/jsf/core"
      xmlns:pm="http://primefaces.org/mobile">
    <f:view renderKitId="PRIMEFACES_MOBILE">
        <h:head></h:head>
        <h:body>

            <pm:page id="customerInfo">
                <pm:header>
                    Acme Pools
                </pm:header>
                <pm:content>
                    <h:form>
                        <p:panel header="Acme Pools Customer Information">

                            #{customerController.selected.name}
                            <br/>
                            #{customerController.selected.addressline1}
                            <br/>
                            #{customerController.selected.addressline2}
                            <br/>
                            #{customerController.selected.phone}

                        </p:panel>
                    <p:commandLink action="index?transition=slide" value="Go Back"/>
                    </h:form>
                </pm:content>
                <pm:footer>
                    Author: Josh Juneau
                </pm:footer>
            </pm:page>
        </h:body>
    </f:view>
</html>
As you can see, the customerInfo view contains the same structure as the original mobile view. There are no special mobile components added, but as you can see from Figure 3, the standard PrimeFaces panel is styled to display nicely on the mobile device.

Conclusion
That wraps it up for this brief look into using PrimeFaces mobile. As you can see, it is easy to develop a mobile interface for your applications. The PrimeFaces mobile suite also includes custom frameworks for navigation, events, and more, making it easy to provide a nice mobile experience. For instance, the events framework includes some swipe events, as well as taphold. It is even possible to hook into the JQuery Mobile framework to provide even more mobile events to your application.
The PrimeFaces mobile navigation framework consists of transitions, which ultimately provide your application with a smoother feel. For instance, one can provide a transition of “slide” to a button navigation, which will result in a UI view that slides into focus when the button is clicked. All of this can be tested using the PrimeFaces Showcase.
For more information on these and other important features of PrimeFaces mobile, please watch for my upcoming OTN article.
Resources
- PrimeFaces Showcase: http://www.primefaces.org/showcase/mobile/
- JQuery Mobile: http://jquerymobile.com/
| Reference: | Getting Started with PrimeFaces Mobile from our JCG partner Josh Juneau at the Josh’s Dev Blog – Java, Java EE, Jython, Oracle, and More… blog. |


