Android Google Maps Tutorial
The Android platform provides easy and tight integration between Android applications and Google Maps. The well established Google Maps API is used under the hood in order to bring the power of Google Maps to your Android applications. In this tutorial we will see how to incorporate Google Maps into an Android app.
Installing the Google APIs
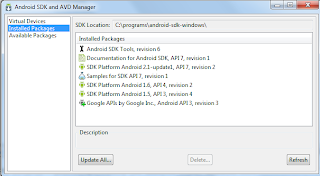
In order to be able to use Google Maps, the Google APIs have to be present in your SDK. In case the Google APIs are not already installed, you will have to manually install them. This is accomplished by using the Android SDK and AVD Manager.
Launch the manager and choose the “Installed Options” section to see what is already installed and the “Available Packages” to download the additional APIs.
You can find more information about this procedure in the following links:
Setting up an Eclipse project
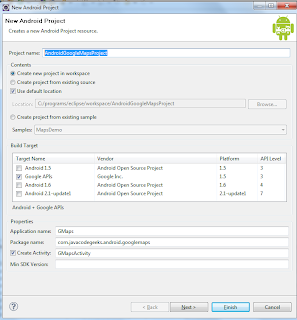
Now that the appropriate tools are installed, let’s proceed with creating a new Android project in Eclipse. The project I created is named “AndroidGoogleMapsProject” and has the following configuration:
It is important to use the “Google APIs” as the target since this option includes the Google extensions that allow you to use Google Maps. Return to the first step of this tutorial if no such option is available in your configuration. I chose the 1.5 version of the platform since we will not be using any of the latest fancy API stuff.
Google Maps API Key Generation
As you might know if you have used the Google Maps API in the past, a key is required in order to be able to use the API. The process is slightly different for use in Android applications, so let’s see what is required to do. Note that the process is described in the “Obtaining a Maps API Key” page, but I will also provide a description here.
First, we have to calculate the MD5 fingerprint of the certificate that we will use to sign the final application. This fingerprint will have to be provided to the Google Maps API service so that it can associate the key with your application. Java’s Key and Certificate Management tool named keytool is used for the fingerprint generation.
The keytool executable resides in the %JAVA_HOME%/bin directory for Windows or $JAVA_HOME/bin for Linux/OS X. For example, in my setup, it is installed in the “C:\programs\Java\jdk1.6.0_18\bin” folder.
While developing an Android application, the application is being signed in debug mode. That is, the SDK build tools automatically sign the application using the debug certificate. This is the certificate whose fingerprint we need to calculate. To generate the MD5 fingerprint of the debug certificate we first need to locate the debug keystore. The location of the keystore varies by platform:
- Windows Vista: C:\Users\\.android\debug.keystore
- Windows XP: C:\Documents and Settings\\.android\debug.keystore
- OS X and Linux: ~/.android/debug.keystore
Now that we have located the keystore, we use the keytool executable to get the MD5 fingerprint of the debug certificate by issuing the following command:
keytool -list -alias androiddebugkey \
-keystore .keystore \
-storepass android -keypass android
For example, in my Windows machine I changed directory to the .android folder and I used the following command:
%JAVA_HOME%/bin/keytool -list -alias androiddebugkey -keystore debug.keystore -storepass android -keypass android
Note that this was executed against the debug keystore, you will have to repeat this for the keystore that will be used with the application you are going to create. Additionally, the application is run on another development environment, with different Android SDK keystore, the API key will be invalid and Google Maps will not work.
The output would be something like the following:
androiddebugkey, Apr 2, 2010, PrivateKeyEntry,
Certificate fingerprint (MD5): 72:BF:25:C1:AF:4C:C1:2F:34:D9:B1:90:35:XX:XX:XX
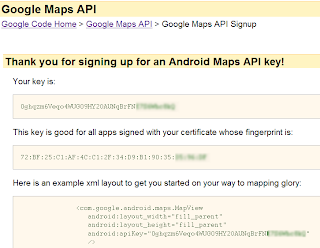
This the fingerprint we have to provide to the Google Maps service. Now we are ready to sign up for a key by visiting the Android Maps API Key Signup page. After we read and accept the terms and conditions, we provide the generated fingerprint as follows:
We generate the API key and we are presented with the following screen:
Creating the Google Maps application
Finally, its time to write some code. Bookmark the Google APIs Add-On Javadocs for future reference. Integrating Google Maps is quite straightforward and can be achieved by extending the MapActivity class instead of the Activity class that we usually do. The main work is performed by a MapView which displays a map with data obtained from the Google Maps service. A MapActivity is actually a base class with code to manage the boring necessities of any activity that displays a MapView. Activity responsibilities include:
- Activity lifecycle management
- Setup and teardown of services behind a MapView
To extend from MapActivity we have to implement the isRouteDisplayed method, which denotes whether or not we are displaying any kind of route information, such as a set of driving directions. We will not provide such information, so we just return false there.
In our map activity, we will just take reference of a MapView. This view will be defined in the layout XML. We will also use the setBuiltInZoomControls method to enable the built-in zoom controls.
Let’s see how our activity looks like so far:
package com.javacodegeeks.android.googlemaps;

import android.os.Bundle;

import com.google.android.maps.MapActivity;
import com.google.android.maps.MapView;

public class GMapsActivity extends MapActivity {

    private MapView mapView;

    @Override
    public void onCreate(Bundle savedInstanceState) {

        super.onCreate(savedInstanceState);
        setContentView(R.layout.main);

        mapView = (MapView) findViewById(R.id.map_view);
        mapView.setBuiltInZoomControls(true);

    }

    @Override
    protected boolean isRouteDisplayed() {
        return false;
    }

}
Let’s also see the referenced main.xml layout file:
<?xml version="1.0" encoding="utf-8"?>

<RelativeLayout
 xmlns:android="http://schemas.android.com/apk/res/android"
 android:orientation="vertical"
 android:layout_width="fill_parent"
 android:layout_height="fill_parent">

 <com.google.android.maps.MapView
  xmlns:android="http://schemas.android.com/apk/res/android"
  android:id="@+id/map_view"
  android:layout_width="fill_parent"
  android:layout_height="fill_parent"
  android:clickable="true"
  android:enabled="true"
  android:apiKey="API-KEY-HERE" />

</RelativeLayout>
Do not forget to provide your API key in the relevant field or else Google Maps will not work.
Launching the application
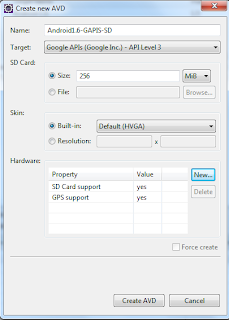
To test the application we will have to use a device that includes the Google APIs. We will use the AVD manager to create a new device with target set to one of the Google APIs and settings like the following:
If we now launch the Eclipse configuration, we will encounter the following exception:
java.lang.ClassNotFoundException: com.javacodegeeks.android.googlemaps.GMapsActivity in loader dalvik.system.PathClassLoader@435988d0
The problem is that we haven’t notified Android that we wish to use the add-on Google APIs which are external to the base API. To do so, we have to use the uses-library element in our Android manifest file, informing Android that we are going to use classes from the com.google.android.maps package.
Additionally, we have to grant internet access to our application by adding the android.permission.INTERNET directive. Here is how our AndroidManifest.xml file looks like:
<?xml version="1.0" encoding="utf-8"?>

<manifest xmlns:android="http://schemas.android.com/apk/res/android"
      package="com.javacodegeeks.android.googlemaps"
      android:versionCode="1"
      android:versionName="1.0">

    <application android:icon="@drawable/icon" android:label="@string/app_name">

        <activity android:name=".GMapsActivity"
                  android:label="@string/app_name">
            <intent-filter>
                <action android:name="android.intent.action.MAIN" />
                <category android:name="android.intent.category.LAUNCHER" />
            </intent-filter>
        </activity>

      <uses-library android:name="com.google.android.maps" />

    </application>

    <uses-permission android:name="android.permission.INTERNET"/>

</manifest>
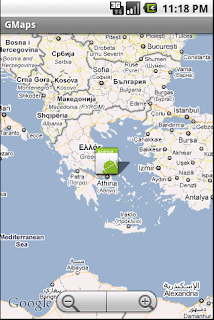
And here is what the application screen looks like:
If you click inside the map, the zoom controls will appear and you will be able to zoom in and out.
Adding map overlays
The next step is to add some custom map overlays. To do so, we can extend the Overlay class, which is a base class representing an overlay which may be displayed on top of a map. Alternatively, we may extend the ItemizedOverlay, which is a base class for an Overlay which consists of a list of OverlayItems. Let’s see how we can do this (note that the following example is very similar to the Hello Map View article from the Android documentation):
package com.javacodegeeks.android.googlemaps;

import java.util.ArrayList;

import android.app.AlertDialog;
import android.content.Context;
import android.graphics.drawable.Drawable;

import com.google.android.maps.ItemizedOverlay;
import com.google.android.maps.OverlayItem;

public class CustomItemizedOverlay extends ItemizedOverlay<OverlayItem> {

   private ArrayList<OverlayItem> mapOverlays = new ArrayList<OverlayItem>();

   private Context context;

   public CustomItemizedOverlay(Drawable defaultMarker) {
        super(boundCenterBottom(defaultMarker));
   }

   public CustomItemizedOverlay(Drawable defaultMarker, Context context) {
        this(defaultMarker);
        this.context = context;
   }

   @Override
   protected OverlayItem createItem(int i) {
      return mapOverlays.get(i);
   }

   @Override
   public int size() {
      return mapOverlays.size();
   }

   @Override
   protected boolean onTap(int index) {
      OverlayItem item = mapOverlays.get(index);
      AlertDialog.Builder dialog = new AlertDialog.Builder(context);
      dialog.setTitle(item.getTitle());
      dialog.setMessage(item.getSnippet());
      dialog.show();
      return true;
   }

   public void addOverlay(OverlayItem overlay) {
      mapOverlays.add(overlay);
       this.populate();
   }

}
Our class requires an Android Drawable in its constructor, which will be used as a marker. Additionally, the current Context has to be provided. We use an ArrayList to store all the OverlayItems stored in the specific class, so the createItem and size methods are pretty much self-explanatory. The onTap method is called when an item is “tapped” and that could be from a touchscreen tap on an onscreen Item, or from a trackball click on a centered, selected Item. In that method, we just create an AlertDialog and show it to the user. Finally, in the exposed addOverlay method, we add the OverlayItem and invoke the populate method, which is a utility method to perform all processing on a new ItemizedOverlay.
Let’s see how this class can be utilized from our map activity:
package com.javacodegeeks.android.googlemaps;

import java.util.List;

import android.graphics.drawable.Drawable;
import android.os.Bundle;

import com.google.android.maps.GeoPoint;
import com.google.android.maps.MapActivity;
import com.google.android.maps.MapController;
import com.google.android.maps.MapView;
import com.google.android.maps.Overlay;
import com.google.android.maps.OverlayItem;

public class GMapsActivity extends MapActivity {

    private MapView mapView;

    private static final int latitudeE6 = 37985339;
    private static final int longitudeE6 = 23716735;

    @Override
    public void onCreate(Bundle savedInstanceState) {

        super.onCreate(savedInstanceState);
        setContentView(R.layout.main);

        mapView = (MapView) findViewById(R.id.map_view);
        mapView.setBuiltInZoomControls(true);

        List mapOverlays = mapView.getOverlays();
        Drawable drawable = this.getResources().getDrawable(R.drawable.icon);
        CustomItemizedOverlay itemizedOverlay =
             new CustomItemizedOverlay(drawable, this);

        GeoPoint point = new GeoPoint(latitudeE6, longitudeE6);
        OverlayItem overlayitem =
             new OverlayItem(point, "Hello", "I'm in Athens, Greece!");

        itemizedOverlay.addOverlay(overlayitem);
        mapOverlays.add(itemizedOverlay);

        MapController mapController = mapView.getController();

        mapController.animateTo(point);
        mapController.setZoom(6);

    }

    @Override
    protected boolean isRouteDisplayed() {
        return false;
    }

}
We create a new instance of our CustomItemizedOverlay class by using the default Android icon as the Drawable. Then we create a GeoPoint pointing to a predefined location and use that to generate an OverlayItem object. We add the overlay item to our CustomItemizedOverlay class and it magically appears in our map on the predefined point.
Finally, we take reference of the underlying MapController and use it to point the map to a specific geographical point using the animateTo method and to define the zoom level by using the setZoom method.
If we launch again the configuration, we will be presented with a zoomed-in map which includes an overlay marker pointing to JavaCodeGeeks home town Athens, Greece. Clicking on the marker will cause the alert dialog to pop-up displaying our custom message.
That’s all guys. A detailed guide on how to integrate Google Maps into your Android application. As always, you can download the Eclipse project created for this tutorial.
Happy mobile coding! And don’t forget to share!
Related Articles:
- “Android Full Application Tutorial” series
- Android Location Based Services Application – GPS location
- Android Reverse Geocoding with Yahoo API – PlaceFinder
- Android Proximity Alerts Tutorial





In my code, when I insert the
CustomItemizedOverlay itemizedOverlay =
34 new CustomItemizedOverlay(drawable, this);
my map does not show the custom graphic I have in my folder. When I use this CustomItemizedOverlay itemizedOverlay =
34 new CustomItemizedOverlay(drawable);
my graphic appears but force closes when I click on it to read the title and snippet. Any help please?
I am nt able to see map on my emulator ,i can just see the grid and the icon which shows the athens.
what should i do ?
how did u solve this?
Check to see if you have your own api-key in main.xml
I’m facing the same problem. The Maps application that comes pre-installed on the emulator works fine. But when I run the eclipse project given here the maps don’t show. What is the solution for this problem?
I followed the steps and it runs in emulator but the installations onto a android 2.1 phone and a 2.3 phone failed, why?
anybody encountered the same problem?
thanks in advance
Chao
Did you ever get a resolution?
Did you ever find a solution, I have the same issue
My google API is installed, but while creating the project, there is no option for choosing Google API as the target build. what should i do?
Update your Android SDK manager !! select google api and click update
Thanks so much for your great tutorial and the downloadable sample code, it works great, and has given me a great jump on playing around with mapping.
This line: List mapOverlays = mapView.getOverlays();
should be: List mapOverlays = mapView.getOverlays();
How can you get multiple drawable icons for separate markers? I have searched all over the internet to no avail. Could someone please help me with this?
Please give code google maps search, thank you so much.
muchas gracias me ha servido de mucho! Saludos desde México
Very useful article (as always)
Did have a problem with getting the MD5 fingerprint.
Starting with JDK 1.7 the default output is SHA1 fingerprint, for MD5 fingerprint add the option -v to the keytool command string.
This knowledge I found here:
http://stackoverflow.com/questions/6305938/how-can-i-get-the-md5-fingerprint-from-javas-keytool-not-only-sha-1
Thanks a lot very useful and explanation was like crystal clear s easily understandable…
I want to change the Longitude and Latitude coordinates to be somewhere else.
So I replace koordainat this:
private static final int latitudeE6 = 37,985,339;
private static final int longitudeE6 = 23,716,735;
to these coordinates: -2.738672, 107.625401
It is a double type numbers, whereas the above integer type, how can I enter the coordinates of longitude: -2.738672 and latitude: 107.625401 is that it may be an integer type
Thank you
hello … i want to learn how send my tag with e-mail or something else
main.xml: Failed to find style ‘mapViewStyle’ in current theme
thanks for nice tutorial :-)
very good tutorial it worked with me:)
can you continue this tutorial to track a position saved in a database in a certain path ?!
Thank you for this helpful tutorial :) i hope to find as useful as this one for using google maps data from saved in database :D
Σε ευχαριστούμε Ηλία :)