Running WildFly on Kubernetes. On Windows. Fabric8!
 Have you ever dreamed about running WildFly on OpenShift and leverage the latest Kubernetes features: On Windows? Sounds like blasphemy: Everything about those technologies is screaming GO and Linux. Windows doesn’t seem to be the right fit. But I know, that there are many developers out there, being stuck on Windows. Corporate laptops, easy management and whatever reasons the different employers come up with. The good news is, there is a small and brave group of people, who won’t let those Windows users down. And I have to admit, that running a Windows operating system while working for Red Hat is a challenge.
We’re a Linux company and an open source company and everything Windows simply feels wrong.
As my fellow colleague Grant stated in a blog-post a couple of weeks ago:
“That being said, I have decided to use Windows as my primary operating system in order to ensure that OpenShift has a great developer experience for Windows users. “
So, I tried to get Kubernetes and OpenShift running on Windows for a while, natively not possible right now. On the other hand, I really want to get my hand on latest developments and look into fancy stuff. But there is a solution: Vagrant and Fabric8.
And Fabric8 only because, I am a Java developer. In fact if you are a Java developer wanting to work with Kubernetes Fabric8 really is the easiest and quickest way to get going. So, let’s setup OpenShift and Fabric8 on a Windows machine.
Prerequisites
Download and install Vagrant (don’t worry, it’s MIT licensesed). Done with that? Restart your machine (You know, why it’s Windows.) You will need to install an additional Vagrant plugin. Switch to a cmd line and type:
$vagrant plugin install vagrant-hostmanager-fabric8
Vagrant-hostmanager is a Fabric8 Vagrant 1.1+ plugin that manages the /etc/hosts file on guest machines (and optionally the host). Its goal is to enable resolution of multi-machine environments deployed with a cloud provider where IP addresses are not known in advance.
The only other thing you need to have installed and ready is VirtualBox (GPL licensed!)
Go and clone the Fabric8 installer git repository and cd into the openshift/latest folder:
$ git clone https://github.com/fabric8io/fabric8-installer.git
$ cd fabric8-installer/vagrant/openshift/latest
The next steps are needed for proper routing from the host to OpenShift services which are exposed via routes. Unfortunately for Windows no automatic routing for new services is possible.
You have to add new routes manually to %WINDIR%\System32\drivers\etc\hosts.
For your convenience, a set of routes for default Fabric8 applications will be pre-added when you start up vagrant
For new services look for the following line and add your new routes (<service-name>.vagrant.f8) to this file on a new line like this:
## vagrant-hostmanager-start id: 9a4ba3f3-f5e4-4ad4-9e80-b4045c6cf2fc
172.28.128.4  vagrant.f8 fabric8.vagrant.f8 jenkins.vagrant.f8 .....
172.28.128.4 myfear-wildfly-test.vagrant.f8
## vagrant-hostmanager-end
Now startup the Vagrant VM:
vagrant up
If you want to tweak the settings for the vm you have to edit the Vagrantfile. The startup including downloads takes a couple of minutes (Good time for #coffee++). While you’re waiting, jump ahead and install the OpenShift client for windows. Download the one for your os from the origin project on github. The windows build has 55 MB. Next is to unpack it into a folder of your choice. Make sure to add this folder to your PATH environment variable.
set PATH=%PATH%;"D:\Program Files (x86)\openshift-origin-v1.0.3"
While you’re at it, add some more environment variables:
set KUBERNETES_DOMAIN=vagrant.f8
set DOCKER_HOST=tcp://vagrant.f8:2375
Assuming, you haven’t changed the default routes added to your hosts file by the vagrant start.
The first one allows your OpenShift cli to use the right Kubernetes domain and the second one allows you to re-use the same Docker daemon, which is already running inside your Fabric8 vagrant image. Please make sure to NOT define any of the other docker env vars like DOCKER_CERT_PATH or DOCKER_TLS_VERIFY!
It is probably a good idea to add this into your system environment variables or put it into a batch-script.
Note: Make sure to use the Docker 1.6 client Windows (exe download). The latest 1.7 version doesn’t work yet.
After the vagrant box is created and docker images are downloaded, the fabric8 console should appear at http://fabric8.vagrant.f8/.
Your browser will complain about an insecure connection, because the certificate is self signed. You know how to accept this, don’t you?
Enter admin and admin as username and password. Now you see all the already installed fabric8 apps. Learn more about Apps and how to build them in the documentation.
Now, let’s see if we can use the docker daemon in the vagrant image :
docker ps
and see the full list of images running (just an excerpt here):
CONTAINER ID        IMAGE                                            COMMAND                CREATED              STATUS                  PORTS                                                             NAMES
d97e438222d1        docker.io/fabric8/kibana4:4.1.0                  "/run.sh"              7 seconds ago        Up Less than a second                                                                      k8s_kibana.7abf1ad4_kibana-4gvv6_default_500af2d1-32b8-11e5-8481-080027bdffff_4de5764e
eaf419a177d6        fabric8/fluentd-kubernetes:1.0                   "fluentd"              About a minute ago   Up About a minute                                                                          k8s_fluentd-elasticsearch.920b947c_fluentd-elasticsearch-172.28.128.4_default_9957562ee416ea2e083f45adb9b6edd0_676633bf
c4111cea4474        openshift/origin-docker-registry:v1.0.3          "/bin/sh -c 'REGISTR   3 minutes ago        Up 3 minutes
One last thing to check, login to OpenShift via the command line tool:
oc login https://172.28.128.4:8443
use admin and admin again as username and password. Now check, which services are already running:
oc get services
Now you’re ready for the next steps. Let’s spin up a WildFly instance on OpenShift with Fabric8.
Dockerizing Your Java EE Application
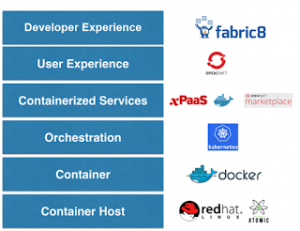
Ok, how does that work? OpenShift is build on top of Docker and Kubernetes. And Fabric8 gives the normal developer a reasonable abstraction on top of all those infrastructure issues. Where do we start? Let’s start with a simple Java EE 7 project. It’s a really simple one in this case. An html page and a HelloWorld servlet. First step is to dockerize it. There is a wonderful plugin out there, which is part of the Fabric8 ecosystem of tools nameddocker-maven-plugin . Simply add this to your pom.xml and define how the image should look like. The magic is in the plugin configuration:
 <configuration>
                    <images>
                        <image>
                            <name>myfear/wildfly-test:latest</name>
                            <build>
                                <from>jboss/wildfly:9.0.1.Final</from>
                                 <maintainer>markus at jboss.org</maintainer>
                                <assembly>
                                    <inline>
                                        <dependencySets>
                                            <dependencySet>
                                                <includes>
                                                    <include>net.eisele:sample-web</include>
                                                </includes>
                                                <outputFileNameMapping>sample.war</outputFileNameMapping>
                                            </dependencySet>
                                        </dependencySets>
                                    </inline>
                                     <user>jboss:jboss:jboss</user>
                                    <basedir>/opt/jboss/wildfly/standalone/deployments</basedir>
                                </assembly>
                            </build>
                        </image>
                    </images>
 </configuration>
Running a
mvn clean install docker:build
Builds your application and creates your docker image. Plus, this image is going to be uploaded to the docker registry running on your OpenShift instance. This is configured with two additional maven properties
 <docker.host>tcp://vagrant.f8:2375</docker.host>
 <docker.registry>vagrant.f8:5000</docker.registry>
There’s one more properties to look after:
<docker.assemblyDescriptorRef>artifact</docker.assemblyDescriptorRef>
It defines which parts of the build will be copied over to the Docker image.
The resulting Dockerfile looks like this:
FROM jboss/wildfly:9.0.1.Final
MAINTAINER markus at jboss.org
COPY maven /opt/jboss/wildfly/standalone/deployments/
USER root
RUN ["chown", "-R", "jboss:jboss","/opt/jboss/wildfly/standalone/deployments/"]
USER jboss
and a maven folder contains your application as a war file. From this point on, you could also use the docker image and push it to the official docker hub or another private repository. There’s not special magic in it. Find all the configuration options in the extensive docker-maven plugin manual.
Fabric8 – Docker and Kubernetes Are Usable Now
Fabric8’s aim is to help any developer, team and organisation that wants to work with containers. Nobody really wants to use a command line to push and start containers. Plus, there’s a lot more to it: Keeping them running, moving them around on hosts, monitoring, and and and. Don’t even think about microservices right now, but those need even more. More fine grained control, more teams, more CI/CD and auto-discovery features. And all this is Fabric8. It can create a complete CI/CD pipeline with approvals and code quality insurance. If you want to see a complete example, have a look at what James Rawlings wrote up a couple of days ago. So, what does that mean for my Java EE project and how to deploy it to OpenShift now? Read up a little about how to run an application on OpenShift with the nice overview post by Arun Gupta. It also includes a pointer to the OpenShift life-cycle. You basically need to create an OpenShift project and include a json file, which describes your application including all the links to the docker images. Doable. For sure. But Fabric8 can do better. There is another Maven plugin available, which takes all this burden off you and just let’s you deploy your application. Exactly, like I as a Java EE developer expected it to be. Let’s add the plugin to your project and configure it a bit:
    <plugin>
                <groupId>io.fabric8</groupId>
                <artifactId>fabric8-maven-plugin</artifactId>
                <version>${fabric8.version}</version>
                <executions>
                    <execution>
                        <id>json</id>
                        <phase>generate-resources</phase>
                        <goals>
                            <goal>json</goal>
                        </goals>
                    </execution>
                    <execution>
                        <id>attach</id>
                        <phase>package</phase>
                        <goals>
                            <goal>attach</goal>
                        </goals>
                    </execution>
                </executions>
            </plugin>
This does little more, than just bind it to the different execution phases. You can skip this for this example, because we’re going to execute it manually anyway. The additional configurations do happen in Maven properties again:
<!-- Defining the Service Name for Fabric8 -->
<fabric8.service.name>myfear-wildfly-test</fabric8.service.name>
<!-- Defining the internal service port -->
<fabric8.service.port>9101</fabric8.service.port>
<!-- the expsed container port -->
<fabric8.service.containerPort>8080</fabric8.service.containerPort>
<!-- the component label, as shown in the console -->
<fabric8.label.component>${project.artifactId}</fabric8.label.component>
<!-- the container label -->
<fabric8.label.container>wildfly</fabric8.label.container>
<!-- the application group label -->
<fabric8.label.group>myfears</fabric8.label.group>
<!-- the domain were working in -->
<fabric8.domain>vagrant.f8</fabric8.domain>
<!-- We don't want to upload images, but want OpenShift to pull them automatically -->
 <fabric8.imagePullPolicy>IfNotPresent</fabric8.imagePullPolicy>
Ok, that’s about it. Most of it are naming, labels and configurations which are a one-time thing to figure out. All we really need from here on, is the Kubernetes JSON file. So, type:
mvn fabric8:json fabric8:apply
What didn’t work locally with my installation is, that my hosts file got updated with the new routing. So, you might need to add the domain-name mapping manually:
172.28.128.4 myfear-wildfly-test.vagrant.f8
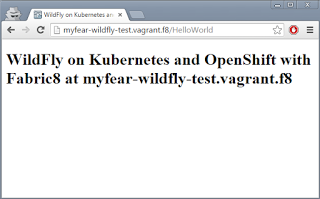
After a couple of seconds, the new pod is created and you can access your application via http://myfear-wildfly-test.vagrant.f8/. This runs your application on OpenShift.
Try docker ps again and see, if you can spot your container. In my case:
c329f2e0f63b myfear/wildfly-test:latest
If you struggle with something and your app doesn’t come up as expected, there are some ways to get closer to the problem. First is, to run the image locally against your Docker daemon. There’s a handy command, mvn fabric8:create-env to figure out the env vars for you so that you can run docker images outside of kubernetes as if they are inside (in terms of service discovery and environment variables defined in the kubernetes json). If that’s not an option, you can also get a bash from your running container:
docker exec -i -t c329f2e0f63b bash
Just replace the container id, with the real one from the ps command. That’s about it. Now you can totally start over. I’m going to walk you through the consoles a bit.
Access The OpenShift Console
First things first. You can spot your application on the OpenShift console. http://vagrant.f8:8443 brings you to the OpenShift console. Select the “default” space and see the Docker Registry, some elasticsearch inststances, some other and finally your instance:
You can also browse the individual pods and services. More about this maybe in a later blogpost
The Fabric8 Console
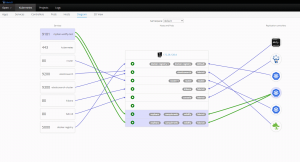
The one magical thing, we’re really interested in is the Fabric8 Console. http://fabric8.vagrant.f8/ brings you there and the “Kubernetes” tab displays all the running apps for you. This also includes you own application:
As you can see in this screenshot, I already scaled the app from one (default) to two pods. Clicking on the little pod icon on the far right (not in this screenshot) let’s you adjust the number of pods running. If you click on the “diagram” view, you see a complete overview of your infrastructure:
There’s a lot more to explore and I am going to show you more in subsequent blog-posts. Now, that we got everything up and running, this will be even more entertaining. Let me know, what you want to read about in particular.
| Reference: | Running WildFly on Kubernetes. On Windows. Fabric8! from our JCG partner Markus Eisele at the Enterprise Software Development with Java blog. |

