Android UI: Layouts with View Groups and Fragments
This article is part of our Academy Course titled Android UI Design – Basics.
In this course, you will get a look at the fundamentals of Android UI design. You will understand user input, views and layouts, as well as adapters and fragments. Check it out here!
Table Of Contents
1. Overview
In the previous article, we talked about Views and we explained how to build user interfaces using Views. We discovered different kinds of Views, with different controls. Android provides several common controls and using them we can build appealing user interfaces. We saw some useful patterns we can implement when we create UIs so that we can guarantee consistency to our app interface.
In this article we want to explore how we can organize such views and how these views can be placed on the screen. In other words, we will analyze in detail layout managers, or simply layouts.
2. Layout overview
When we create our app interface, we use some special view that acts as container. These special views control how other views are placed on the smartphone/tablet screen. Android provides a collection of Layout Managers and each of them implements a different strategy to hold, manage and place its children. From the API point of view, all the Layout managers derive from the ViewGroup class. There are some layouts that place their children horizontally or vertically, and others that implement a different strategy. We will analyze them in details later in this article.
In Android, layouts can be nested so we can use different layouts for different areas of our interface. However, please ve aware that it is not advisable to create too complex layouts, because this can affect the overall app performance. We can declare a layout in two ways:
- Using XML: In this case, using an XML file we “describe” how our user interface looks like. We define the elements (views and sub layouts) that appear in the user interface. At the same time, we define their attributes, as we saw in the previous article.
- At runtime: In this case, we code our layout instantiating our
ViewGroupand attachingViewsto it. We can manipulate their properties programmatically setting their attributes.
We can use both approaches in our app. We could, for example, use XML to create the user interface and assign to its Views some properties. At run time, we can find (or lookup) this Views and ViewGroup (layout) and change their properties programmatically. We could for example, have a View with red background and at runtime we change it to green color. Android is very powerful and flexible from this point of view.
Using XML, we somehow decouple the presentation from the code that handles its behavior. In XML, the UI description is external to the source code, so theoretically we could change the presentation, meaning just the XML file, without touching our source code. This is the case when, for example, we want to adapt our user interface for multiple screen dimensions. In this case, we define different layouts having the same name but in different directories, and the system chooses the one that best matches the screen dimensions. This is the standard approach taken by Android in order to handle multiple screen sizes. Moreover, we will see later that we can use another technique based on Fragments. If we use XML, it is possible to use draw the layout and debug it easily.
From the API point of View, each ViewGroup defines a nested class called LayoutParameter that holds some parameters that define size and position for each views belonging to the ViewGroup. All ViewGroups have in common two parameters called width and height (or layout_width and layout_height) that every View must define. These two parameters represent the width and the height of the View. We can specify a numeric value or more often we can use two constants:
wrap_content, meaning that the dimension of the view will depend on the actual contentfill_parent(ormatch_parent), meaning that the view has to become as big as its parent holding it
A view in Android is a rectangle, and the view location is expressed as a pair of coordinates left and top. These two values determine the View position inside its ViewGroup.
Another important View property inside a Layout is padding, expressed with four values (let, top, right, bottom). Using padding we can move the content of the View.
Android provides several standard layout managers:
- Linear Layout
- Table Layout
- Relative Layout
- Frame Layout
- Grid Layout
2.1. LinearLayout
This is the simplest Layout manager. This layout disposes its children vertically or horizontally depending on the orientation parameter. To define this layout in XML, we can use:
1 2 3 4 5 6 | android:layout_width="match_parent" android:layout_height="match_parent"></LinearLayout> |
The orientation attribute is the most important attribute because it determines how views are placed. It can assume two values: horizontal or vertical. In the first case, the views are placed horizontally and in the second case they are placed vertically. There are two other parameters that affect the position and the size of the views. They are gravity and weight.
The gravity parameter behaves like the alignment. So if we want to align a view to the left side we can set the gravity left or right, if we want to align it to the right. The corresponding attribute in XML is layout_gravity. If we create an app, using the layout shown below:
01 02 03 04 05 06 07 08 09 10 11 12 13 14 15 16 17 18 19 20 21 22 23 24 25 | android:layout_width="match_parent" android:layout_height="match_parent" android:orientation="vertical" > <TextView android:layout_width="match_parent" android:layout_height="wrap_content" android:gravity="left" android:text="Left" /> <TextView android:layout_width="match_parent" android:layout_height="wrap_content" android:gravity="right" android:text="Right" /> <TextView android:layout_width="match_parent" android:layout_height="wrap_content" android:gravity="center" android:text="Center" /></LinearLayout> |
and run it, we have:
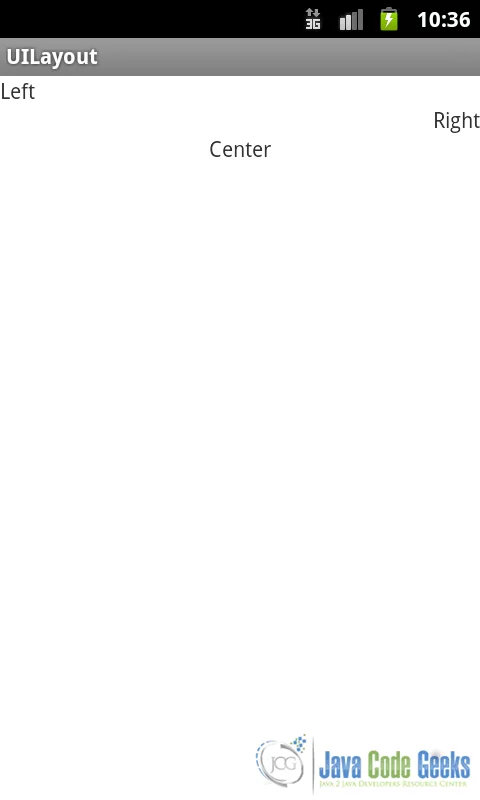
Another important parameter is weight (or layout_weight in XML). Using the weight parameter we can assign an importance value to a View respect to the others. The View with higher importance value is more important than Views with lower values. In other words, Views with higher weight value consume more space than other Views. For example, see this layout:
01 02 03 04 05 06 07 08 09 10 11 12 13 14 15 16 17 18 19 20 21 22 23 24 25 26 27 28 | android:layout_width="match_parent" android:layout_height="match_parent" android:orientation="vertical" > <TextView android:layout_width="match_parent" android:layout_height="wrap_content" android:layout_weight="0" android:gravity="left" android:text="Left" /> <TextView android:layout_width="match_parent" android:layout_height="wrap_content" android:layout_weight="1" android:gravity="right" android:text="Right" /> <TextView android:layout_width="match_parent" android:layout_height="wrap_content" android:layout_weight="0" android:gravity="center" android:text="Center" /></LinearLayout> |
In this case, we used layout_weight and we gave more importance to the TextView with right text. Running the app, we have:

Another important aspect we have to consider is the difference between android:gravity and layout_gravity. Even if they look very similar, they have a different meaning. android:gravity is an attribute used by the View, while layout_gravity is a parameter used by the container.
2.2. TableLayout
This is layout manager that disposes its children in a table, grouping them in rows and columns. For example, using the layout shown below, we create two different rows holding two cells.
01 02 03 04 05 06 07 08 09 10 11 12 13 14 15 16 17 18 19 20 21 22 23 24 25 26 27 28 29 30 31 32 33 34 35 36 | <?xml version="1.0" encoding="utf-8"?> android:layout_width="match_parent" android:layout_height="match_parent" > <TableRow> <TextView android:layout_width="match_parent" android:layout_height="match_parent" android:text="Cell 1" > </TextView> <TextView android:layout_width="match_parent" android:layout_height="match_parent" android:text="Cell 2" > </TextView> </TableRow> <TableRow> <TextView android:layout_width="match_parent" android:layout_height="match_parent" android:text="Cell 3" > </TextView> <TextView android:layout_width="match_parent" android:layout_height="match_parent" android:text="Cell 4" > </TextView> </TableRow></TableLayout> |
We used as TableLayout child the TableRow, which represents a row inside the table. Running an app with this layout we have:
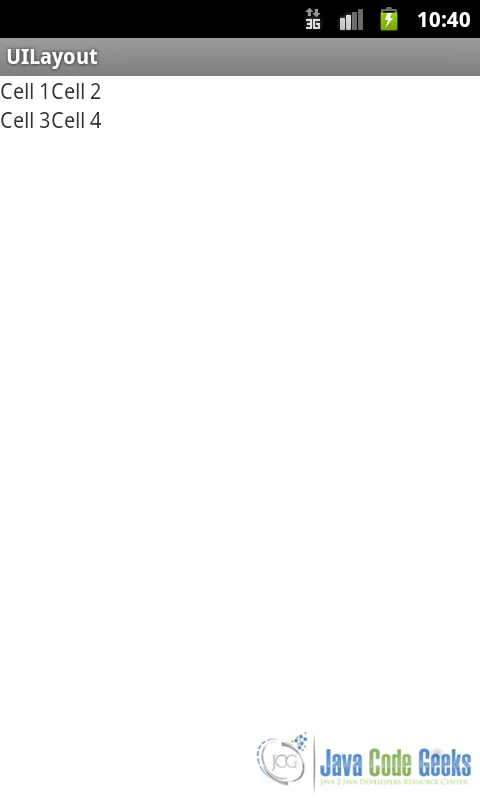
We can even use different cell numbers for different rows like the example shown below, where in the second row we have three cells:
01 02 03 04 05 06 07 08 09 10 11 12 13 14 15 16 17 18 19 20 21 22 23 24 25 26 27 28 29 30 31 32 33 34 35 36 37 38 39 40 41 42 | <?xml version="1.0" encoding="utf-8"?> android:layout_width="match_parent" android:layout_height="match_parent" > <TableRow> <TextView android:layout_width="match_parent" android:layout_height="match_parent" android:text="Cell 1" > </TextView> <TextView android:layout_width="match_parent" android:layout_height="match_parent" android:text="Cell 2" > </TextView> </TableRow> <TableRow> <TextView android:layout_width="match_parent" android:layout_height="match_parent" android:text="Cell 3" > </TextView> <TextView android:layout_width="match_parent" android:layout_height="match_parent" android:text="Cell 4" > </TextView> <TextView android:layout_width="match_parent" android:layout_height="match_parent" android:text="Cell 5" > </TextView> </TableRow></TableLayout> |
In this case, the first row has an empty cell. Running the example we have:
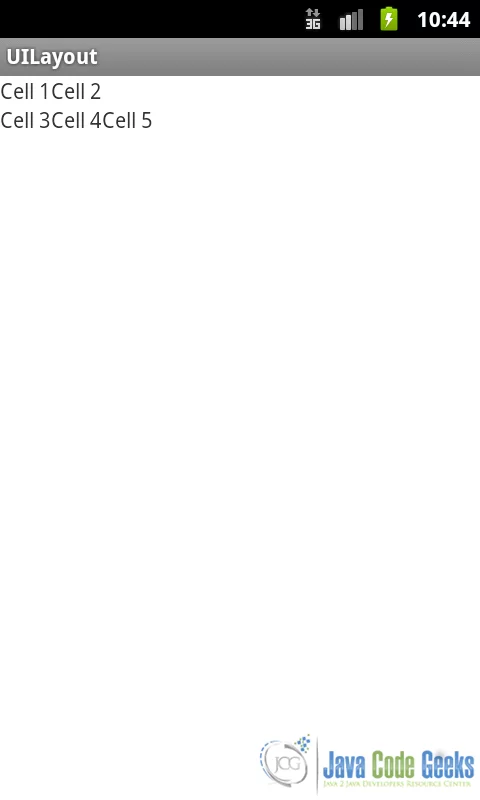
It is not required to use TableRow, because we can use all the components that extend the View class. In this case, this component will have the same width as the table. For example:
01 02 03 04 05 06 07 08 09 10 11 12 13 14 15 16 17 18 19 20 21 22 23 24 25 26 27 28 29 30 31 32 33 34 35 36 37 38 39 40 41 42 43 44 45 46 47 48 | <?xml version="1.0" encoding="utf-8"?> android:layout_width="match_parent" android:layout_height="match_parent" > <TextView android:layout_width="wrap_content" android:layout_height="wrap_content" android:text="This is a row!" > </TextView> <TableRow> <TextView android:layout_width="match_parent" android:layout_height="match_parent" android:text="Cell 1" > </TextView> <TextView android:layout_width="match_parent" android:layout_height="match_parent" android:text="Cell 2" > </TextView> </TableRow> <TableRow> <TextView android:layout_width="match_parent" android:layout_height="match_parent" android:text="Cell 3" > </TextView> <TextView android:layout_width="match_parent" android:layout_height="match_parent" android:text="Cell 4" > </TextView> <TextView android:layout_width="match_parent" android:layout_height="match_parent" android:text="Cell 5" > </TextView> </TableRow></TableLayout> |
In this case, we did not use TableRow but we used TextView as the first TableLayout child and we specified that the TextView width should be as big as the content. If we run an app with this layout, we have:
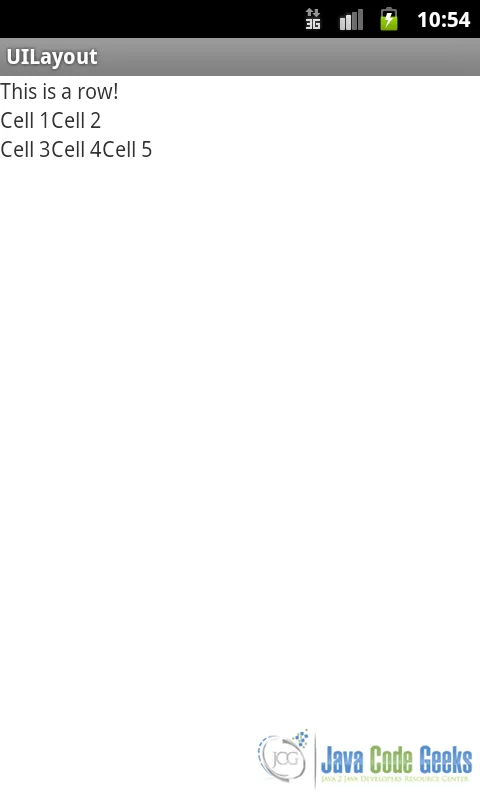
You can notice that even if we specified that the TextView should be as big as the content, it still occupies the entire row.
2.3. RelativeLayout
This is the most flexible layout in Android. This layout manager uses a policy where the container places its Views relative to other Views. We can implement, using this layout manager, very complex UI structures.
RelativeLayout implements some view attributes that we can use to place the View. There are attributes that control the position of the View respect to other Views:
layout_toLeftof: the right edge position of this View is to the left of a specific Viewlayout_toRightof: the left edge position of this View is to the right of a specific Viewlayout_below: the top edge of this view is below to a specific Viewlayout_above: the bottom edge of this view is above to a specific View
There are other parameters that are used to place the view respect to its container:
layout_alignParentLeft: the left edge of this view matches the left edge of its containerlayout_alignParentRight: the right edge of this view matches the right edge of its containerlayout_alignParentTop: the top edge of this view matches the top edge of its containerlayout_alignParentBottom: the bottom edge of this view matches the bottom edge of its container
There are some other parameters that can be used and you are advised to have a look at the documentation. For example:
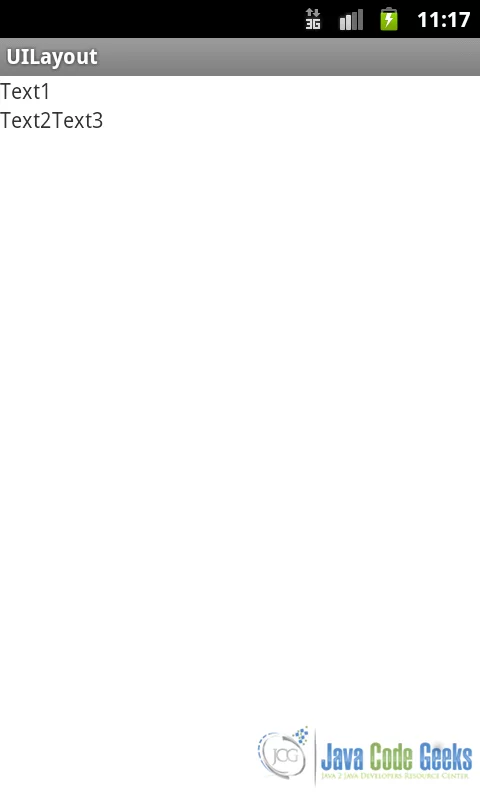
01 02 03 04 05 06 07 08 09 10 11 12 13 14 15 16 17 18 19 20 21 22 23 24 25 26 27 | <?xml version="1.0" encoding="utf-8"?> android:layout_width="match_parent" android:layout_height="match_parent" > <TextView android:id="@+id/t1" android:layout_width="wrap_content" android:layout_height="wrap_content" android:text="Text1" /> <TextView android:id="@+id/t2" android:layout_width="wrap_content" android:layout_height="wrap_content" android:layout_below="@id/t1" android:text="Text2" /> <TextView android:id="@+id/t3" android:layout_width="wrap_content" android:layout_height="wrap_content" android:layout_below="@id/t1" android:layout_toRightOf="@id/t2" android:text="Text3" /></RelativeLayout> |
In the example above, we placed the TextView with id t2 below the TextView with id t1, the TextView with id t3 is places to the left of t2 and below t1. Running the example we have:
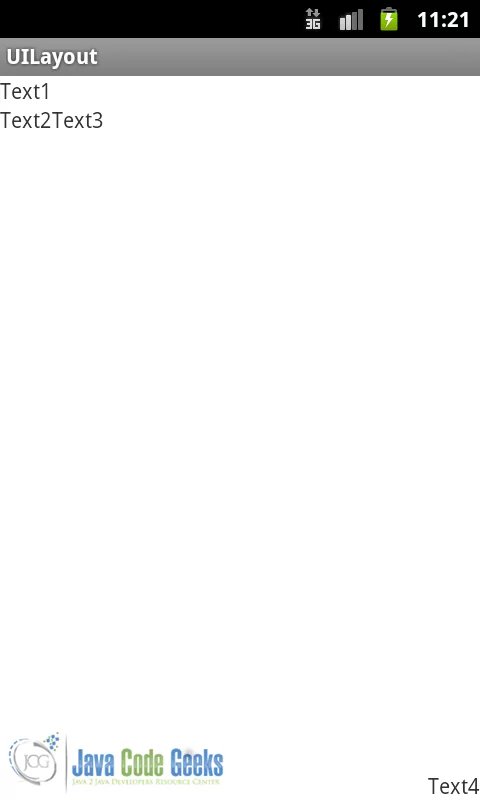
Let us suppose we want to add another TextView to the layout above and this TextView has to be placed in bottom right corner, so we have:
01 02 03 04 05 06 07 08 09 10 11 12 13 14 15 16 17 18 19 20 21 22 23 24 25 26 27 28 29 30 31 32 33 34 35 | <?xml version="1.0" encoding="utf-8"?> android:layout_width="match_parent" android:layout_height="match_parent" > <TextView android:id="@+id/t1" android:layout_width="wrap_content" android:layout_height="wrap_content" android:text="Text1" /> <TextView android:id="@+id/t2" android:layout_width="wrap_content" android:layout_height="wrap_content" android:layout_below="@id/t1" android:text="Text2" /> <TextView android:id="@+id/t3" android:layout_width="wrap_content" android:layout_height="wrap_content" android:layout_below="@id/t1" android:layout_toRightOf="@id/t2" android:text="Text3" /> <TextView android:id="@+id/t4" android:layout_width="wrap_content" android:layout_height="wrap_content" android:layout_alignParentBottom="true" android:layout_alignParentRight="true" android:text="Text4" /></RelativeLayout> |
Running the example, we have:
2.4. FrameLayout
FrameLayout is a special layout that we will cover in more detail later. We saw different layout manager that implements some specific strategies to place views on the UI. FrameLayout is used when we want to display dynamically a view. It is very useful when we use Fragments.
2.5. GridLayout
This is the last layout manager that we cover in this article. It is very similar to TableLayout and it was introduced since Android 4.0. This layout manager disposed its views in a grid form, but respect to the TableLayout it is easier to use. GridLayout divides the screen area into cells. Its children occupy one or more cells.
2.6. Layout and multiple screen support
A special consideration is needed when we want to support multiple screen size. When we want to build an app for multiple devices, we have to implement several layouts. In Android, we have different directories and there we can implement the layouts. The default layout is the one under res/layout. We can provide some size qualifier that we append to the layout:
- small
- large
- xlarge
Moreover, we can even provide the screen orientation:
- land
- portrait
So, for example, if we want to create a layout for an extra large screen, we create a directory under res called layout-xlarge and here we implement our layout.
If we want to provide a layout for landscape mode we create another dir, under res, called layout-land land and so on. In Android 3.2 there were introduced other size qualifiers to better adapt the layout to the screen size. If you want to have more information you can look here.
3. Fragments
By now, we have seen how we can build UIs using layouts and components. In this situation, we have an Activity with its layout and components. We know how we can adapt our layout for multiple screens but this technique sometimes is not enough, especially when we want to support tablets and smartphones. We have talked about this already, and we know that the smartphone screen size is very different from the screen of a tablet. Moreover, it is necessary to make the UI more dynamic and flexible in a large screen tablets. For these reasons, Android 3.0 (API level 11) has introduced the fragments concept.
What is a fragment? A fragment is a piece of user interface in an Activity. We can combine multiple fragments to create complex UIs. Each fragment has its own lifecycle and we can manage the lifecycle of each fragment independently. A fragment exists just inside an Activity that acts as its container. When we add a fragment inside a layout, it lives inside the ViewGroup that represents the layout. A fragment is a very powerful component that helps developers to create dynamic UI and support, at the same time, multiple screen size.
A fragment can be seen as a reusable piece of code with its own interface. It is crucial to differentiate when we need to use fragments and when we can use just “simple” layouts. Well, as said before, there are some situations where simple layouts, even if they are adapted to the screen size, are not enough.
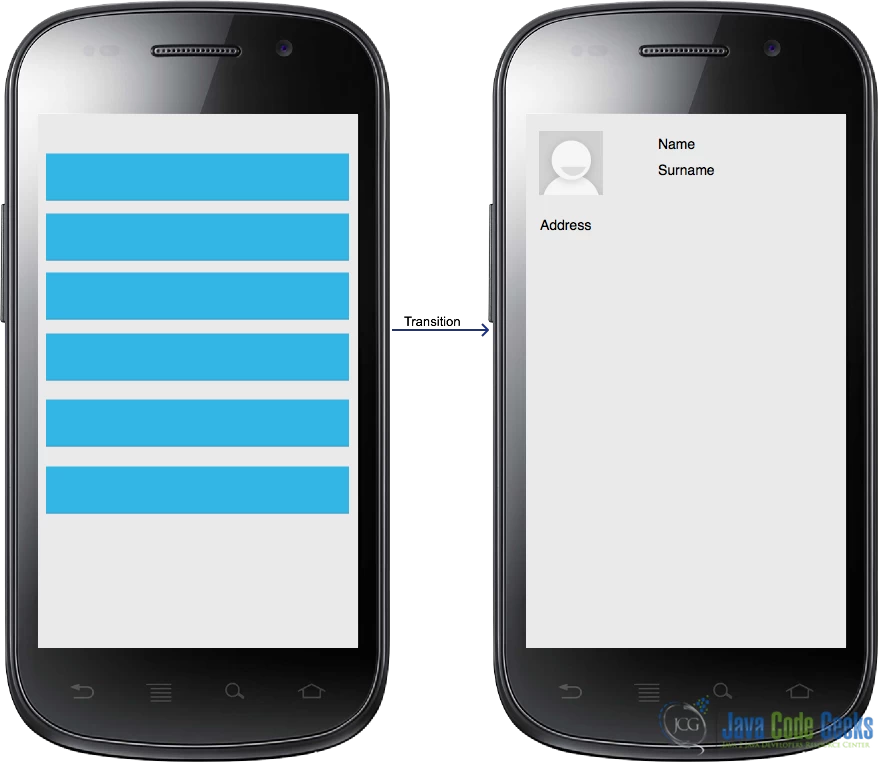
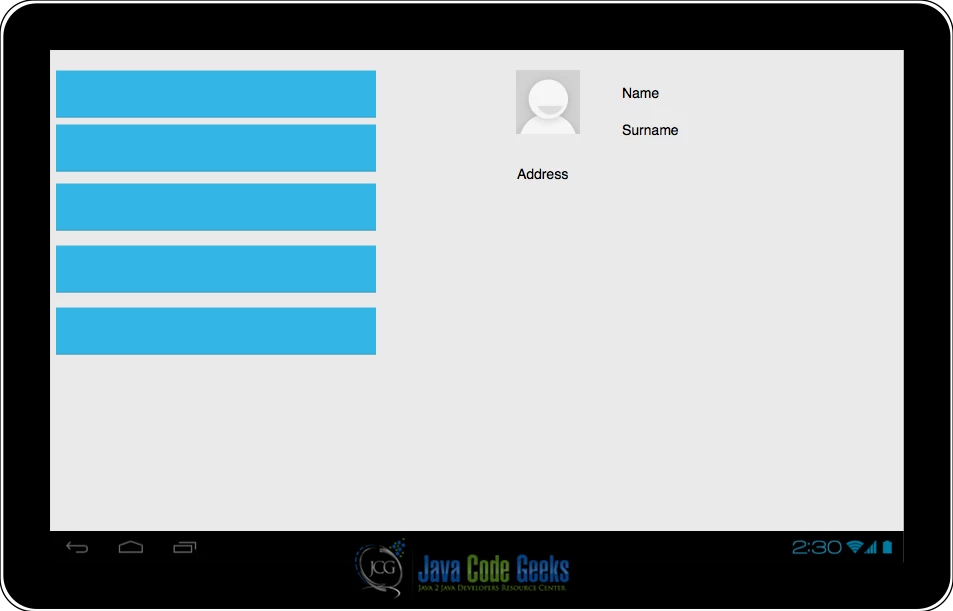
A classic example is an app that has a list of contacts where, when a user clicks on a contact, the app shows the contact’s details. In a smartphone we can move from one activity to another showing a different layout, list and details. However, in a tablet this behavior would result in a poorly appealing app that does not use all the screen size available. In the tablet, we would like to have a list and the details at the same time on the screen.
For example, in a smartphone we would have:
while in a tablet we would have:
In this case, fragments help us. We can create two fragments: one that handles the contact list and another one the contact details. So we have:
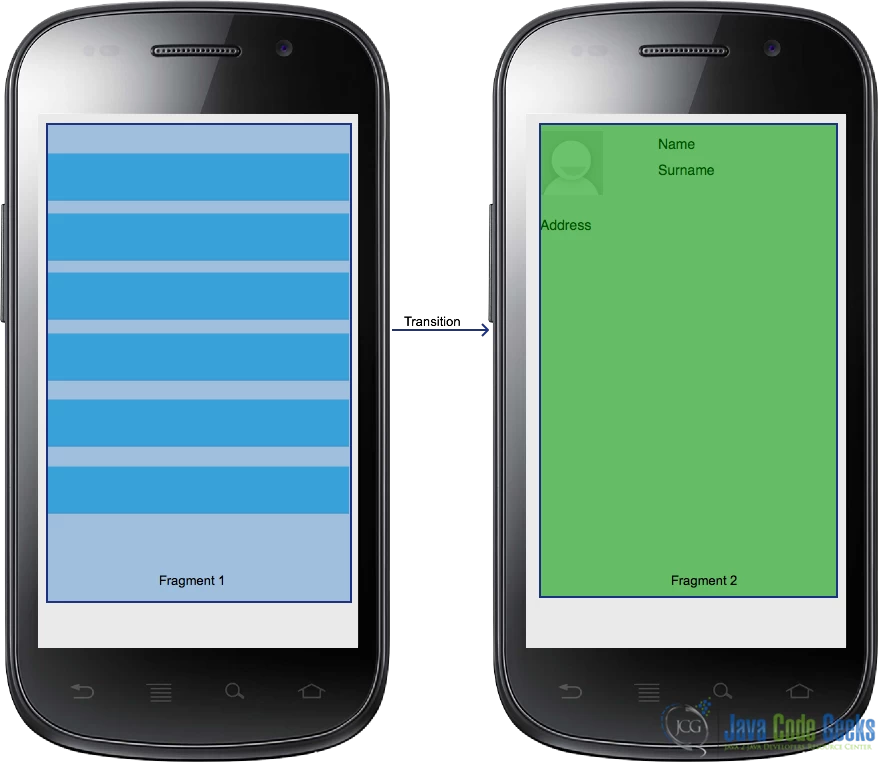
while in a tablet:
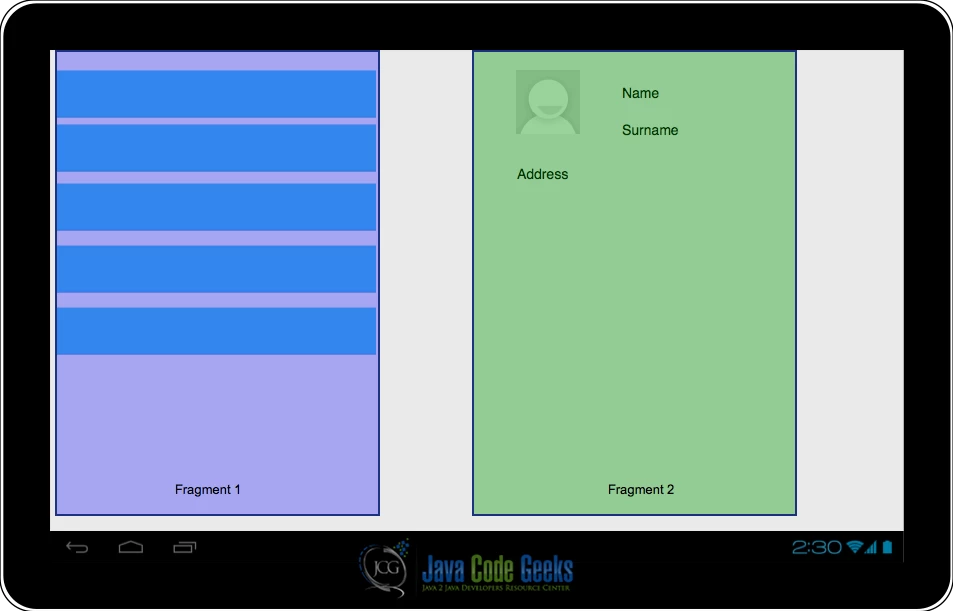
3.1. Fragment lifecycle
Now that we know when we should use fragments, we need to know how they work before using them. A fragment has its own lifecycle as an Activity has, but it is more complex in comparison to the activity lifecycle. Moreover, a fragment lives only inside an Activity that acts as its container. Below, the fragment lifecycle is shown:

As we can see, this lifecycle has more states in comparison with the activity lifecycle. Moving from the top to the bottom, we have:
onInflate: This method is called only if we define fragment directly in our layout using the tag. In this method we can save some configuration parameter and some attributes define in the XML layout file.onAttach: This method is called as soon as the fragment is “attached” to the “father” activity and we can use this method to store the reference about the activity.onCreate: It is one of the most important steps, our fragment is in the creation process. This method can be used to start some thread to retrieve data information, maybe from a remote server.onCreateView: It is the method called when the fragment has to create its view hierarchy. During this method we will inflate our layout inside the fragment. During this phase we cannot be sure that our activity is still created so we cannot count on it for some operation.OnActivityCreated: In this method, we are notified when the “father” activity is created and ready for use. From now on, our activity is active and created and we can use it when we need.onStart: Here we do the common things as in the activityonStart, during this phase our fragment is visible but it isn’t still interacting with the user.onResume: This method is called when the fragment is ready to interact with user. At the end of this phase our fragment is up and running!
Then, it is possible that the activity might be paused and so the activity’s onPause is called. Well, in this case the onPause fragment method is called too. After that, it is possible that the OS decides to destroy our fragment view and so the onDestroyView is called. After that, if the system decides to dismiss our fragment, it calls the onDestroy method. Here we should release all the active connections because our fragment is close to shutting down. Even during the destroy phase, it is still attached to the father activity. The last step is to detach the fragment from the activity and it happens when the onDetach is called.
3.2. How to use fragments
Once we know the fragment lifecycle, we need to know how we can create a fragment and how we attach it to the Activity. Creating a fragment is very simple, we have just to extend an Android class called android.app.Fragment . We can suppose, we want to create a fragment called Fragment1. In this case we have:
1 2 | public class Fragment1 extends Fragment {} |
In this way, we have created a fragment. In this class we can override callback methods so that we handle different states in the fragment lifecycle. By now, we can suppose that this fragment has a very simple layout:
01 02 03 04 05 06 07 08 09 10 | android:layout_width="match_parent" android:layout_height="match_parent" > <TextView android:layout_width="wrap_content" android:layout_height="wrap_content" android:text="Test Fragment1" /></LinearLayout> |
In this case this layout just has a TextView component that writes a text on the screen. If we want to “attach” this layout to our fragment we can do it in the onCreateView method, because according to the fragment lifecycle, this method is called when the fragment creates its view hierarchy. So in our Fragment1 class we can override the onCreateView method and implement our logic:
1 2 3 4 5 6 | @Overridepublic View onCreateView(LayoutInflater inflater, ViewGroup container, Bundle savedInstanceState) { View v = inflater.inflate(R.layout.text_frag, container, false); return v;} |
In this method, we inflate our fragment layout called text_frag (the one shown above). Now we have created the fragment and we need to attach it to the Activity that holds it, because we know that a fragment exists only inside an Activity. We can do this operation in two ways:
- declaring the fragment inside the activity layout
- declaring a place holder inside the activity layout and attach the fragment inside the activity
In the first case, this operation is static, meaning we attach the fragment permanently to the activity. In the second case we can manage fragments at runtime, so we can replace a fragment with another one for example.
If we declare the fragment inside the layout we have to use the fragment tag.
Moreover, we have to specify the full qualified class name. For example, if the Fragment1 class is under the package com.swa, for the activity layout we will have:
01 02 03 04 05 06 07 08 09 10 11 12 | android:layout_width="match_parent" android:layout_height="match_parent" > <fragment android:id="@+id/f1" android:layout_width="match_parent" android:layout_height="match_parent" class="com.sswa.Fragment1" /></LinearLayout> |
Running the example above, we will get us:
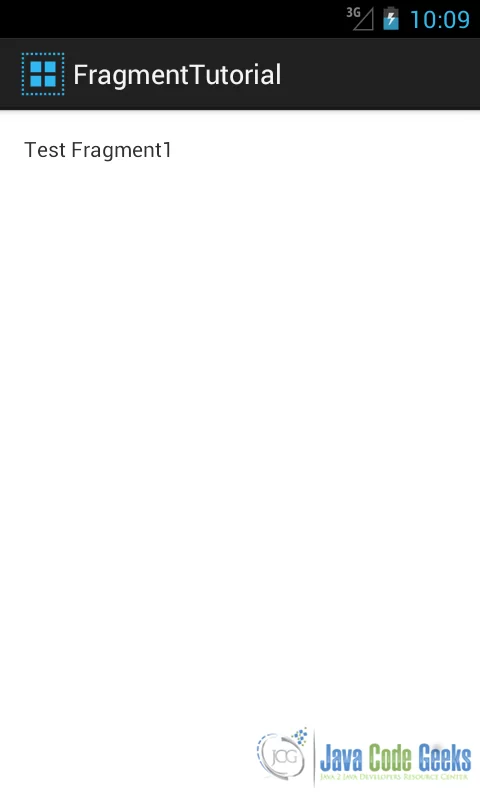
A bit more complex is the second option where we want to manage fragments dynamically.
3.3. FrameLayout and FragmentManager
When we want to handle fragments dynamically inside our Activity we cannot use fragment tag in the activity layout but we have to use a place holder that we will “fill” with the fragment UI. In this case, the activity layout becomes:
01 02 03 04 05 06 07 08 09 10 11 | android:layout_width="match_parent" android:layout_height="match_parent" > <FrameLayout android:id="@+id/fl1" android:layout_width="wrap_content" android:layout_height="wrap_content" /></LinearLayout> |
In the Activity, we have to use a component that helps us to handle fragments. This component is called FragmentManager. Using this component we can add, remove, replace fragments at runtime and also to find fragments.
Note that before doing any kind of operations on a fragment, we need to activate a transaction. Using the FragmentManager we can create a transaction, start it and commit it at the end, when the fragment operation is done. So in the Activity we have:
01 02 03 04 05 06 07 08 09 10 11 12 13 14 15 16 | public class MainActivity extends Activity { @Override protected void onCreate(Bundle savedInstanceState) { super.onCreate(savedInstanceState); setContentView(R.layout.activity_main_din); // Create fragment Fragment1 f1 = new Fragment1(); FragmentManager fm = getFragmentManager(); FragmentTransaction ft = fm.beginTransaction(); ft.add(R.id.fl1, f1); ft.commit(); }} |
3.4. Fragment Activity communication
Often we need to exchange information between a fragment and the activity that holds it. We need to consider that we can re-use fragments with different activities, so we cannot bind the fragment to a specific activity.
Inside a fragment, we can retrieve the activity instance using the getActivity() method. If we want to exchange data, it is a good practice to create a callback interface inside the fragment and require that the activity implements it.
For example, we can suppose to add a button to the fragment1 UI and when the user clicks the button we want to pass this information to the activity. The first thing we need to do is to modify our fragment layout:
01 02 03 04 05 06 07 08 09 10 11 12 13 14 15 16 | android:layout_width="match_parent" android:layout_height="match_parent" > <TextView android:layout_width="wrap_content" android:layout_height="wrap_content" android:text="Test Fragment Dynamic" /> <Button android:id="@+id/btn1" android:layout_width="wrap_content" android:layout_height="wrap_content" android:text="Click me" /></LinearLayout> |
The second step is to create an interface like this:
1 2 3 4 5 | public class Fragment1 extends Fragment { public static interface FragmentListener { public void onClickButton() ; }} |
Now that we have the interface, our activity has to implement it:
1 2 3 4 5 6 7 | public class MainActivity extends Activity implements Fragment1.FragmentListener { @Override public void onClickButton() { // Handle here the event }} |
Now we have to check, in the fragment class, if the activity implements the interface so that we can notify the event, when it occurs. The best place to do it, remembering the fragment lifecycle, is in the onAttach method, so we have:
01 02 03 04 05 06 07 08 09 10 | public class Fragment1 extends Fragment { @Override public void onAttach(Activity activity) { super.onAttach(activity); if (!(activity instanceof FragmentListener)) throw new ClassCastException(); }} |
We are, finally, ready to notify the event when the user clicks on the button and we can do it in the onCreateView method:
01 02 03 04 05 06 07 08 09 10 11 12 13 14 15 16 | public class Fragment1 extends Fragment { @Override public View onCreateView(LayoutInflater inflater, ViewGroup container, Bundle savedInstanceState) { View v = inflater.inflate(R.layout.text_frag, container, false); Button b = (Button) v.findViewById(R.id.btn1); b.setOnClickListener(new View.OnClickListener() { @Override public void onClick(View v) { ((FragmentListener) getActivity()).onClickButton(); } }); return v; }} |
3.5. Inter fragment communication
When developing an android app using fragments, we not only need to exchange data between the fragment and the activity that contains it, but we also need to exchange information between two fragments. In this case, the best practice is to avoid a fragment to fragment communication, so that we can guarantee that fragments are decoupled.
If we want to exchange data in ths manner, we can pass it from the first fragment to the activity, using the method described before, and then from the activity to the destination fragment. In this way, we can be sure that our fragments can be re-used in different situations.
3.6. Multiple screen support using fragments
At the beginning of this article, we explained when we should use fragments. We specified that they are very useful when we want to support different screen sizes, for example when we build an app that runs on a smartphone and on a tablet too. In this case just using layouts is not enough.
It is time ti explore how to create an UI that works on a tablet and a smartphone. In order to achieve this, we can revisit the example described before. In this case, we can suppose that when a user clicks on the button then the app shows a message. If we have a smartphone, when user clicks on the button then we move to another activity that shows the message, while if we use a tablet we want to show this message on the same screen.
First things first, we code a second fragment with a very simple layout that just shows a message and we call this fragment Fragment2:
1 2 3 4 5 6 7 8 | public class Fragment2 extends Fragment { @Override public View onCreateView(LayoutInflater inflater, ViewGroup container, Bundle savedInstanceState) { View v = inflater.inflate(R.layout.frag_message, container, false); return v; }} |
The layout is:
01 02 03 04 05 06 07 08 09 10 | android:layout_width="match_parent" android:layout_height="match_parent" > <TextView android:layout_width="wrap_content" android:layout_height="wrap_content" android:text="Hello world" /></LinearLayout> |
If the app runs on a smartphone, then the layout is similar to the one described previously, while some special consideration has to be done in the case of a tablet. We can suppose, for simplicity, that tablet has a landscape layout, so we can create, under res directory, a new directory called layout-land:
01 02 03 04 05 06 07 08 09 10 11 12 13 14 15 16 17 | android:layout_width="match_parent" android:layout_height="match_parent" android:orientation="horizontal" > <FrameLayout android:id="@+id/fl1" android:layout_width="wrap_content" android:layout_height="wrap_content" /> <FrameLayout android:id="@+id/fl2" android:layout_width="wrap_content" android:layout_height="wrap_content" /></LinearLayout> |
Notice that we have two FrameLayouts in this case. The “heavy” work is done by the Activity. If in the current layout attached to it there is no FrameLayout with id equal to f2, then we have a single fragment layout, meaning we are using a smartphone, otherwise we are using a fragment.
In the callback method in the activity we have:
01 02 03 04 05 06 07 08 09 10 11 12 13 14 15 16 17 18 19 20 21 22 23 24 25 26 27 | import wkkwc.com;@Override public void onClickButton() { // Handle here the event if (findViewById(R.id.fl2) != null) { // We have dual fragment layout Fragment2 f2 = (Fragment2) getFragmentManager().findFragmentById(R.id.fl2); if (f2 == null) { // Fragment2 is not inizialized f2 = new Fragment2(); FragmentTransaction ft = getFragmentManager().beginTransaction(); ft.replace(R.id.fl2, f2); ft.commit(); } } else { // Single fragment layout Fragment2 f2 = new Fragment2(); FragmentTransaction ft = getFragmentManager().beginTransaction(); ft.replace(R.id.fl1, f2); ft.commit(); } } |
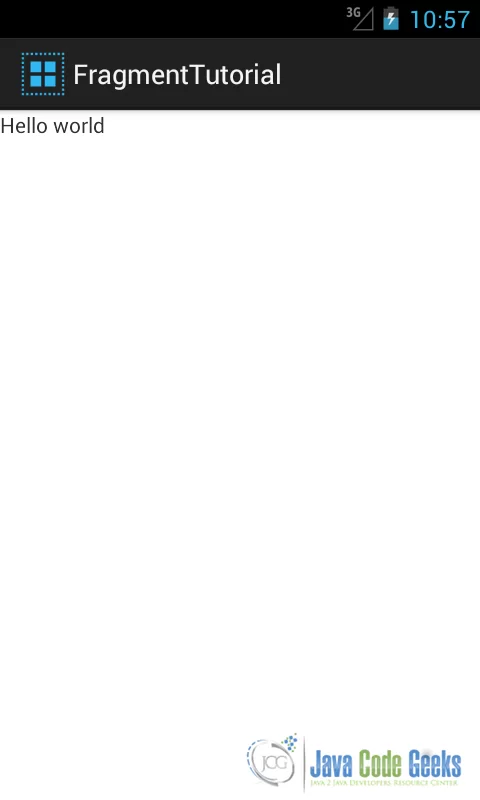
Running the app, we have in the smartphone:
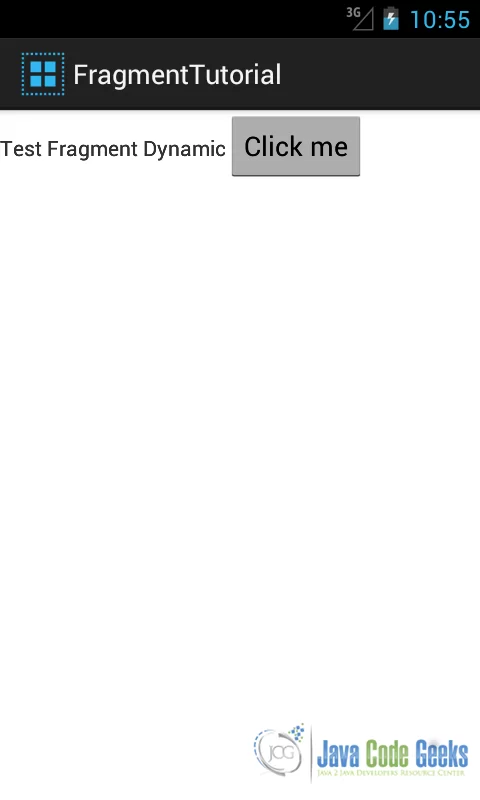
while, if we run the app on a tablet, we have:
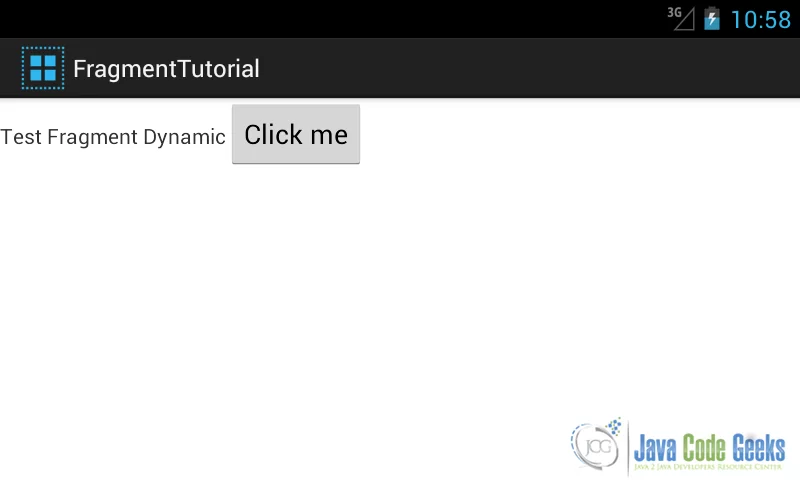
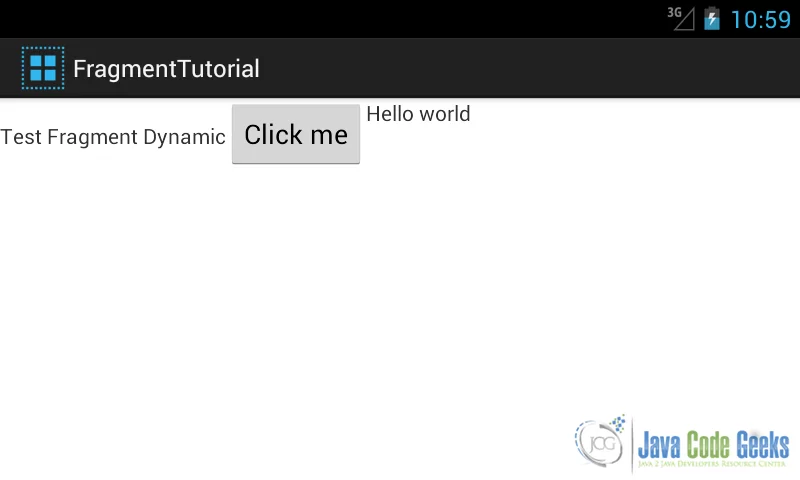
4. Download the Source Code
This was a lesson of how to create Android Layouts with ViewGroups and Fragments. You may download the source code here: AndroidLayout.zip



Very good explanation. Thank you