IoT project: Arduino sends push notification to Android using Temboo, Parse.com
This post describes how to create an IoT project that uses Arduino to send push messages to Android smart phones using Temboo and Parse.com. As example, we will build an alarm system based on Arduino and Android, this is an interesting example of Internet of things (IoT) and the aim of this project is building an alarm using an infrared sensor (PIR) connected to Arduino board that sends push messages to Android smart phone. This project mixes different technologies and platforms and we make them working together!
The alarm system uses two platforms that help simplyfing the project:
- Temboo
- Parse.com
IoT Project overview
Before diving into the project it is useful to describe these two platforms.
Temboo is a platform that has a set of “connectors” that can be used to exchange data with other platforms or service providers (i.e eBay, Yahoo! Weather, Google and so on). The interesting part of Temboo is that it is compatible with
Arduino board, so that these connectors can be exported on Arduino.
Parse.com is the platform we used in the last post to send android push messages.
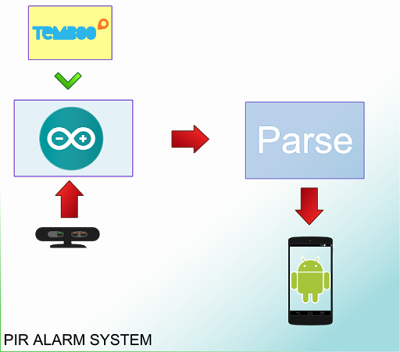
The main overview of the internet of things project is shown below:
As it is clear, there are several parts that build the IoT project. The first part is Arduino board with PIR sensor that is used to detect movements. Arduino runs a Temboo agent that sends data to Parse platform. This agent is triggered when one of the Arduino digital input gets HIGH. The Temboo platforms is used to create the agent without writing too much code lines. Using Temboo choreo, Arduino can send JSON data directly to Parse.com that in turns send a push message to our smart phone.
Arduino Sketch
The first step is setting up the Arduino sketch that uses PIR sensor and test it. This step is very simple, we have to connect the sensor to Arduino board using three wires: Power, Ground and Signal.
The sensor is very simple, the output gets high when it detects movements. For this example we can suppose it is connected on digital pin 8.
To check that our sensor works correctly and it is connected in the right way to Arduino board so that it detects movements, try to load this code into arduino:
int stato = 0;

void setup() {
  // put your setup code here, to run once:
  Serial.begin(9600);
  pinMode(8, INPUT);
}

void loop() {
  // put your main code here, to run repeatedly:
  stato = digitalRead(8);

  Serial.println(stato);
    delay(500);

}
Now runs the code and move your hand in front of the sensor and give a look at the serial monitor to check if it works!
Now the Arduino component is ready!
Temboo choreo
The next step is setting up the agent that connects Arduino board to Parse.com. In this case, we need a Ethernet shield to connect Arduino to internet. I’ve used Wiznet W5500. Once you have created your account, it is time to configure your Temboo chores. We want to connect Arduino to Parse so we check Parse -> Push Notification. Parse choreos requires some information before using it:
- Application ID
- RestAPI Key
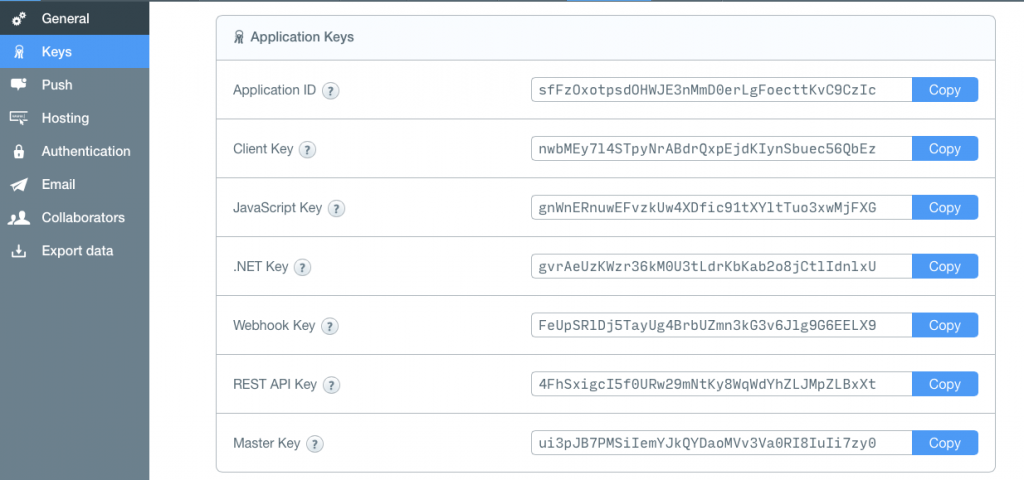
These two parameters are used to connect the agent to Parse.com. You can find these info in Parse.com:
You have to copy the required key into Temboo:
Ok we are ready. If you want you can try to send a notification from Temboo to Parse.com.
Now set the trigger that control the agent:
At the end Temboo will create the Arduino code ready to use!! finally copy and paste the code into your Arduino IDE.
The code generated by Temboo is shown below:
#include
#include <dhcp.h>
#include <dns.h>
#include <ethernet.h>
#include <ethernetclient.h>
#include <temboo.h>
#include "TembooAccount.h" // Contains Temboo account information

byte ethernetMACAddress[] = ETHERNET_SHIELD_MAC;
EthernetClient client;

// The number of times to trigger the action if the condition is met
// We limit this so you won't use all of your Temboo calls while testing
int maxCalls = 10;

// The number of times this Choreo has been run so far in this sketch
int calls = 0;

int inputPin = 8;

IPAddress ip(192, 168, 1, 130); // Arduino IP Add

void setup() {
  Serial.begin(9600);

  // For debugging, wait until the serial console is connected
  delay(4000);
  while(!Serial);


 Ethernet.begin(ethernetMACAddress, ip) ;

  Serial.println("OK");
  delay(5000);

  // Initialize pins
  pinMode(inputPin, INPUT);

  Serial.println("Setup complete.\n");
}

void loop() {
  int sensorValue = digitalRead(inputPin);
  Serial.println("Sensor: " + String(sensorValue));

  if (sensorValue == HIGH) {
    if (calls < maxCalls) {
      Serial.println("\nTriggered! Calling SendNotification Choreo...");
      runSendNotification(sensorValue);
      calls++;
    } else {
      Serial.println("\nTriggered! Skipping to save Temboo calls. Adjust maxCalls as required.");
    }
  }
  delay(250);
}

void runSendNotification(int sensorValue) {
  TembooChoreo SendNotificationChoreo(client);

  // Set Temboo account credentials
  SendNotificationChoreo.setAccountName(TEMBOO_ACCOUNT);
  SendNotificationChoreo.setAppKeyName(TEMBOO_APP_KEY_NAME);
  SendNotificationChoreo.setAppKey(TEMBOO_APP_KEY);

  // Set profile to use for execution
  SendNotificationChoreo.setProfile("ParseAccount");
  // Set Choreo inputs
  String NotificationValue = "{\"channel\": \"temboo\", \"type\": \"android\", \"data\": {\"message\": \"This is a test alert!\"}}";
  SendNotificationChoreo.addInput("Notification", NotificationValue);

  // Identify the Choreo to run
  SendNotificationChoreo.setChoreo("/Library/Parse/PushNotifications/SendNotification");

  // Run the Choreo
  unsigned int returnCode = SendNotificationChoreo.run();

  // Read and print the error message
  while (SendNotificationChoreo.available()) {
    char c = SendNotificationChoreo.read();
    Serial.print(c);
  }
  Serial.println();
  SendNotificationChoreo.close();
}
Configure Parse.com channel and build Android app
Temboo requires we use a Parse channel to send our notifications. We have then to modify our Android app to use a channel to listen to incoming notification. If you don’t know how to write an android app that handles push messages you can read my previous post describing how to send android push messages with Parse.com.
Modify slightly the ParseTutorialApplication.java in this way:
@Override
    public void onCreate() {
        super.onCreate();
        System.out.println("Application");
        Parse.initialize(this, "sfFzOxotpsdOHWJE3nMmD0erLgFoecttKvC9CzIc", "nwbMEy7l4STpyNrABdrQxpEjdKIynSbuec56QbEz");
        ParseInstallation.getCurrentInstallation().saveInBackground();

        ParsePush.subscribeInBackground("temboo");
    }
where temboo is the channel.
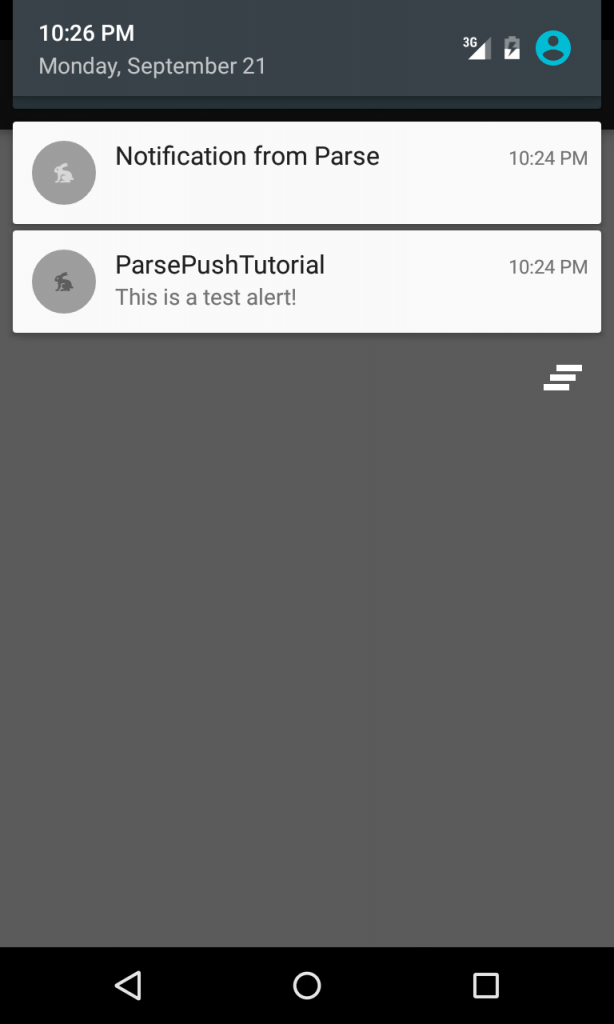
We are ready!! Runs the app and move your hand near the sensor, Arduino will send a push message to the Android smart phone!!
The final result is shown here:
At the end of this post, you know how to build an IoT project using Arduino and Android and how to integrate these two ecosystems through Temboo and Parse.com.
| Reference: | IoT project: Arduino sends push notification to Android using Temboo, Parse.com from our JCG partner Francesco Azzola at the Surviving w/ Android blog. |


