Docker for Java Developers: Continuous Integration on Docker
This article is part of our Academy Course titled Docker Tutorial for Java Developers.
In this course, we provide a series of tutorials so that you can develop your own Docker based applications. We cover a wide range of topics, from Docker over command line, to development, testing, deployment and continuous integration. With our straightforward tutorials, you will be able to get your own projects up and running in minimum time. Check it out here!
Table Of Contents
1. Introduction
Along this tutorial we have seen how Docker penetrated into every aspect of the typical Java application lifecycle: build, development, testing and deployment. In this part we are going to focus on the one of the increasingly important topics of continuous integration.
Although the market of the continuous integration (and continuous delivery) solutions is overcrowded, for better or worse, there is one product which stands still for years and is very close to the heart of every Java developer out there. Yes, your guess is right, it is Jenkins, the leading open source automation server.
2. Why Jenkins?
For many, the relationship with Jenkins falls into hate or love category. Leaving the history behind, the second generation of Jenkins platform, namely 2.x release branch, hit the ecosystem like a tornado and literally became a game changer.
To make a point, here are the key features of Jenkins which are distinguishing it from many other competing solutions:
- Built-in support for delivery pipelines (also known as “pipeline as a code”)
- Improved UI and usability
- Very easy to install and configure
- Exceptional extensibility and very rich plugins ecosystem
- Distributed deployment
- Automation
To illustrate most of them in action, we are going to put what we have learned about Docker so far at work and build our own Jenkins image. Not only that, we would integrate it with Git (using tremendously popular Github hosting), configure the tooling, create multibranch pipeline for our Spring Boot application we have developed previously. And, last but not least, we are going to do all that in a completely automated fashion. If it sounds exciting, let us get started.
3. Pipeline as a code
One of the recent trends in the industry is to treat your continuous delivery pipelines as a code, storing them in the source control system and versioning if necessarily. If you are looking to introduce something like that into your projects, Jenkins is a perfect match, no doubts.
There are multiple favors of pipeline configurations which Jenkins supports out of the box. The one we are going to use in this part of the tutorial is to keep the pipeline definition, Jenkinsfile, along with your project, in the root of the repository tree.
As you may remember, our Spring Boot application requires Java and is using Gradle for dependency management. Keeping that in mind, here is an example we could come up with as a simple pipeline to build such a project in Jenkins.
pipeline {
  agent any

  options {
    disableConcurrentBuilds()
    buildDiscarder(logRotator(numToKeepStr:'5'))
  }

  triggers {
    pollSCM('H/15 * * * *')
  }

  tools {
    jdk "jdk-8u162"
  }

  environment {
    JAVA_HOME="${jdk}"
  }

  stages {
    stage('Cleanup before build') {
      steps {
        cleanWs()
      }
    }

    stage('Checkout from Github') {
      steps {
        checkout scm
      }
    }

    stage('Build') {
      steps {
        script {
          def rtGradle = Artifactory.newGradleBuild()
          rtGradle.tool = "Gradle 4.3.0"
          rtGradle.run buildFile: 'build.gradle', tasks: 'clean build'
        }
      }
    }
  }

  post {
    always {
      archiveArtifacts artifacts: 'build/libs/*.jar', fingerprint: true
    }
  }
}
I hope you would agree, it is surprisingly very clean and expressive. The only thing we need to do is co-locate this definition with the project in question.
If you would like to see our Jenkins deployment in action, at this time it would be good to create a new Github (or Bitbucket, Gitlab, …) repository with Spring Boot application inside.
4. Jenkins and Docker
To our luck, Jenkins maintains the official Docker images repository, so it becomes very easy to integrate and extend it for your needs. As of now, the latest long-term support version of Jenkins is 2.89.4 and this is what we are going to use in this part of the tutorial.
What is interesting, Jenkins also has a comprehensive Docker support (as part of the pipeline declarations and the job definitions) and we are going to look at it as well.
With the official images available out of the box, it is simple to build your own image by extending one of those, for example.
FROM jenkins/jenkins:lts
Good start but it would be great to preinstall some plugins which we think would be useful to us. It is straightforward to do with the install-plugins.sh script already provided.
RUN /usr/local/bin/install-plugins.sh docker-plugin docker-slaves workflow-scm-step workflow-cps pipeline-model-definition docker-workflow cloudbees-folder timestamper workflow-aggregator git gradle pipeline-maven artifactory maven-plugin ssh-slaves build-timeout pipeline-stage-view antisamy-markup-formatter mailer matrix-auth junit findbugs maven-invoker-plugin pipeline-build-step credentials ws-cleanup email-ext ldap pam-auth subversion blueocean credentials-binding
There are quite a lot of the plugins listed here, to be honest, but this is just a tiny piece of what is available. The plugins ecosystem around Jenkins is just astonishing. At this point we would need to generate a key pair to use with Github (or Bitbucket, Gitlab, …) repository.
ssh-keygen -t rsa -C jenkins@javacodegeeks.com
And copy this key pair to our image:
COPY github/id_rsa /var/jenkins_home/.ssh/
COPY github/id_rsa.pub /var/jenkins_home/.ssh/
Moving on, we would certainly aim to run Jenkins using secure protocol, HTTPS, so we would have to generate a self-signed certificate along with the private key.
openssl req  -x509  -sha256  -newkey rsa:2048  -keyout jenkins.key  -out jenkins.crt  -days 1024  -nodes
openssl rsa -in jenkins.key -out jenkins.rsa
Let us add the generated files to the image as well:
COPY jenkins/jenkins.crt /var/lib/jenkins/cert
COPY jenkins/jenkins.rsa /var/lib/jenkins/pk
Awesome, we are pretty much done with the environment part. Let us finalize it with a couple of environment variables.
ENV JENKINS_SLAVE_AGENT_PORT 50001
ENV JAVA_OPTS -Djenkins.install.runSetupWizard=false
ENV JENKINS_OPTS --httpPort=-1 --httpsPort=8083 --httpsCertificate=/var/lib/jenkins/cert --httpsPrivateKey=/var/lib/jenkins/pk
To keep things simple, it would be great to pre-configure the administrative account so we could login right away with known to us credentials.
ENV JENKINS_USER admin
ENV JENKINS_PASS ef8a7543087c4b999cbecdd57696f557
Also, it would be good to know the URL to connect to Git-compatible repository and fetch the project we are going to build.
ENV GIT_URL "<Git URL to repo>"
Next come the important ones but not very obvious. We would need the username and password in order to be able to download the official Oracle JDK distribution (as we all remember, the licensing agreement should be accepted before doing that).
ENV ORACLE_JDK_USER "<username>"
ENV ORACLE_JDK_PASSWORD "<password>"
If we just build the image at this stage and run the container out of it, we would end up with a fully functional Jenkins instance but without any tooling, security or jobs configured. As our goal is full automation, we are going to use Jenkins scripting (based on Groovy) capabilities to accomplish that.
The uncomplicated example of the script would be a good starting point to understand the core idea behind Jenkins automation, here is the init.groovy one.
def instance = Jenkins.getInstance()
instance.setNumExecutors(5)
instance.setSlaveAgentPort([55001])
It does not look scary at all. Progressively adding more meat, let us take a look on the next script which configures security setting to access Jenkins instance, security.groovy.
// Get system environment
def env = System.getenv()
def instance = Jenkins.getInstance()
instance.setSecurityRealm(new HudsonPrivateSecurityRealm(false))
instance.setAuthorizationStrategy(new GlobalMatrixAuthorizationStrategy())

def user = instance.getSecurityRealm().createAccount(env.JENKINS_USER, env.JENKINS_PASS)
user.save()

instance.getAuthorizationStrategy().add(Jenkins.ADMINISTER, env.JENKINS_USER)
instance.save()
You can also spot how we use the JENKINS_USER and JENKINS_PASS environment variables from the Dockerfile definition above. Moving forward, the next thing we are going to do is to store the private key (which we have copied to the image before) to access the SCM of our choice, scripted in the credentials.groovy.
def instance = Jenkins.getInstance()
String keyfile = "/var/jenkins_home/.ssh/id_rsa"
def domain = Domain.global()
def store = instance.getExtensionList('com.cloudbees.plugins.credentials.SystemCredentialsProvider')[0].getStore()

def credentials = new BasicSSHUserPrivateKey(
     CredentialsScope.GLOBAL,
     "22d9d94b-2794-4d0c-8576-accf87764d0f",
     "jenkins",
     new BasicSSHUserPrivateKey.FileOnMasterPrivateKeySource(keyfile),
     "",
     ""
)

store.addCredentials(domain, credentials)
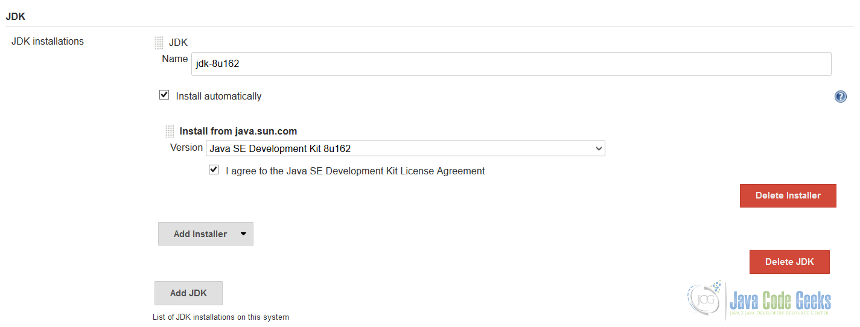
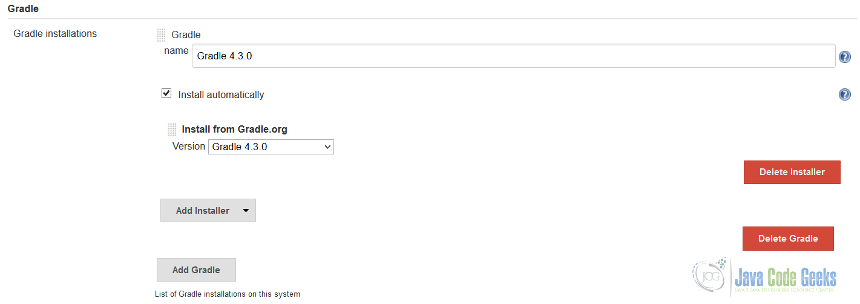
As we have decided to focus on Spring Boot application, and already come up with a Jenkinsfile for that, it would be good to preinstall Oracle JDK 8 (latest version is 8u162) and Gradle tooling (the version we use is 4.3.0, although not latest but let us stick to it). The jdk.groovy snippet is taking care of Oracle JDK configuration.
def env = System.getenv()
def instance = Jenkins.getInstance()
def descriptor = instance.getDescriptor("hudson.model.JDK")
def installations = []
def installer = new JDKInstaller("jdk-8u162-oth-JPR", true)
def installerProps = new InstallSourceProperty([installer])
def installation = new JDK("jdk-8u162", "", [installerProps])
installations.push(installation)

descriptor.setInstallations(installations.toArray(new JDK[0]))
descriptor.save()

def jdkInstaller = instance.getDescriptor("hudson.tools.JDKInstaller")
jdkInstaller.doPostCredential(env.ORACLE_JDK_USER, env.ORACLE_JDK_PASSWORD)
Please notice the mandatory step to configure username and password to download the JDK (using ORACLE_JDK_USER and ORACLE_JDK_PASSWORD environment variables). On the other side, gradle.groovy is looking much simpler.
def instance = Jenkins.getInstance()
def gradle = new GradleInstallation("Gradle 4.3.0", "", [new InstallSourceProperty([new GradleInstaller("4.3.0")])])
def descriptor = instance.getDescriptorByType(GradleInstallation.DescriptorImpl)
descriptor.setInstallations(gradle)
descriptor.save()
Terrific so far, but the most interesting script is left in the end. It is the pipeline configuration stored in the pipeline.groovy.
def env = System.getenv()
def instance = Jenkins.getInstance()

def project = instance.createProject(WorkflowMultiBranchProject, 'spring-boot-webapp-pipeline')
GitSCMSource gitSCMSource = new GitSCMSource(null, env.GIT_URL, "22d9d94b-2794-4d0c-8576-accf87764d0f", "*", "", false)
project.getSourcesList().add(new BranchSource(gitSCMSource))
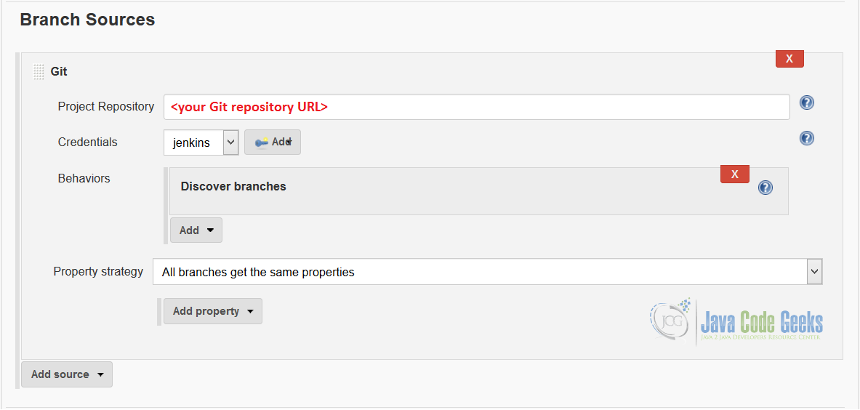
Please notice how we reference the credentials preconfigured in the credentials.groovy by using the unique identifier, 22d9d94b-2794-4d0c-8576-accf87764d0f. The URL to Git repository comes from the environment variable GIT_URL.
And as the last step, let us copy all the scripts to our image to give Jenkins a chance to execute them during the initialization phase.
COPY scripts/init.groovy /usr/share/jenkins/ref/init.groovy.d/init.groovy
COPY scripts/credentials.groovy /usr/share/jenkins/ref/init.groovy.d/credentials.groovy
COPY scripts/pipeline.groovy /usr/share/jenkins/ref/init.groovy.d/pipeline.groovy
COPY scripts/security.groovy /usr/share/jenkins/ref/init.groovy.d/security.groovy
COPY scripts/jdk.groovy /usr/share/jenkins/ref/init.groovy.d/jdk.groovy
COPY scripts/gradle.groovy /usr/share/jenkins/ref/init.groovy.d/gradle.groovy
Awesome, the only thing which we have to do manually (but one time only) is to authorize github/id_rsa.pub key to have read-only access to your Github (or Bitbucket, Gitlab, …) repository. When it is done, we could go ahead and build the image:
docker build . --tag jenkins:jcg
And run our Jenkins container right away.
docker run --rm -p 8083:8083 -p 50001:50001 -v /var/run/docker.sock:/var/run/docker.sock --privileged jenkins:jcg
Once the container is started, we could navigate to https://localhost:8083 and use the username
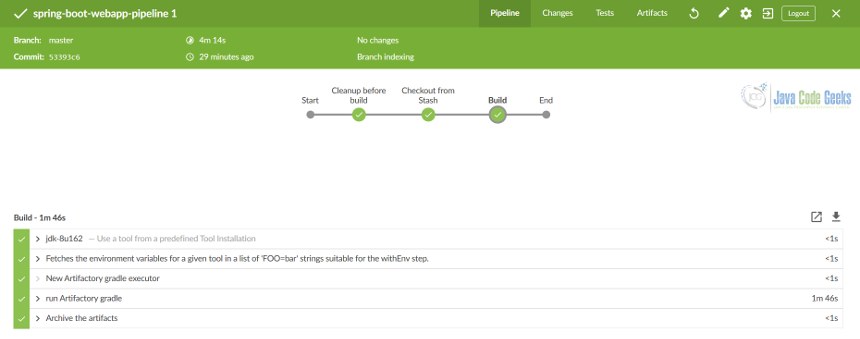
admin and password ef8a7543087c4b999cbecdd57696f557 to login, scan the pipeline, wait for the build and check out our spring-boot-webapp-pipeline job status.All is looking green, as any healthy project should be looking all the time. It would be nice to make sure that our tooling has been configured properly.
Also, it will not hurt to verify that out pipeline is configured with correct repository and is pointing to the right credentials to use.
The best confirmation that things have been set in place properly is to check that pipeline and all its stages have been executed successfully.
In case you are looking for modern and fancier web UI, Jenkins is offering such kind of user experience with Blue Ocean, designed from the ground up for Jenkins Pipeline.
We could have declared success at this point, but to be fair, the need to install tooling and whatnot complicates the automation process. Any chance we could make it simpler? Yes, for sure, and the key player here is once again Docker.
5. Docker in Jenkins
As we mentioned already, Jenkins has an outstanding Docker support fulfilled by fair number of plugins with Docker plugin and Docker Pipeline plugin being the keys ones. What it means practically is that your pipeline (or other kind of job) may spin up containers to run the build (and any other tasks or stage) on them.
The best way to illustrate the difference is to modify our Jenkinsfile from the previous section to use Docker agent instead of predefined tooling.
pipeline {
  agent {
    docker {
      image 'gradle:4.3.0-jdk8-alpine'
    }
  }

  options {
    disableConcurrentBuilds()
    buildDiscarder(logRotator(numToKeepStr:'5'))
  }

  triggers {
    pollSCM('H/15 * * * *')
  }

  stages {
    stage('Cleanup before build') {
      steps {
        cleanWs()
      }
    }

    stage('Checkout from Github') {
      steps {
        checkout scm
      }
    }

    stage('Build') {
      steps {
        sh 'gradle build'
      }
    }
  }

  post {
    always {
      archiveArtifacts artifacts: 'build/libs/*.jar', fingerprint: true
    }
  }
}
This pipeline looks more compact. We get rid of quite a few definitions (and practically could get rid of some initialization scripts as well). When we commit this new Jenkinsfile to our existing repository (overriding the current one) we should observe a bit different set of stages but the build is still green.
This is just one example of Docker integration with Jenkins, there are tons of different ways you could leverage Docker to push the limits of your continuous integration (and delivery) processes to perfection.
There is one more thing to mention here before we wrap up the discussion. Because we are running Jenkins in Docker, and Jenkins itself executes job/stage steps in Docker, such model of containers usage is known as Docker-in-Docker (or shortly DinD). There are quite a few things to be aware of when you are running DinD environments, brilliantly summarized by Jérôme Petazzoni in the blog post. Please check it out if you are seriously considering this model.
6. Conclusions
In this very last part of the tutorial we have looked at quite a practical application of Docker by deploying and configuring continuous integration platform (based on Jenkins) in a fully automated fashion. We created a build pipelines for one of the applications we have developed previously and demonstrated the use case of running Docker inside live Docker containers.
With that, our tutorial comes to the end. It was a long but hopefully useful journey, where we have learned something practical and helpful. The conclusion of this whole series could be nicely summarized by restating that Docker is terrific piece of technology which is capable to push us to the new horizons.
The complete scripts and project sources are available for download:
- Spring Boot web application with Jenkinsfile
- Jenkinsfile with Docker agent
- Jenkins Docker image and scripts


