Graphics Tutorial
To start with here are some prerequisites :
-You should have fair idea about java syntax because I am not going to teach that.
-You should have Eclipse downloaded (anyone will do i.e Indigo, Galileo, Ganymede etc.)
– You should Download acm.jar file and include it into your project as an external jar file.
NOTE : If you can either download Eclipse or execute from Command Prompt. If executing from Command Prompt then don’t forget to enter the path of acm.jar to Environment Variable -> CLASSPATH, otherwise it will throw an error.
The AWT (Abstract Window Toolkit) provides the GUI components that can be used in Java applets, but here we will also be using acm.jar library.
The java.awt package and acm.*/acm.program.* package contains the GUI components.
Now we should describe the components that you will be using to build a GUI.
Canvas :
Canvas (in java.awt)/ GCanvas (acm.*) is a class that provides a canvas at the background for adding the object over it. This is created automatically by the Graphics program.
Some of the methods of GCanvas are :
add( object ) : Adds the object onto the canvas.
add( object, x, y ) : Adds the object in the position (x,y) specified.
add( object, position ) : Adds the object in the position (SOUTH, NORTH, EAST, WEST) specified.
remove ( object) : Removes that particular object
removeAll() : Removes all objects from the canvas.
setBackground ( color ) : Sets the background of the Canvas.
To know more about GCanvas methods click here.
To know about Canvas methods click here.
Containers :
You add GUI components to the container using the add method.
There are two types of containers Window and Panel.
Window :
A Window is a container which is independent of other containers. There are two types of window : Frame and Dialog. A Frame is a window with a title and corners that can be resized, whereas a Dialog is a simple window. We can move a Dialog but cannot resize it.
Panel :
A Panel must be contained inside another container or a web browser window. You must place the Panel into a Window to be displayed.
Positioning and Sizing Components :
The position and size of a component in a container is determined with the help of a layout manager. A container has an instance of the layout manager. Whenever the container need to resize or reposition the component inside it it call the layout manager and does the needful.
There are different methods defined in the Layout Manager class for achieving re-positioning and re-sizing.
Frames :
A Frame is a subclass of Window. Frame inherits its properties from Container class so you can add components to a Frame using the add method.
The default layout of Frame is BorderLayout, thought this can be changed with the help of setLayout method.
The constructor Frame(String ) creates a new invisible Frame object with the title specified by the String.
Example :
//Program using the acm library
import javax.swing.*;
import java.awt.*;
import acm.program.*;

public class FrameExample extends GraphicsProgram{
    private JFrame f;
    public FrameExample(){
        f = new JFrame("Code 2 Learn");
    }
    public void launchMyFrame(){
        f.setSize(300,300);
        f.setBackground(Color.blue);
        f.setVisible(true);
    }
    public void init(){
        FrameExample fe=new FrameExample();
        fe.launchMyFrame();
    }
}
//Program using the w/o acm library
import java.awt.*;

public class FrameExample{
    private Frame f;

    public FrameExample(){
        f = new Frame("Code 2 Learn");
    }

    public void launchMyFrame(){
        f.setSize(300,300);
        f.setBackground(Color.blue);
        f.setVisible(true);
    }
    public static void main(String args[]){
        FrameExample fe=new FrameExample();
        fe.launchMyFrame();
    }
}
Panels :
A Panel, like Frame, provides the space for you to attach GUI component. Each Panel can have its own layout manager.
After creating a Panel we must add it to a Window or Frame. This can be achieved using the add() method.
Example :
//Program using the acm library
import javax.swing.*;
import java.awt.Color;
import acm.program.*;

public class FrameExample extends GraphicsProgram{

    private JFrame f;
    private JPanel p;

    public FrameExample(){
        f = new JFrame("Code 2 Learn");
        p=new JPanel();
    }

    public void launchMyFrame(){
        f.setSize(300,300);
        f.setLayout(null); //Override the default layout manager

        p.setSize(300, 50);
        p.setBackground(Color.BLACK);
        f.add(p);
        f.setVisible(true);
    }

    public static void main(String args[]){
        FrameExample fe=new FrameExample();
        fe.launchMyFrame();
    }
}
/Program using the w/o acm library
import javax.swing.*;
import java.awt.*;

public class FrameNPanel{

    private Frame f;
    private Panel p;

    public FrameNPanel(){
        f = new Frame("Code 2 Learn");
        p=new Panel();
    }

    public void launchMyFrame(){
        f.setSize(300,300);
        f.setLayout(null); //Override the default layout manager

        p.setSize(300, 50);
        p.setBackground(Color.BLACK);
        f.add(p);
        f.setVisible(true);
    }

    public static void main(String args[]){
        FrameNPanel fe=new FrameNPanel();
        fe.launchMyFrame();
    }
}
I have explained about panels, frames and windows which we can put our items. But we didn’t set the layout of the window , panel or frame in our last tutorial, what we did was we used the default layout.
Now we will be understanding about the different types on Layouts that are available for us to use and manipulate our GUI.
Container Layout :
The layout of each component in the container is governed by the Layout Manager. Each container (such as Panel or Frames) has a default layout manager associated with it, which we can change.
Layout Manager :
The following layout managers are included with the Java Programming Language :
- FlowLayout – The FlowLayout is the default layout manager for Panel and Applet. The components when placed in the container having layout manager as FlowLayout will be placed next to each other making a flow (like students in a straight line)
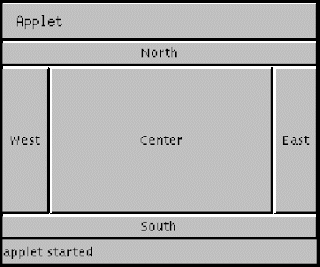
- BorderLayout – The BorderLayout is the default layout manager of Window,Dialog and Frame. The BorderLayout is when applied will make the components appear on the borders i.e. WEST, SOUTH, NORTH, CENTER OR EAST depending upon what is the choice given.
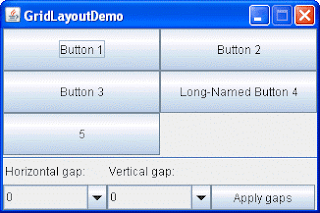
- GridLayout – This layout manager provides the flexiblity for placing components on the container
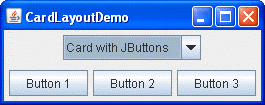
- CardLayout – It is something that uses two or more components which share the same display (as you can see below).
- GridBagLayout – The GridBagLayout is the most flexible and the most complex layout manager in the Java Environment. It places is components and rows and columns and thus allow us to do row span or column span in order to place over components.
NOTE :
By default, all Window classes use the BorderLayout manager and the Panel classes use the FlowLayout manager. A function called setLayout() is used to change the layout of the container (its shown below in the example).
A Simple FlowLayout Example :
import java.awt.*;

public class GUI2 {

    private Frame f;
    private Button but1;
    private Button but2;

    public GUI2(){
        f = new Frame("CODE 2 LEARN");
        but1 = new Button("Like Code 2 Learn");
        but2 = new Button("Don't Like Code 2 Learn");
    }

    public void generateGUI(){
        f.setLayout(new FlowLayout());
        f.add(but1);
        f.add(but2);
        f.pack();
        f.setVisible(true);
    }

    public static void main(String[] args) {
        GUI2 launchgui= new GUI2();
        launchgui.generateGUI();
    }
}
Reference: Java Graphics Tutorial – 1 & Java Graphics Tutorial -II from our JCG partner Farhan Khwaja at the Code 2 Learn blog.


Sweet, dude! I’m a 13 year old programmer! Can you show me a graphics 2d tutorial? Thanks! ~Zack.
anyone please help me in java project . “Retail management system “