Angular Internationalization Example
Welcome readers, in this tutorial, we will implement internationalization in an angular application.
1. Introduction
- Angular is a Typescript-based open-source framework that helps developers build single page applications
- Offers Object-oriented features and supports the dynamic loading of the pages
- Supports Two-way data-binding, Property (
[]), and Event (()) binding techniques - Supports command-line-interface to easily initiate and manage the angular projects from the command line
1.1 Internationalization
Internationalization is a concept of making an application available to a global audience in a user-friendly fashion. Angular provides the inbuilt i18n tools but they encounter their own disadvantages. For instance, JIT decreases the application performance while AOT increases the compilation time of the application. To overcome these problems, we will use a commonly used third-party library known as ngx-translate.
Now open the visual studio code and let us see how to implement this tutorial in the angular framework.
2. Angular Internationalization Example
Here is a systematic guide for implementing this tutorial.
2.1 Tools Used
We are using Visual Studio Code and Node Terminal to compile and execute the angular code on a browser.
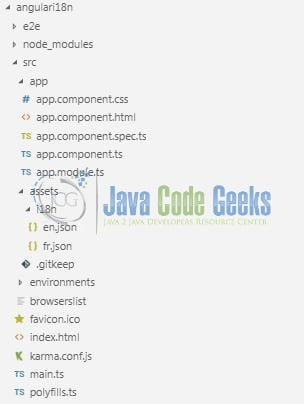
2.2 Project Structure
In case you are confused about where you should create the corresponding files or folder, let us review the project structure of the angular application.

3. Creating Angular application
Run the ng new angulari18n command in the npm console to create a new angular project. Once the new project is created, execute the following commands in the npm console to install and load ngx-translate dependency required for this example.
npm install @ngx-translate/core –save

npm install @ngx-translate/http-loader
3.1 Importing Translation Module
Import and inject the Http client and Translation module in the src/app/app.module.ts file. In this file, we will also create an Http Loader factory that returns an object which loads the translations using http and json files. Add the following code to the file.
app.module.ts
import { BrowserModule } from '@angular/platform-browser';
import { NgModule } from '@angular/core';

import { HttpClientModule, HttpClient } from '@angular/common/http';

// Importing internationalisation translator modules in the application.
import { TranslateModule, TranslateLoader } from '@ngx-translate/core';
import { TranslateHttpLoader } from '@ngx-translate/http-loader';

import { AppComponent } from './app.component';

// "HttpLoaderFactory" returns an object that loads the translations using the .json file.
// Function returns the "TranslateHttpLoader" object for the AOT compiler.
export function HttpLoaderFactory(http: HttpClient) {
  return new TranslateHttpLoader(http);
}

@NgModule({
  declarations: [
    AppComponent
  ],

  // Importing the modules into the application module.
  imports: [
    BrowserModule, HttpClientModule,
    TranslateModule.forRoot({
      loader: {
        provide: TranslateLoader,
        useFactory: HttpLoaderFactory,
        deps: [HttpClient]
      }
    })
  ],

  providers: [],

  bootstrap: [AppComponent]
})

export class AppModule { }
3.2 Inject Translation Service
To start working with internationalization we’ll need to import the Translation Service in src/app/app.component.ts file.
app.component.ts
import { Component } from '@angular/core';
// Importing the translator service.
import { TranslateService } from '@ngx-translate/core';

@Component({
  selector: 'app-root',
  templateUrl: './app.component.html',
  styleUrls: ['./app.component.css']
})

export class AppComponent {
  title = 'Angular Internationalization tutorial';

  // Setting the default language of the application.
  constructor(private translate: TranslateService) {
    translate.setDefaultLang('en');
  }

  // Method to change the language.
  switchLanguage(language: string) {
    this.translate.use(language);
  }
}
3.3 Creating Translations
Remember to create some translations files inside the assets/i18n folder. For this example, we have created en.json and fr.json files.
3.4 Translating Text
Add the following code to src/app/app.component.html for translating the language in a native language. Do remember to include the translate directive for providing internationalization support.
app.component.html
<div class="container">
  <h2 align="center" class="text-info">{{title}}</h2>
  <hr />

  <div>
    <p translate>Title</p>
    <p>{{ 'Intro' | translate }}</p>
  </div>

  <div>
    <button class="btn btn-info" (click)="switchLanguage('en')">en</button><br/><br/>
    <button class="btn btn-info" (click)="switchLanguage('fr')">fr</button>
  </div>
</div>
4. Run the Application
As we are ready with all the changes, let us compile and run the angular application with ng serve command. Once the projects are successfully compiled and deployed, open the browser to test it.
5. Project Demo
Open your favorite browser and hit the angular application url (http://localhost:4200/) to display the index page of the application.

The user can click the language button to toggle the application’s text as per their native language. That is all for this tutorial and I hope the article served you whatever you were expecting for. Happy Learning and do not forget to share!
6. Conclusion
In this section, we learned how to support internationalization in the angular application. Developers can download the sample application as an Eclipse project in the Downloads section.
7. Download the Eclipse Project
This was a tutorial of internationalization in an angular application.
You can download the full source code of this example here: Angular Internationalization Example


