Hello. In this tutorial, we will understand how to write API documentation in Node.js using Swagger.
1. Introduction
A swagger is a popular tool used for generating interactive API documentation. In this tutorial, we will see how to write swagger api documentation in the nodejs application.
1.1 Setting up Node.js
To set up Node.js on windows you will need to download the installer from this link. Click on the installer (also include the NPM package manager) for your platform and run the installer to start with the Node.js setup wizard. Follow the wizard steps and click on Finish when it is done. If everything goes well you can navigate to the command prompt to verify if the installation was successful as shown in Fig. 1.

2. API Documentation in Node.js Using Swagger
To set up the application, we will need to navigate to a path where our project will reside. For programming stuff, I am using Visual Studio Code as my preferred IDE. You’re free to choose the IDE of your choice.
2.1 Setting up the implementation
Let us write the different files which will be required for practical learning.
2.1.1 Setting up dependencies
Navigate to the project directory and run npm init -y to create a package.json file. This file holds the metadata relevant to the project and is used for managing the project dependencies, script, version, etc. Add the following code to the file wherein we will specify the required dependencies.
package.json
01 02 03 04 05 06 07 08 09 10 11 12 13 14 15 16 17 18 19 20 21 22 23 24 25 | { "name": "swagger", "version": "1.0.0", "description": "api documentation via swagger in nodejs application", "main": "index.js", "scripts": { "dev": "nodemon index.js", "test": "echo \"Error: no test specified\" && exit 1" }, "keywords": [ "nodejs", "expressjs", "apidocumentation", "swagger" ], "author": "javacodegeeks", "license": "MIT", "dependencies": { "express": "^4.17.1", "swagger-ui-express": "^4.2.0" }, "devDependencies": { "nodemon": "^2.0.15" }} |
To download the dependencies navigate to the directory path containing the file and use the npm install command. If everything goes well the dependencies will be loaded inside the node_modules folder and you are good to go with the further steps.
2.1.2 Creating swagger.json file
Creating a swagger.json file in the project’s root directory that will be responsible to create the description of the entire api. For this tutorial, we will be exposing two points and the entity/dto object which will be used in response for the client.
- Get all users
- Get user by id
swagger.json
001 002 003 004 005 006 007 008 009 010 011 012 013 014 015 016 017 018 019 020 021 022 023 024 025 026 027 028 029 030 031 032 033 034 035 036 037 038 039 040 041 042 043 044 045 046 047 048 049 050 051 052 053 054 055 056 057 058 059 060 061 062 063 064 065 066 067 068 069 070 071 072 073 074 075 076 077 078 079 080 081 082 083 084 085 086 087 088 089 090 091 092 093 094 095 096 097 098 099 100 101 102 103 104 105 106 107 108 109 110 111 112 113 114 115 116 117 118 119 120 121 122 123 124 | { "swagger": "2.0", "info": { "version": "1.0.0", "title": "API Documentation in Node.js Using Swagger", "description": "User Restful webservice application", "license": { "name": "MIT", } }, "basePath": "/", "tags": [ { "name": "Users", "description": "API for users" } ], "produces": ["application/json"], "paths": { "/users": { "get": { "tags": ["Users"], "summary": "Get all users", "responses": { "200": { "description": "ok", "schema": { "$ref": "#/definitions/Users" } } } } }, "/user": { "parameters": [ { "name": "id", "in": "query", "required": true, "description": "Id of the user which is to be searched", "type": "integer" } ], "produces": ["application/json"], "get": { "tags": ["Users"], "summary": "Get user by id", "responses": { "200": { "description": "ok", "schema": { "$ref": "#/definitions/User" } }, "404": { "description": "not found" } } } } }, "definitions": { "User": { "required": ["name", "_id", "companies"], "properties": { "id": { "type": "integer", "uniqueItems": true }, "name": { "type": "string" }, "username": { "type": "string" }, "email": { "type": "string" }, "address": { "type": "object", "properties": { "street": { "type": "string" }, "suite": { "type": "string" }, "city": { "type": "string" }, "zipcode": { "type": "string" } } }, "phone": { "type": "string" }, "website": { "type": "string" }, "company": { "type": "object", "properties": { "name": { "type": "string" }, "catchPhrase": { "type": "string" }, "bs": { "type": "string" } } } } }, "Users": { "type": "array", "$ref": "#/definitions/User" } }} |
2.1.3 Creating a service class
Create a service file in the service folder which will be responsible to send the response to the user for the get all users endpoint and get user by id endpoint. Here we are sending the mock data but in an ideal application, this data would be fetched from the database.
user.js
001 002 003 004 005 006 007 008 009 010 011 012 013 014 015 016 017 018 019 020 021 022 023 024 025 026 027 028 029 030 031 032 033 034 035 036 037 038 039 040 041 042 043 044 045 046 047 048 049 050 051 052 053 054 055 056 057 058 059 060 061 062 063 064 065 066 067 068 069 070 071 072 073 074 075 076 077 078 079 080 081 082 083 084 085 086 087 088 089 090 091 092 093 094 095 096 097 098 099 100 101 102 103 104 105 106 107 108 109 110 111 112 113 114 115 116 117 118 119 120 | const getUsers = () => { return [ { id: 1, name: "Leanne Graham", username: "Bret", email: "Sincere@april.biz", address: { street: "Kulas Light", suite: "Apt. 556", city: "Gwenborough", zipcode: "92998-3874" }, phone: "1-770-736-8031 x56442", website: "hildegard.org", company: { name: "Romaguera-Crona", catchPhrase: "Multi-layered client-server neural-net", bs: "harness real-time e-markets" } }, { id: 2, name: "Ervin Howell", username: "Antonette", email: "Shanna@melissa.tv", address: { street: "Victor Plains", suite: "Suite 879", city: "Wisokyburgh", zipcode: "90566-7771" }, phone: "010-692-6593 x09125", website: "anastasia.net", company: { name: "Deckow-Crist", catchPhrase: "Proactive didactic contingency", bs: "synergize scalable supply-chains" } }, { id: 3, name: "Clementine Bauch", username: "Samantha", email: "Nathan@yesenia.net", address: { street: "Douglas Extension", suite: "Suite 847", city: "McKenziehaven", zipcode: "59590-4157" }, phone: "1-463-123-4447", website: "ramiro.info", company: { name: "Romaguera-Jacobson", catchPhrase: "Face to face bifurcated interface", bs: "e-enable strategic applications" } }, { id: 4, name: "Patricia Lebsack", username: "Karianne", email: "Julianne.OConner@kory.org", address: { street: "Hoeger Mall", suite: "Apt. 692", city: "South Elvis", zipcode: "53919-4257" }, phone: "493-170-9623 x156", website: "kale.biz", company: { name: "Robel-Corkery", catchPhrase: "Multi-tiered zero tolerance productivity", bs: "transition cutting-edge web services" } }, { id: 5, name: "Chelsey Dietrich", username: "Kamren", email: "Lucio_Hettinger@annie.ca", address: { street: "Skiles Walks", suite: "Suite 351", city: "Roscoeview", zipcode: "33263" }, phone: "(254)954-1289", website: "demarco.info", company: { name: "Keebler LLC", catchPhrase: "User-centric fault-tolerant solution", bs: "revolutionize end-to-end systems" } } ];};const getUserById = (key) => { console.log("Search key = " + key); const item = getUsers().filter((user) => { if (user.id == key) { return user; } }); if (item.length > 0) { console.log("User found!"); return item; } else { return false; }};module.exports = { getUsers, getUserById}; |
2.1.4 Creating the index file
Create the file that will act as a welcome point for the application. The file will be responsible to handle the incoming request from the client and initialize the swagger configuration. During the swagger configuration initialization, it will parse the swagger.json file and will expose an api-docs endpoint.
user.js
01 02 03 04 05 06 07 08 09 10 11 12 13 14 15 16 17 18 19 20 21 22 23 24 25 26 27 28 29 30 31 32 33 34 35 36 37 38 39 40 41 42 43 44 45 46 47 48 49 50 | // applicationconst express = require("express");const app = express();app.use(express.json());const { getUsers, getUserById } = require("./service/user");// swagger configconst swaggerUi = require("swagger-ui-express"), swaggerDoc = require("./swagger.json");// application routes// get all users// endpoint = http://localhost:6001/usersapp.get("/users", (req, res) => { return res.status(200).json({ status: "ok", item: getUsers() });});// get user by id// endpoint = http://localhost:6001/user?id=1app.get("/user", (req, res) => { let id = req.query.id; const user = getUserById(id); if (!user) { return res.status(404).json({ status: "not found", message: "resource not found" }); } else { return res.status(200).json({ status: "ok", item: user }); }});// setting up swagger// endpoint = http://localhost:6001/api-docs/app.use("/api-docs", swaggerUi.serve, swaggerUi.setup(swaggerDoc));// start applicationconst port = process.env.PORT || 6001;app.listen(port, () => { console.log(`Service endpoint = http://localhost:${port}`);}); |
3. Run the Application
To run the application navigate to the project directory and enter the following command as shown below.
Command
1 | $ nodemon |
If everything goes well the application will be started successfully on port – 6001 as shown in Fig. 2.

4. Demo
Open up the browser and hit the endpoints to confirm that the application is running fine. But in this tutorial, we have an extra thing wherein one can also check the swagger documentation generated at the below link –
Swagger endpoint
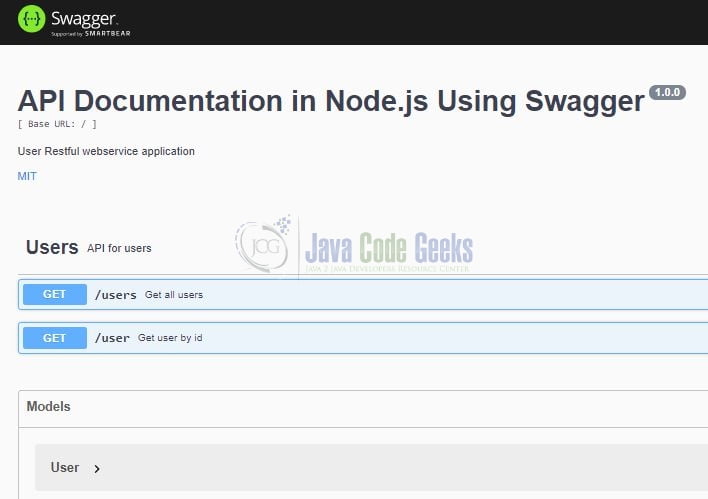
If everything goes the swagger documentation will be generated as shown in Fig. 3.
That is all for this tutorial and I hope the article served you with whatever you were looking for. Happy Learning and do not forget to share!
5. Summary
In this tutorial, we saw how to set up swagger documentation in a nodejs application for the api. You can download the source code and the postman collection from the Downloads section.
6. Download the Project
This was a tutorial to set up swagger documentation in a nodejs application for the api.
You can download the full source code of this example here: API Documentation in Node.js Using Swagger

So I was working with vanilla Nodejs and swagger and is it possible to implement swagger with Vanilla nodejs