Spring Boot Postgres App On Podman
1. Introduction to Podman
Running Spring a Boot Postgres App on Podman offers a lightweight and secure containerization solution for developers. Podman, an open-source containerization tool, operates without a daemon, ensuring enhanced security and eliminating single points of failure. In this guide, we’ll explore how to seamlessly integrate your Spring Boot application with a PostgreSQL database on Podman, streamlining your development workflow.
2. Difference between Podman and Docker
One significant difference between Podman and Docker is the absence of a central daemon in Podman. Docker relies on a daemon to manage containers, while Podman operates as a daemonless container engine. This distinction provides enhanced security and eliminates potential single points of failure. Additionally, Podman supports rootless containers, enabling non-root users to run containers without compromising security.
3. Installing Podman on Windows/Linux/macOS
Installing Podman is straightforward and varies slightly depending on the operating system. On Linux, you can typically install Podman using the package manager of your distribution. For Windows and macOS, Podman can be installed within a Linux virtual machine using tools like WSL (Windows Subsystem for Linux) or multipass.
3.1. Linux
3.1.1. CentOS
Podman is available in the default Extras repos for CentOS 7 and in the AppStream repo for CentOS 8 and Stream.
1 | sudo yum -y install podman |
3.1.2. Debian
The podman package is available in the Debian 11 (Bullseye) repositories and later.
1 | sudo apt-get -y install podman |
3.2. macOS
1 | brew install podman |
3.3. Windows
On Windows, you can install WSL and then set up a Linux distribution such as Ubuntu or Fedora. Once the Linux environment is set up, you can install Podman within it following the Linux installation instructions.
Podman for Windows guide
4. Creating a Spring Boot Application
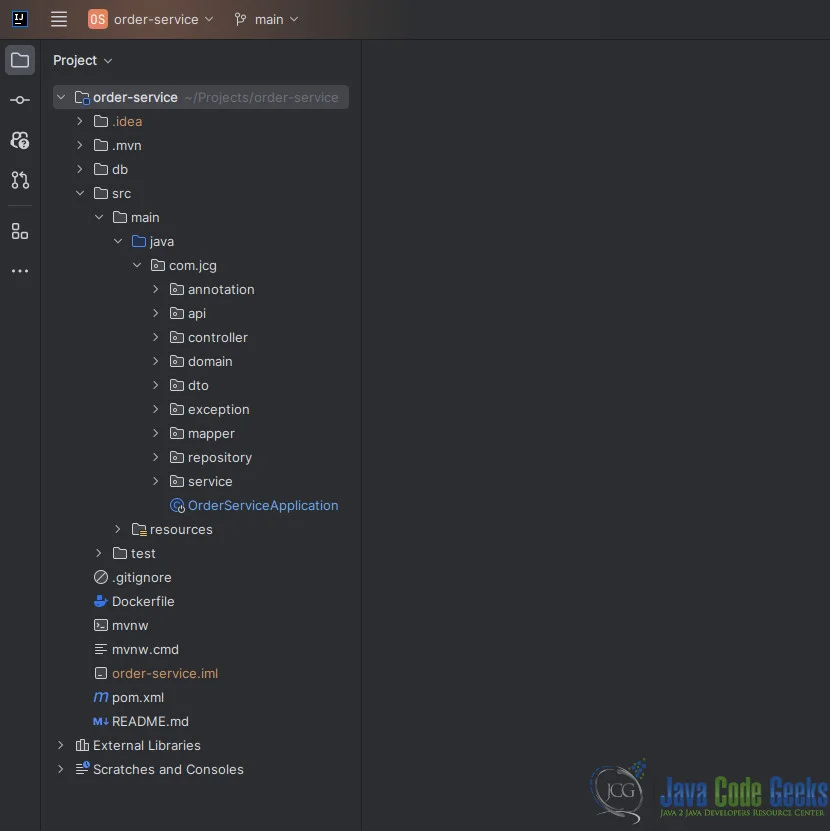
We have created a simple Spring Boot application, REST API Order Service for a simple web store, It’s responsible for managing orders and items.
The application has two different profiles, a default profile application.properties with embedded H2 and a postgres profile application-postgres.properties with PostgreSQL as a data source.

The application.properties file is a configuration file used in Spring Boot applications to customize various aspects of the application’s behavior. It allows developers to configure properties such as database connection settings, server port, logging levels, and more. Below we demonstrate the details of the application.properties files for our Spring Boot application with H2 and PostgreSQL:
4.1. application.properties
01 02 03 04 05 06 07 08 09 10 11 12 13 14 15 16 17 18 19 20 21 22 23 24 25 26 27 28 29 30 31 32 | # General information about the application & profile it's runningspring.application.name=order-service# Tomcatserver.port=8080server.error.whitelabel.enabled=falseserver.servlet.context-path=/${spring.application.name}# Jackson Serialization / Deserialization optionsspring.jackson.property-naming-strategy=SNAKE_CASEspring.jackson.deserialization.fail-on-unknown-properties=falsespring.jackson.default-property-inclusion=non_empty# Error handlingspring.mvc.problemdetails.enabled=true# Databasespring.datasource.url=jdbc:h2:file:./db/order_service;MODE=MYSQLspring.datasource.driverClassName=org.h2.Driverspring.datasource.username=order_servicespring.datasource.password=order_servicespring.jpa.database-platform=org.hibernate.dialect.H2Dialectspring.liquibase.change-log=classpath:db/changelog/db.changelog-master.yamlspring.jpa.open-in-view=false# Miscellaneous settingsspring.output.ansi.enabled=ALWAYSspring.main.banner-mode=off# Swaggerspringdoc.swagger-ui.path=/swagger |
This application.properties file demonstrates how to configure a Spring Boot application to connect to the embedded H2 database, and set up Hibernate for database interaction.
4.2. application-postgres.properties
1 2 3 4 5 6 7 8 | # Databasespring.datasource.url=jdbc:postgresql://postgresql:5432/order_servicespring.datasource.driverClassName=org.postgresql.Driverspring.datasource.username=order_servicespring.datasource.password=order_servicespring.jpa.properties.hibernate.dialect=org.hibernate.dialect.PostgreSQLDialectspring.liquibase.change-log=classpath:db/changelog/db.changelog-master.yamlspring.jpa.open-in-view=false |
This application-postgres.properties file demonstrates how to configure a Spring Boot application to connect to a PostgreSQL database, and set up Hibernate for database interaction despite using all the default configurations in our application.properties.
5. Containerizing and Deploying the Application in Podman
Containerizing a Spring Boot application involves creating a Dockerfile that defines the container’s environment and dependencies. With Podman, this process remains similar to Docker. You specify the base image, copy application files, and configure the container environment. After building the container image, you can deploy it using Podman commands like podman run.
5.1. Package the Spring Boot Application
Run the mvn package command, it will create a jar and place it in the target directory
1 2 | cd order-service./mvnw package |
5.2. Create the Docker File
FROM eclipse-temurin:21-jdk-alpine: Specifies the lightweight Alpine Linux-based JDK image as the base for the container.VOLUME /tmp: Creates a mount point at/tmpfor storing temporary files or data that may need to persist.COPY target/*.jar app.jar: Copies the Spring Boot application JAR file from the host’stargetdirectory to the container’s root directory asapp.jar.ENTRYPOINT ["java","-jar","/app.jar"]: Sets the command to start the Spring Boot application packaged inapp.jarwhen the container starts.
1 2 3 4 | FROM eclipse-temurin:21-jdk-alpineVOLUME /tmpCOPY target/*.jar app.jarENTRYPOINT ["java","-jar","/app.jar"] |
5.3. Create the Image using Podman
1 | podman build -t order-service . |
6. Start the Postgres Container in Podman
Podman enables seamless management of multiple containers within a single pod. To run a Postgres container alongside the Spring Boot application, you can create a pod using Podman and add both containers to it. This approach simplifies the management and networking of interconnected containers.
6.1. Create a new pod
We create a new Podman pod named order-svc-pod and forwards ports 5432 (Postgres) and 8080 (SpringBoot) from the host’s loopback interface (127.0.0.1) to containers within the pod. This allows services running inside the containers to be accessible from the host machine via these specified ports.
1 | podman pod create --name order-svc-pod -p 127.0.0.1:5432:5432 -p 127.0.0.1:8080:8080 |
6.2. Run the Postgres container
We create and run a container named postgresql based on the PostgreSQL image. We set environment variables for the PostgreSQL username and password, and we deploy the container within the “order-svc-pod” pod. The containerized PostgreSQL instance will run in the background, allowing other services within the pod to interact with it.
1 | podman run --name postgresql -e POSTGRES_USER=order_service -e POSTGRES_PASSWORD=order_service --pod order-svc-pod -d postgres |
7. Connecting Spring Boot Application to Containerized Postgres
To establish a connection between the Spring Boot application and the containerized Postgres database, we need to run the application’s with the configured Postgres data source in application-postgres.properties. We ensure that by binding the profile postgres as a SPRING_PROFILES_ACTIVE
We create and run a container named order_service based on the order-service image. we set environment variables for the SPRING_PROFILES_ACTIVE, and we deploy the container within the “order-svc-pod” pod.
1 | podman run --name order_service -e "SPRING_PROFILES_ACTIVE=postgres" --pod order-svc-pod -d order-service |
9. Conclusion
Running a Spring Boot and Postgres application on Podman offers developers a lightweight and secure containerization solution. Podman’s daemonless architecture, combined with its support for rootless containers and pod management, makes it an attractive choice for container deployment. By following the steps outlined in this guide, developers can effectively leverage Podman to containerize, deploy, and manage their applications with ease.
You can download the full source code of this example here: Running Spring Boot Application with Postgres on Podman


